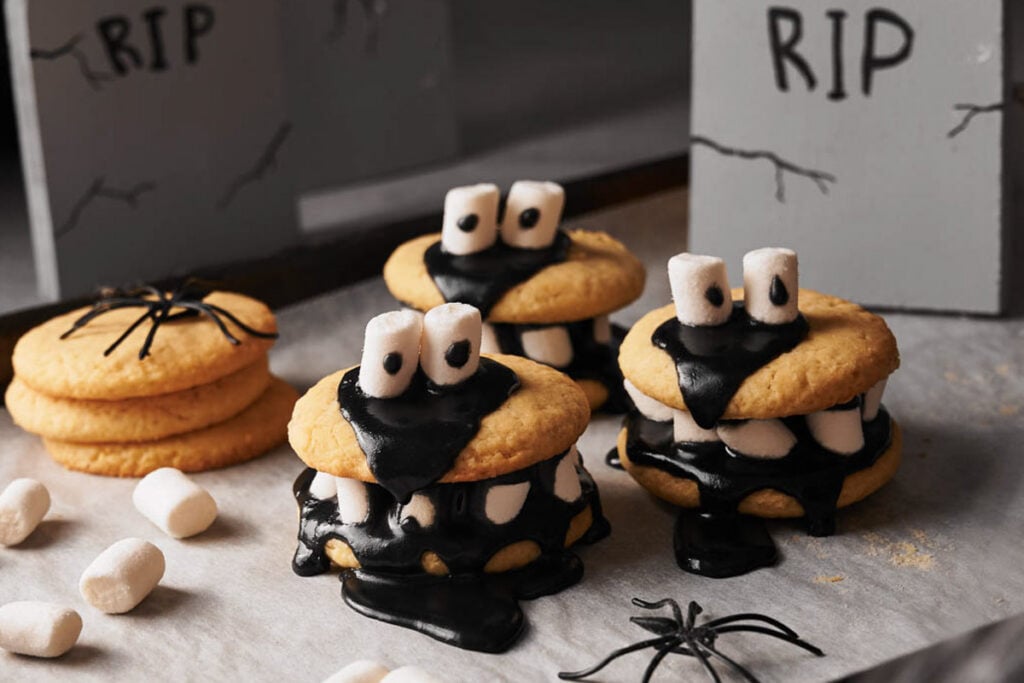
Spooky Halloween Cookies

Our Spooky Halloween Cookies are not only a blast to make but also taste delectably delightful. Perfect for your next Halloween party, get-togethers, or just a fun evening with the family, this fun Halloween treat is bound to impress both kids and adults alike. So, if you’re looking for a baking adventure that’s as much fun to create as it is to eat, you’ve landed at the right spot!
This post contains affiliate links. As an Amazon Affiliate, if you purchase through those links, I earn a small commission. Thank you!
Why You Will Love Making These Halloween Cookies
- Let’s start with the obvious: Who doesn’t love cookies? Add the Halloween fun twist, and you’ve got a winner! Our Halloween cookies blend the perfect balance of sweet and spooky, making them a hit at any Halloween festivity. Whether you’re hosting a big Halloween bash or a cozy family night, this spooky treat will light up the room. And let’s not forget, they’re made with all vegetarian ingredients, ensuring that all your guests can indulge in the fun!
- Get the kids involved! There’s so much fun to be had while rolling out cookie dough balls, cutting shapes with cookie cutters, or decorating with candy eyes and Halloween sprinkles. The messier, the better – because that’s where the memories lie. Don’t be surprised if you find yourself laughing and sharing stories while getting hands-on with these cookies.
- Let’s be honest: we all love a good Instagram moment. And this fun Halloween cookie recipe is perfect for that! You’ll have all your friends double-tapping in no time, so, don’t forget to snap a pic before this delicious treat disappears (and tag us!).
- Packaging a batch of these Halloween treats in a cute box or wrapping them in plastic wrap with a little ribbon can be a delightful gift. Whether it’s for neighbors, teachers, or friends, there’s nothing quite like a homemade treat to spread some Halloween cheer.
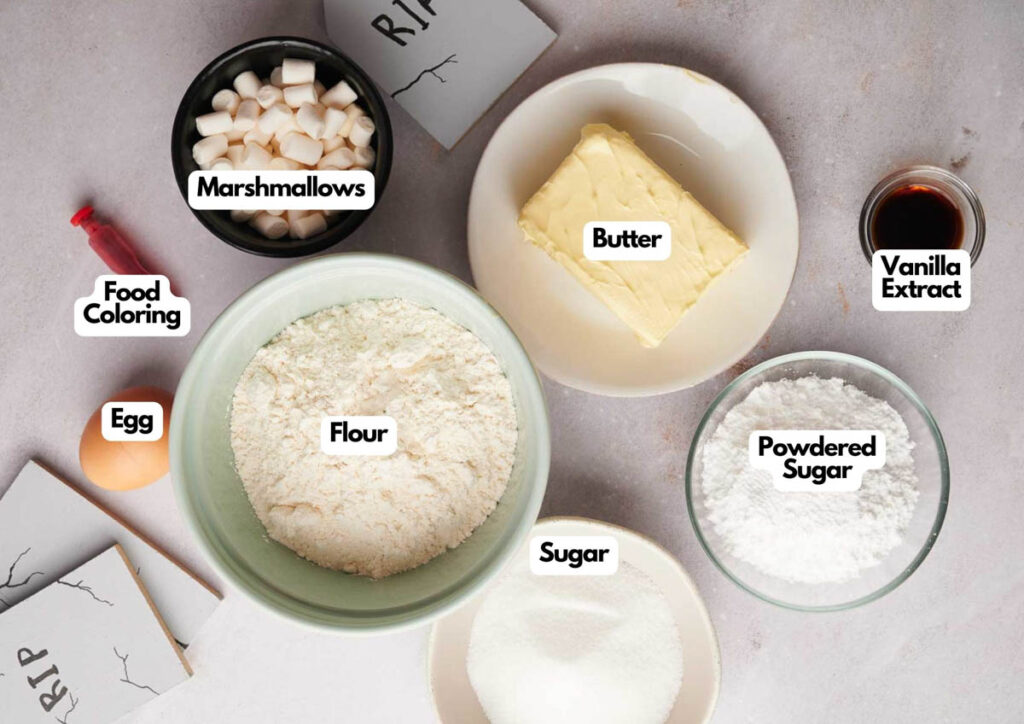
Ingredients You’ll Need
You’ll need all the ingredients shown in the photograph below.
How to Make Spooky Halloween Cookies with Step-by-Step Instructions
A complete printable recipe and the measurements in both US customary and metric are available in the recipe card below.
Starting with the Basics
To make the sugar cookies, begin by creaming together the sugar and unsalted butter until it’s all fluffy and light.
Once that’s done, toss in the egg yolk and vanilla extract. Now, it’s all about gently folding in the all-purpose flour without overmixing.
Once you’ve got a smooth dough, shape it into a log, wrap it up in plastic wrap, and let it chill in the fridge. This cooling step is crucial because it helps the cookies maintain their shape during baking.
Roll, Cut, Repeat!
After the dough has rested for a couple of hours, it’s time to have some fun! Roll out the dough on a floured surface.
Aim for about an eighth of an inch thickness. Next, take your cookie cutter and start cutting out circles.
Don’t waste those dough scraps! Just re-roll and continue the cutting process until all the dough is used.
Bake Cookies to Perfection
Place the cookie cutouts on a baking sheet lined with parchment paper, ensuring there’s space between each cookie.
Bake them for about 10 minutes or until you notice a slight golden hue around the edges. When they’re ready, transfer the baked cookies to a wire rack and let them cool completely.
SERIOUSLY GOOD
DESSERTS!

Dessert First is a collection of 61 RECIPES to show you that you can make beautiful, impressive desserts right in your own kitchen, no matter your skill level.
Immediate eBook download. No physical book available.
Includes ad-free recipes like:
∙ Lemon Pound Cake
∙ Key Lime Bars
∙ Boston Cream Pie
∙ No-Bake Chocolate Lasagna
∙ Raspberry Cheesecake
...and much more!
Decorating – Where Magic Happens!
Now, for the most exciting part! In a mixing bowl, whisk together the confectioner’s sugar, water, and black food coloring.
You’re aiming for a thick but spreadable consistency.
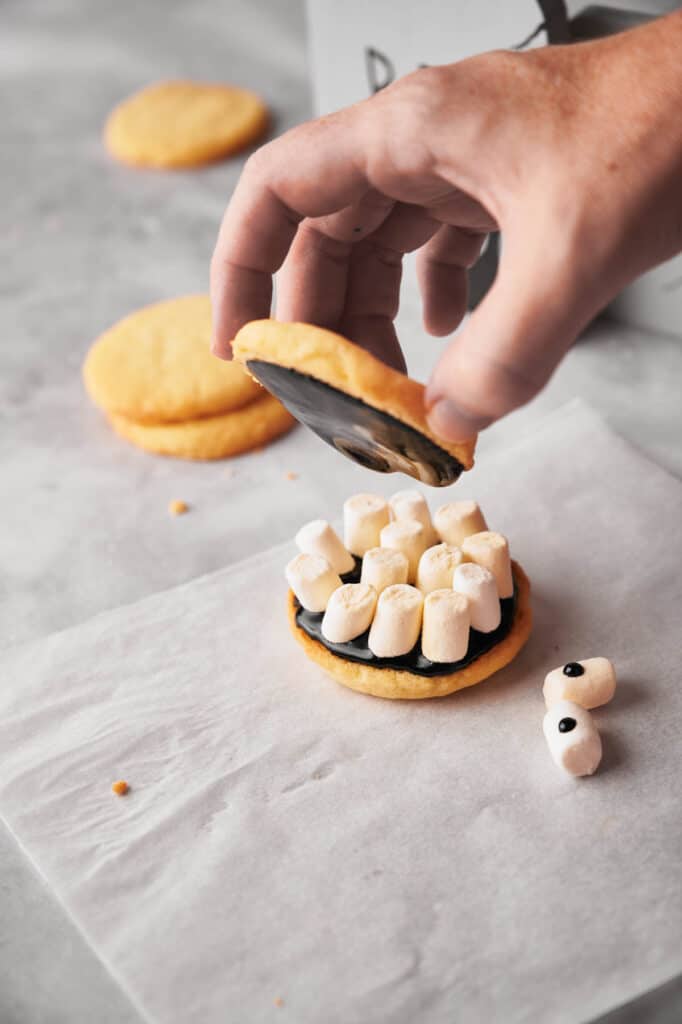
Spread one or two tablespoons of this mixture onto each cookie, and place the mini marshmallows around the edge like teeth. You only need to add marshmallows to half of the cookies.
Top the marshmallows with the other cookies, and then add a tablespoon of the black mixture on top.
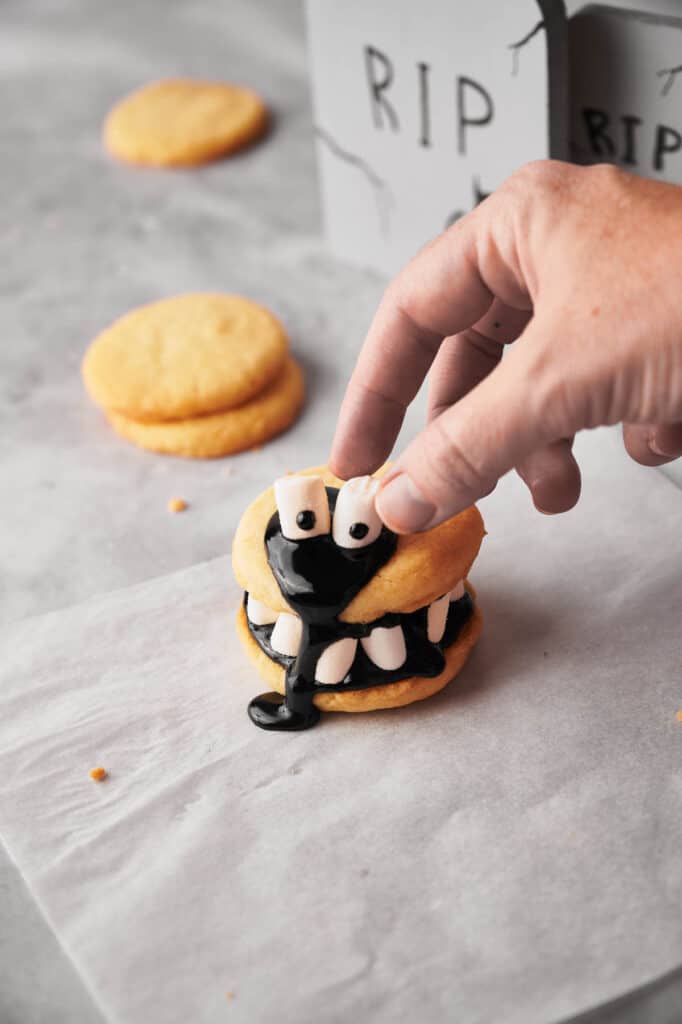
Finally, place two marshmallows on the black mixture and dot each one with a little more of the mixture.
We recommend using a toothpick or a very thin paintbrush for this.
Enjoy your spooky cookies!

Ingredients
For the Cookies
- ¾ cup sugar
- ¾ cup + 2 tablespoons unsalted butter softened
- 1 egg yolk
- 2 teaspoon vanilla extract
- 1¾ cups + 2 tablespoons all-purpose flour
For the Decoration
- 1 cup confectioner's sugar
- 6 tablespoons water
- 3 teaspoons black food grade coloring
- 1 cup white vegetarian mini marshmallows
Instructions
- In a bowl, combine sugar and softened butter and mix until creamy. Add the egg yolk and vanilla extract and mix well. Add the flour and mix with a spoon, just until it’s all combined – don’t overmix. Shape the cookie dough into a log, and cover it with plastic wrap, refrigerate for 2 hours.¾ cup sugar, ¾ cup + 2 tablespoons unsalted butter, 1 egg yolk, 2 teaspoon vanilla extract, 1¾ cups + 2 tablespoons all-purpose flour
- Remove from the fridge, and cut it in two parts. Working on a floured surface, roll the dough until it’s about an eighth of an inch thick. Use a cookie cutter to cut discs out of the dough; you can re-roll the remaining dough and roll it again.
- Preheat the oven to 180ºC. Line a baking sheet with parchment paper and place the cookies on it. Bake for 10 minutes until they turn slightly golden brown. Remove from the oven, and transfer the cookies to a cooling rack, and let them cool.
- In a mixing bowl, mix the confectioner’s sugar, water, and black food coloring. You may need to adjust the quantities according to your coloring; the idea is to get a thick mixture that you can still spoon out and that’s super black.1 cup confectioner's sugar, 6 tablespoons water, 3 teaspoons black food grade coloring
- Place around 1-2 tablespoons of the black mixture over a cookie and spread it all around, arrange the marshmallows as if they were teeth, including the middle part so the cookies are sturdy and support the upper layer, and then spread 1-2 tablespoons of the black mixture over another cookie, and quickly flip it over the marshmallows.1 cup white vegetarian mini marshmallows
- Place a tablespoon of the black mixture on top and place two marshmallows as eyes and carefully make the two eyeballs with the mixture. Serve and enjoy!
Notes
- Don’t Overmix the Dough: It might be tempting to keep going once you’ve started mixing, especially if you’re using a stand mixer fitted with a paddle attachment. But refrain! Overmixing can lead to cookies that are dense rather than soft and crumbly. Once the all-purpose flour is added, mix just until combined for best results.
- Parchment Paper vs. Baking Spray: While many might reach for a baking spray, we recommend lining your baking sheets with parchment paper. It not only ensures even baking but also makes clean-up a breeze! Plus, you can slide the whole sheet onto a cooling rack without risking any broken cookies.
- Amount of Flour: Too much flour can make your cookies thick and dense. When measuring, use the spoon and level method. This means spooning the flour into your measuring cup and leveling it off with a flat edge. Avoid scooping directly from the bag or container as this can lead to using too much flour.
- Coloring Caution: Food coloring can vary in intensity. Start with a little and add more as needed to achieve the desired color. And always opt for food-grade coloring to ensure it’s safe for consumption.
- Cool Completely Before Decorating: This ensures that your decorations, especially those made from sugar or marshmallows, don’t melt upon contact.
- I don’t have black food coloring. Can I use another color? Of course! Feel free to get creative with any food coloring you have on hand. Green, purple, or red could be equally spooky and fun for Halloween!
- What if I don’t have circle cookie cutters? No worries! You can use the rim of a glass or cup to cut out circular cookies. Alternatively, shape the dough into rectangles or triangles using a knife for a different take, or you could even use Halloween-themed cookie cutters (like a pumpkin shape) for a spooky twist.
- Other cookies: Switch out the cookies for other cookies of your choice! Pumpkin chocolate chip cookies, pumpkin oatmeal cookies, or chocolate sugar cookies are some other tasty choices for this great recipe. Just follow the directions for the decorating!
- How long will the cookie dough last in the fridge if I don’t use it right away? The cookie dough can be refrigerated for up to 3 days. Just ensure it’s wrapped tightly in plastic wrap to prevent it from drying out.
- Storage: The best way to store these Halloween Cookies is in an airtight container. If you’ve decorated your cookies, make sure they’re set before storing them. They keep at room temperature for up to 4 days, and they can last up to a week in the fridge. Just remember to let them sit out for a bit before serving, so they come back to room temperature.
- Freezing: Once the cookies are cooled after baking, place them on a baking sheet and freeze until solid. Then, transfer them to a zip-top bag or airtight container, placing parchment paper between layers. When you’re ready to enjoy, simply take out the desired number of cookies, let them thaw at room temperature, and decorate them!
Nutrition
SERIOUSLY GOOD
DESSERTS!
Dessert First is a collection of 61 RECIPES to show you that you can make beautiful, impressive desserts right in your own kitchen, no matter your skill level.
Immediate eBook download. No physical book available.
Includes ad-free recipes like:
∙ Lemon Pound Cake
∙ Key Lime Bars
∙ Boston Cream Pie
∙ No-Bake Chocolate Lasagna
∙ Raspberry Cheesecake
...and much more!
Recipe Notes and Expert Tips
- Butter Tips: Always use unsalted butter for this recipe. Why? This allows you to control the salt content in your cookies. Plus, when the recipe calls for softened butter, it’s crucial! Softened butter should easily yield to gentle pressure but should not be too soft or melted. This is key to achieving that creamy texture in the cookie dough.
- Don’t Overmix the Dough: It might be tempting to keep going once you’ve started mixing, especially if you’re using a stand mixer fitted with a paddle attachment. But refrain! Overmixing can lead to cookies that are dense rather than soft and crumbly. Once the all-purpose flour is added, mix just until combined for best results.
- Parchment Paper vs. Baking Spray: While many might reach for a baking spray, we recommend lining your baking sheets with parchment paper. It not only ensures even baking but also makes clean-up a breeze! Plus, you can slide the whole sheet onto a cooling rack without risking any broken cookies.
- Amount of Flour: Too much flour can make your cookies thick and dense. When measuring, use the spoon and level method. This means spooning the flour into your measuring cup and leveling it off with a flat edge. Avoid scooping directly from the bag or container as this can lead to using too much flour.
- Coloring Caution: Food coloring can vary in intensity. Start with a little and add more as needed to achieve the desired color. And always opt for food-grade coloring to ensure it’s safe for consumption.
- Cool Completely Before Decorating: This might seem obvious, but it’s an essential tip! Before you dive into the decorating process, ensure your cookies are completely cool. This ensures that your decorations, especially those made from sugar or marshmallows, don’t melt upon contact.
- I don’t have black food coloring. Can I use another color? Of course! Feel free to get creative with any food coloring you have on hand. Green, purple, or red could be equally spooky and fun for Halloween!
- What if I don’t have circle cookie cutters? No worries! You can use the rim of a glass or cup to cut out circular cookies. Alternatively, shape the dough into rectangles or triangles using a knife for a different take, or you could even use Halloween-themed cookie cutters (like a pumpkin shape) for a spooky twist.
- How long will the cookie dough last in the fridge if I don’t use it right away? The cookie dough can be refrigerated for up to 3 days. Just ensure it’s wrapped tightly in plastic wrap to prevent it from drying out.
- Other cookies: Switch out the cookies for other cookies of your choice! Pumpkin chocolate chip cookies, pumpkin oatmeal cookies, or chocolate sugar cookies are some other tasty choices for this great recipe. Just follow the directions for the decorating!
How to Store Leftover Halloween Cookies
We’d be surprised if you had any leftover cookies, but if you do, here’s how to store them.
Air-Tight Containers are Your Best Friend
The best way to store these Halloween Cookies is in an airtight container. By sealing out the air, you’re ensuring that the cookies maintain their freshness and don’t go stale quickly.
If you’ve decorated your cookies, make sure they’re set before storing them.
Keeping Things Chilly in the Fridge
While these cookies do perfectly well at room temperature for a few days, if you want to extend their life a little more, we recommend refrigerating them.
Stored in an airtight container in the fridge, they can last up to a week. Just remember to let them sit out for a bit before serving, so they come back to room temperature.
Freezing for Future Fun
Once the cookies are cooled after baking, place them on a baking sheet and freeze until solid.
Then, transfer them to a zip-top bag or airtight container, placing parchment paper between layers.
When you’re ready to enjoy, simply take out the desired number of cookies, let them thaw at room temperature, and decorate them!
What to Serve with Spooky Halloween Cookies
If you love Halloween like we do, you’ll not want to stop at spooky cookies, so here are some easy Halloween treats to make.
Spooky Sips
No Halloween treat table is complete without some thirst-quenching, spooky beverages to accompany those delicious cookies.
Consider a punch bowl filled with a red or green drink (like cranberry or lime sherbet mix) and floating, lychee eyeballs for eeriness.
Or how about a creamy pumpkin spiced latte to warm up those cool October nights?
And for our little ghouls and goblins, a healthy, green Tom Collins Mocktail can be a hit, while the adults sip on our sweet and spicy Halloween Cocktail from the Crypt!
Frighteningly Delightful Desserts
While our Halloween cookies are the star of the show, there’s always room for more treats on the dessert table.
How about a mummy Mississippi Mud Pie made with white chocolate strips and candy eyeballs instead of the creamy topping?
Or spider chocolate truffles with pretzel legs and candy eyes? There’s so much fun to be had with Halloween-themed desserts.
And if you want to incorporate a healthier touch, fruit platters featuring “ghost” bananas (with chocolate chip faces), mummified Halloween Strawberries, and “pumpkin” oranges (with celery stalks) are both adorable and tasty.
Savory Bites for Balance
It’s not all about the sugar, even on Halloween! Consider serving some savory bites alongside your cookies.
Mini jack-o’-lantern stuffed bell peppers (just cut out a jack-o-lantern face before stuffing!) or deviled “spider” eggs are just a couple of playful options.
A cheeseboard with a Cheese Ball surrounded by cheeses cut into Halloween shapes using cookie cutters can be a fun addition, too.
Why not try slicing olives (for eyes) and adding a couple onto each of these Mini Goat Cheese Balls to make some cute furry green or red monsters? Let your imagination run wild!
I did a test run on these cookies last night and love how they turned out! The cookies were delicious, and I love how easy the dough was to handle. We’re having a Halloween party in a couple weeks, and I can’t wait to see the look on all the kids’ faces when I set out these cookies! They’re just so cute and fun.
I hope the kids love them and glad you did too 🙂