
Cheese Ball
 Add Preferred Source

This classic Cheese Ball is the appetizer I make when people are coming over, because it’s the one that gets eaten before anything else on the table. Sharp Cheddar and cream cheese do the work, and a coating of pecans and walnuts gives every scoop something to crunch against.
It goes together in one bowl and chills while you deal with everything else. I’ve made enough of these to know the small things that decide whether it holds its shape or slumps into a dip.

This post contains affiliate links. As an Amazon Affiliate, if you purchase through those links, I earn a commission. Thank you!
Why You’ll Love This Recipe
- It is properly make-ahead. You can mix and shape it, then leave it wrapped in the fridge while you get on with the rest of the spread.
- One bowl, no cooking. The only heat involved is the optional minute or two of toasting the nuts, and even that is a choice rather than a default step.
- The sharp Cheddar carries it. A lot of cheese balls taste mostly of cream cheese and salt, and this one keeps a real Cheddar bite underneath the creaminess.
- It is an easy thing to bring. Wrapped tight and kept cold, it travels to a potluck or a party far better than most appetizers you have to serve warm.
- You can make it your own. The base takes to different nuts, cheeses, and add-ins without falling apart, so it’s a good one to mix and match for the crowd you are feeding.
Ingredients You’ll Need
You’ll need all the ingredients shown in the photograph below.
- Cream cheese. Use the full-fat blocks, not the whipped tubs or anything labeled light. The block cheese is what lets the ball hold together once it’s chilled. It also needs to be properly softened first, or you’ll fight lumps the whole way through.
- Sharp Cheddar. Grate it yourself from a block. Pre-shredded Cheddar is coated in anti-caking starch that keeps it from blending smoothly into the cream cheese, and the flavor from a fresh block is sharper. This is the ingredient doing the real savory work, so it’s worth the few minutes at the grater.
- Pecans and walnuts. The coating is half the point of a cheese ball, and the mix of the two nuts gives you more interest than either alone. Chop them a little finer than feels right so they press into the surface and stay put when someone cuts in.
- Vegetarian Worcestershire sauce. Standard Worcestershire is made with anchovies, so check the label and use a vegetarian bottle. It brings a savory, slightly tangy depth that you would miss if you left it out. It’s the kind of background note that makes people ask what is in it.
- Green onions, garlic powder, and hot sauce. These are the seasonings that keep the ball from tasting flat. Go lighter than you think on the hot sauce and the Worcestershire at first, then taste, because those two are what tip a cheese ball into salty and sharp if you’re heavy-handed.

How to Make Cheese Ball
A complete printable recipe and the measurements in both US customary and metric are available in the recipe card below.
Chop and Set Out the Nuts
Roughly chop the pecans and walnuts and spread them on a plate, ready for coating. If you want the extra step, toast them first on a baking sheet at 350°F (177°C) for five to seven minutes, until they smell nutty. Toasting is not essential, but it does wake up the flavor and crisp the coating.
Mix the Cheese Base
Beat the softened cream cheese smooth first, on its own, before anything else goes in. Then work in the grated Cheddar, the vegetarian Worcestershire, green onion, hot sauce, garlic powder, dried parsley, dried oregano, and black pepper, mixing until it’s even throughout with no streaks of plain cream cheese.
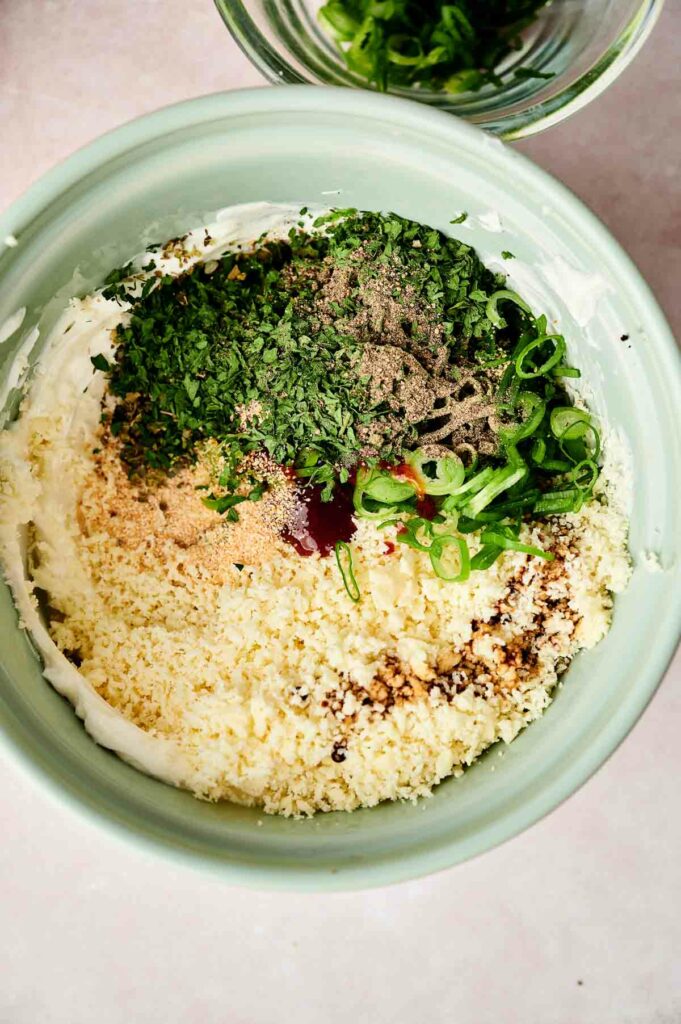
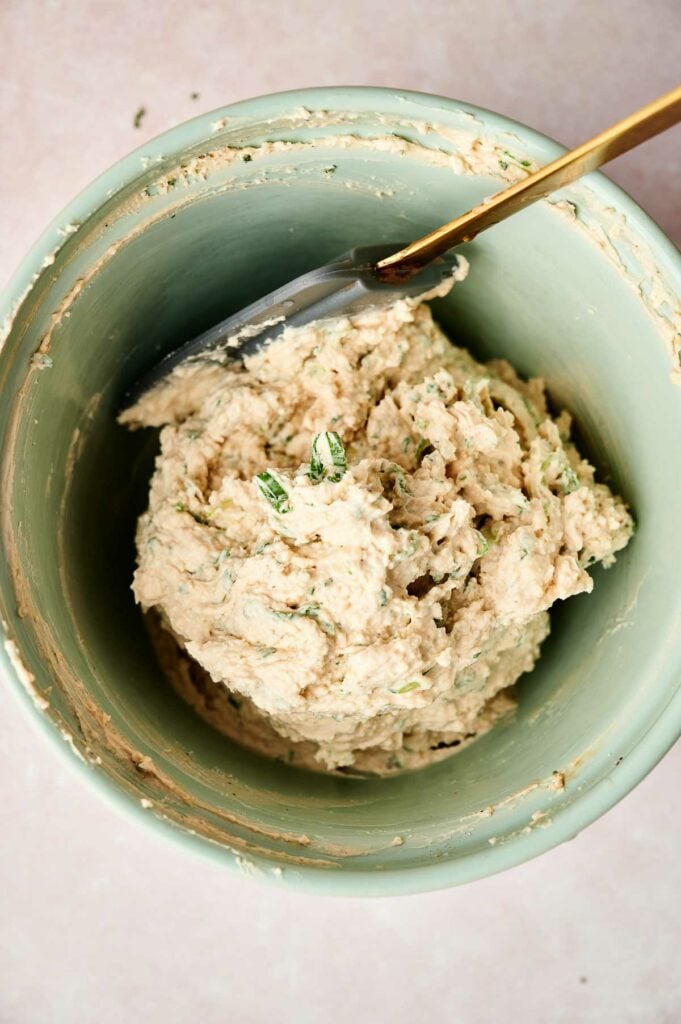
A hand mixer makes quick work of this, but a sturdy spoon and a bit of effort will get you there as well.
Shape and Coat
Scrape everything to the center of the bowl, then shape it into a ball with greased hands. Oil or a little cooking spray on your palms is the difference between a smooth ball and a sticky mess.
Roll the ball through the waiting nuts so the whole outside is coated, then come back over any bare patches.
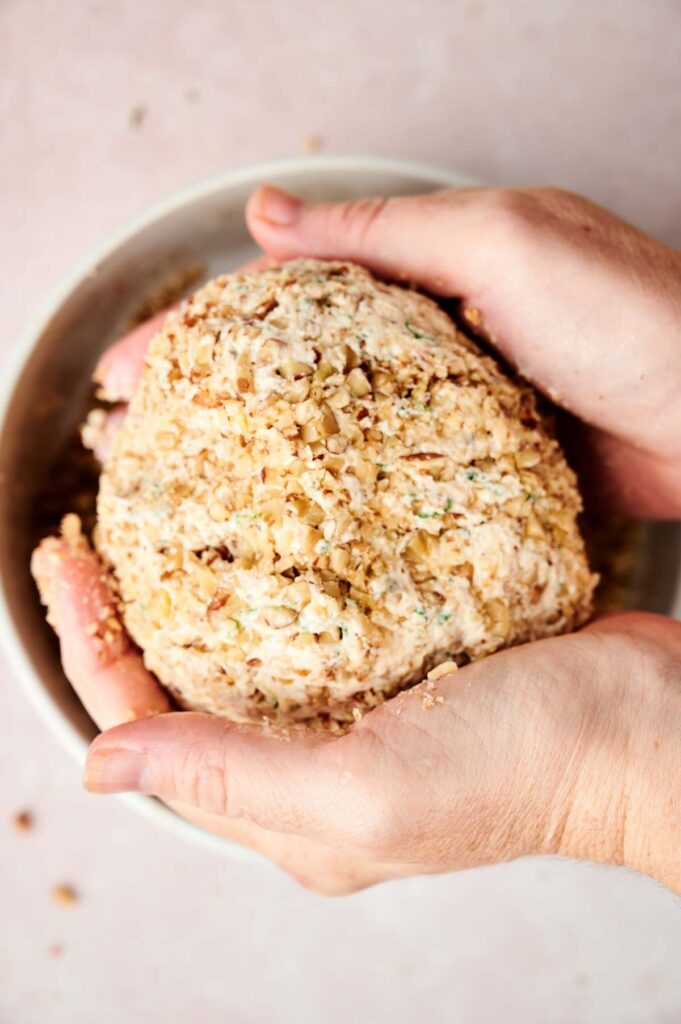
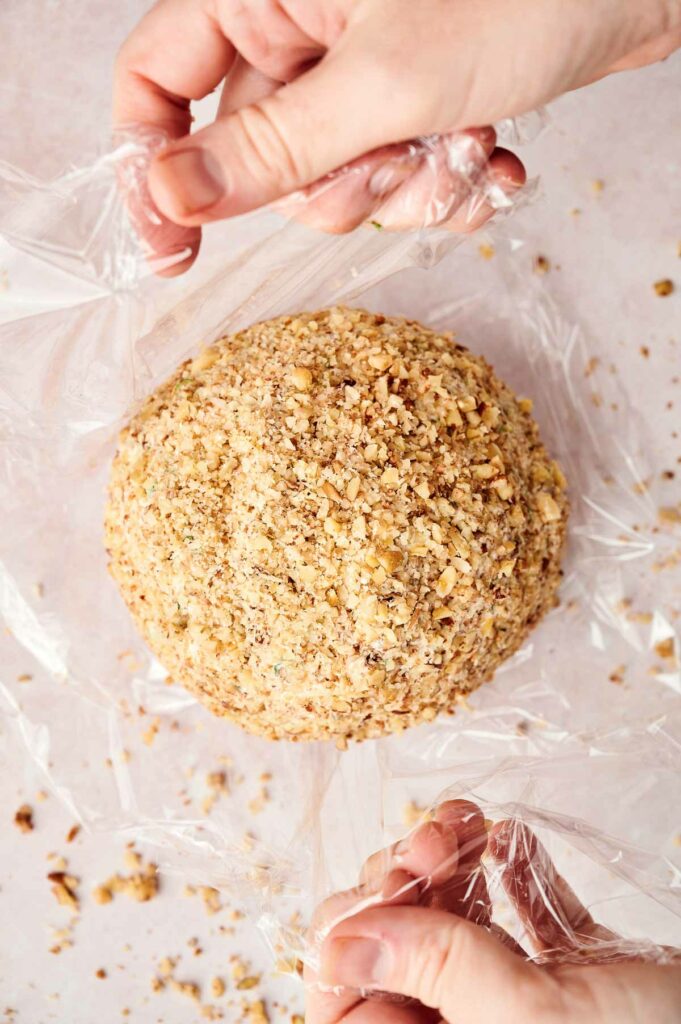
Chill, Then Let It Soften
Wrap the coated ball tightly in plastic and chill it for about one hour so it firms up and holds its shape. This is the step people shortcut, and an under-chilled ball is the usual reason one slumps or turns gummy under the nuts.
When you’re ready to serve, take it out fifteen to twenty minutes ahead so it comes back to a spreadable softness instead of being fridge-hard against the crackers.
This is a forgiving make-ahead. Mix and shape the ball, wrap it well, and keep it refrigerated for a day or two before the event. Then press on the nuts closer to serving so the coating stays at its best. Keep it chilled until you need it, and don’t leave a dairy-based ball sitting out at room temperature while you prep.
Recipe Notes and Expert Tips
- Soften the cream cheese all the way. Half an hour on the counter is the honest minimum. Cold cream cheese is what gives you a lumpy base no amount of mixing fully smooths out, and warming it in the microwave to rush it tends to leave it loose.
- Grate it on the coarse side, and let it warm up. Cheddar grated fine turns pasty against the cream cheese, while a coarser grate keeps some texture in the finished ball. Let the shreds sit out with the cream cheese, so both are at room temperature when you mix, and they come together far more evenly.
- Season, then taste, then decide. The Worcestershire and hot sauce are easy to overdo, and over-salting is the complaint I see most often with cheese balls. Add, mix, taste a little on a cracker, and only then add more if needed.
- Press the nuts, don’t sprinkle them. Push them gently into the surface with your palm so they key into the soft cheese. Nuts that are only resting on top shed all over the board the moment someone spreads a knife through it.
- Two small balls beat one big one. A single large ball looks impressive for about ten minutes, then gets messy once guests dig in. Splitting the mix into two smaller balls means you can put one out and keep one in reserve, looking fresh.
- Pulse the nuts in a food processor. Use a food processor to roughly chop the nuts if they’re not already chopped; it works like a breeze every time.
Recipe Variations
- Swap the pecan-and-walnut coating for finely chopped toasted almonds or pistachios, for a different crunch and a greener look. This is a safe, supported swap because the nuts go in by the same volume, so nothing else about the recipe changes.
- For a sharper, more grown-up ball, trade some of the Cheddar for crumbled blue cheese or grated Gruyère. It is backed by how these cheeses behave rather than tested in this exact recipe. Since it does not change the ratios, it holds together just the same.
- To serve a crowd grazing style, divide the mixture and roll it into small individual balls instead of one large one, each rolled in the nut coating. It is the same tested recipe in miniature, so nothing about the mixing or chilling changes, only the shape and the serving.
- Rolling the ball in chopped fresh herbs or dried cranberries instead of the nuts is a nut-free route I have not tested here, so treat the coating amount as a starting point and press on as much as sticks.
How to Store Leftovers
Keep the cheese ball in a deep airtight container or a prep bowl with a lid in the fridge for up to 1 week, so it holds its shape rather than getting squashed. The nuts soften a little after a day or two, but the flavor stays good.
It freezes well for up to 1 month. Wrap it tightly in plastic, then seal it in a freezer-safe container, and thaw it overnight in the fridge before serving. Then, let it sit out on the counter for fifteen to twenty minutes to soften to a spreadable texture.
Once it’s on the table, a dairy-based cheese ball should not sit out longer than 2 hours, or 1 hour if you’re serving outdoors on a day above 90°F (32°C). After that, food safety guidance says to throw it out rather than chill it again.
What to Serve With Cheese Ball
I put it out with sturdy crackers and crisp baguette slices first, since those are what most people go for, and then add something fresh to cut the richness: celery and carrot sticks, cucumber rounds, bell pepper strips. Apple and pear slices or a few grapes on the side give you the sweet-and-savory contrast that keeps people grazing.
If you’re building a whole appetizer spread around it, put something warm next to the cold ball so the table has a bit of contrast.
I set it beside a creamy spinach and artichoke dip for the people who want something hot, a batch of cream cheese stuffed mushrooms for a bite with more substance, and a cool sour cream and chive dip for the vegetables so the crudites have a home of their own.
FAQs
It needs more time in the fridge. An under-chilled ball stays loose and the nuts sink in rather than coating the outside, so give it a good long chill wrapped in plastic. If it’s still slack after proper chilling, the cream cheese was likely too warm or too soft a type; full-fat block cream cheese is what sets up firm.
Yes, and it’s one of the best reasons to make one. Mix and shape the ball up to a day or two ahead and keep it wrapped and refrigerated, then press the nuts on closer to serving so the coating stays crisp. Set it out a little before guests arrive so it loses the fridge chill and spreads easily.
Press them into the surface with your palm rather than sprinkling them on, so they key into the soft cheese while it’s still fresh. Chopping them a little finer helps too, since smaller pieces sit flush against the ball instead of balancing on it.
You can, but it’s the one shortcut I would steer you away from here. The anti-caking coating on bagged shreds fights a smooth blend and leaves the Cheddar flavor flatter than it should be. A few minutes with a box grater is what separates a good cheese ball from a flat one.
Yes. Wrap it tightly, seal it in a freezer-safe container, and freeze for up to 1 month, then thaw it overnight in the fridge. The texture holds up well; if it releases a little liquid on thawing, a quick stir of the surface brings it back before you serve.
More Easy Appetizers to Put Out Next
If this one goes down well, here’s where I’d point you next for your table.
- Pineapple Cheese Ball. When you want the sweet-savory version of this same idea, with pineapple and pecans in place of the sharp-and-savory profile here.
- Mini Goat Cheese Balls. My pick when I want individual, no-slice portions guests can just grab, with a tangier goat cheese edge.
- Cheesy Brussels Sprouts Bites. For when the spread needs something warm and a little green to balance all the richness.
- Goat Cheese Dip. A scoopable cheese spread for the crowd that would rather dip than spread, with olives and sun-dried tomato running through it.

Equipment
Ingredients
- ⅓ cup pecans roughly chopped
- ⅓ cup walnuts roughly chopped
- 16 ounces cream cheese softened
- 2 cups sharp Cheddar cheese freshly grated
- 1 teaspoon vegetarian Worcestershire sauce
- 2 green onions chopped
- 1 teaspoon hot pepper sauce
- ½ teaspoon garlic powder
- 1 teaspoon dried parsley
- ½ teaspoon dried oregano
- ¼ teaspoon black pepper ground

Video
Instructions
- Place your pecans and walnuts on a plate and set aside.⅓ cup pecans, ⅓ cup walnuts
- Place your cream cheese in a medium bowl and mix it until it's smooth. Add cheese, vegetarian Worcestershire sauce, green onion, hot sauce, garlic powder, dried parsley, dried oregano, and black pepper and mix thoroughly to combine16 ounces cream cheese, 2 cups sharp Cheddar cheese, 1 teaspoon vegetarian Worcestershire sauce, 2 green onions, 1 teaspoon hot pepper sauce, ½ teaspoon garlic powder, 1 teaspoon dried parsley, ½ teaspoon dried oregano, ¼ teaspoon black pepper
- Using a rubber spatula, scrape the mixture into the center of the bowl, ensuring all the sides are scraped. Then, with greased hands, shape the cheese mixture into a large ball.
- Now, holding the cheese ball in one hand, scoop the nuts with the other hand, and press them gently into the cheese, ensuring an even coating of the ball .
- Once the cheese is coated, then wrap it in plastic wrap and place it in the fridge for approximately an hour in order for it to firm up. Remove it from the fridge 15 – 20 minutes before serving so that it softens slightly.
- Serve with crackers, bruschetta, vegetables, or your favorite foods to dip in cheese. Enjoy your delicious cheese ball!
Notes
Nutrition
