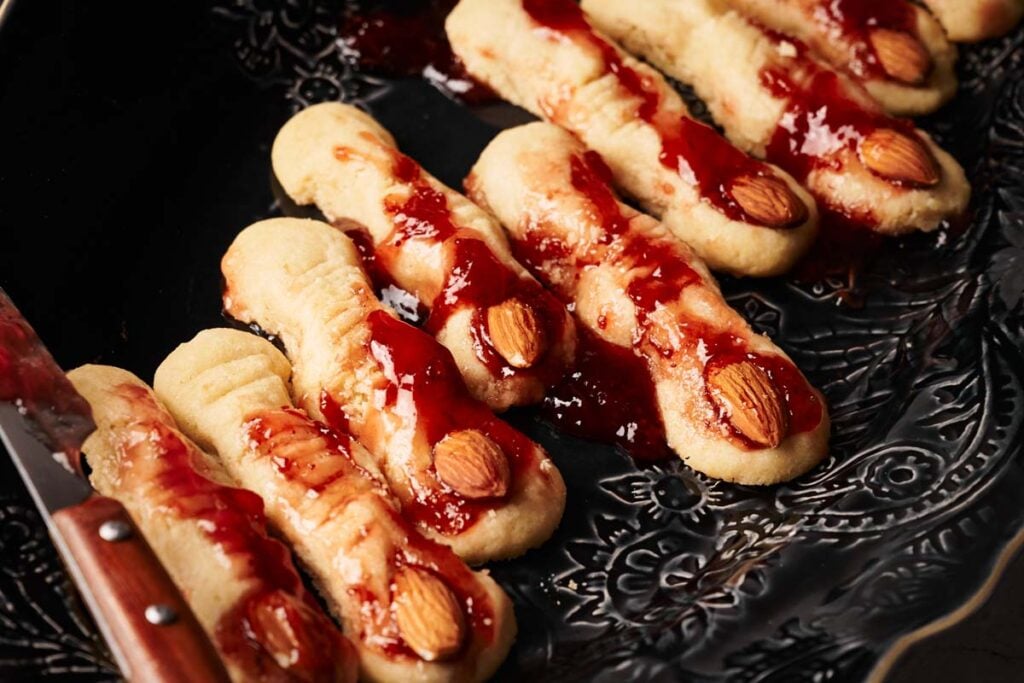
Creepy Halloween Witch Finger Cookies (Easy Recipe)

Looking for the ultimate Halloween treat that’s sure to impress? These creepy Witch Fingers are not only delightful to taste but also perfect for setting the spooky mood at any Halloween gathering. With buttery shortbread, almond fingernails, and raspberry jam “blood,” they’re as fun to make as they are to eat.
This post contains affiliate links. As an Amazon Affiliate, if you purchase through those links, I earn a small commission. Thank you!
Why You Will Love Making Witch Fingers
- There’s something super fun about themed treats, especially during the spooky season. These witch finger cookies are bound to be the talk of your upcoming Halloween party. Not only do they look eerily realistic, but they also have that wonderful taste that everyone craves. Your guests will be both intrigued and delighted, asking for seconds and even thirds!
- If you’re a fan of buttery shortbread cookies, then you’re in for a treat with this great recipe. The base of these witch fingers is a classic shortbread cookie dough, which means every bite is rich, crumbly, and melt-in-your-mouth delicious.
- Making witches fingers is so much fun, especially if you have little helpers in the kitchen. Shaping the dough into fingers, adding the almond nails, and raspberry jam for that extra touch of gore is an activity that kids and adults alike will enjoy. Plus, with each cookie being a unique creation, it’s like crafting edible art!
- Whether you’re a seasoned baker or just starting out, this fun recipe is straightforward and easy to follow. With simple ingredients like butter, sugar, egg, and vanilla extract, you likely have everything you need in your pantry already. And if you’re looking for more Halloween recipes after this, you’ll be well on your way to becoming the go-to Halloween treat master in your circle.
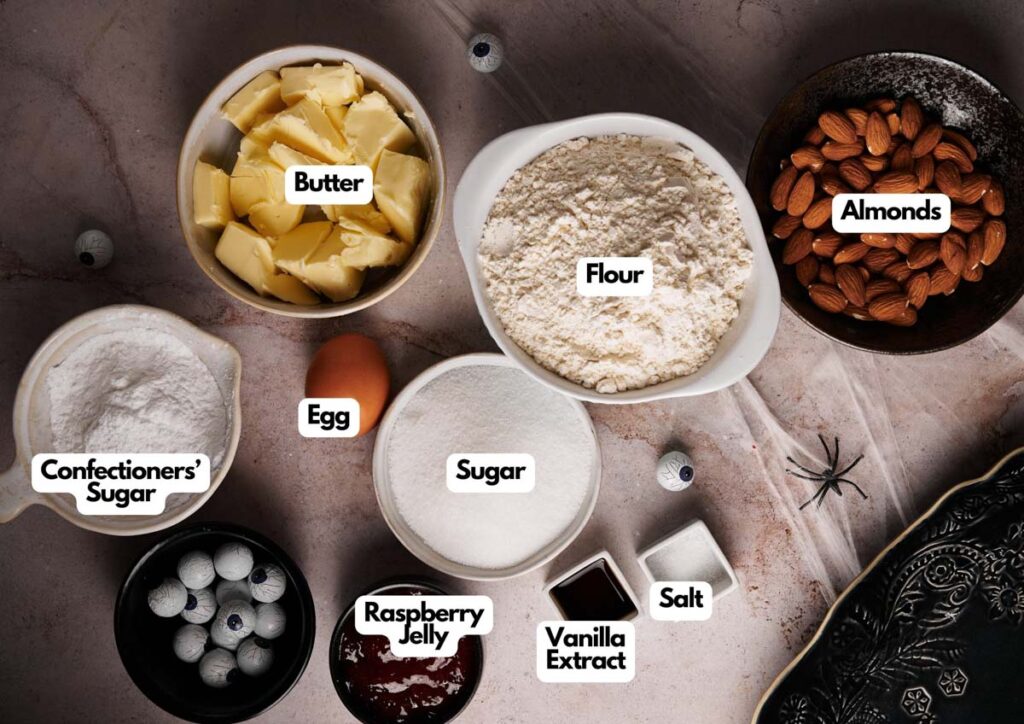
Ingredients You’ll Need
You’ll need all the ingredients shown in the photograph below.
How to Make Witch Finger Cookies with Step-by-Step Instructions
A complete printable recipe and the measurements in both US customary and metric are available in the recipe card below.
Starting with the Dough
The foundation of these cookies is the buttery shortbread dough. Begin by creaming together softened butter in a large mixing bowl with confectioner’s sugar and granulated sugar using an electric mixer.
This process ensures a smooth and creamy texture. Once well combined, add in the egg and vanilla extract. The aroma of vanilla will fill your kitchen, hinting at the deliciousness to come.
Finally, gently fold in the all-purpose flour and salt. The dough might seem a bit dry, but as you work with it, you’ll find it holds its shape beautifully when you press it between your fingers.
Cover the dough with plastic wrap and let it chill in the fridge for 1 hour.
SERIOUSLY GOOD
DESSERTS!

Dessert First is a collection of 61 RECIPES to show you that you can make beautiful, impressive desserts right in your own kitchen, no matter your skill level.
Immediate eBook download. No physical book available.
Includes ad-free recipes like:
∙ Lemon Pound Cake
∙ Key Lime Bars
∙ Boston Cream Pie
∙ No-Bake Chocolate Lasagna
∙ Raspberry Cheesecake
...and much more!
Shaping the Fingers
Once your dough is ready, it’s time for the fun part! Roll the dough until it’s about ½ inch thick. Cut it into rectangles, roughly the length and thickness of a finger (2 inches x ½ inch).
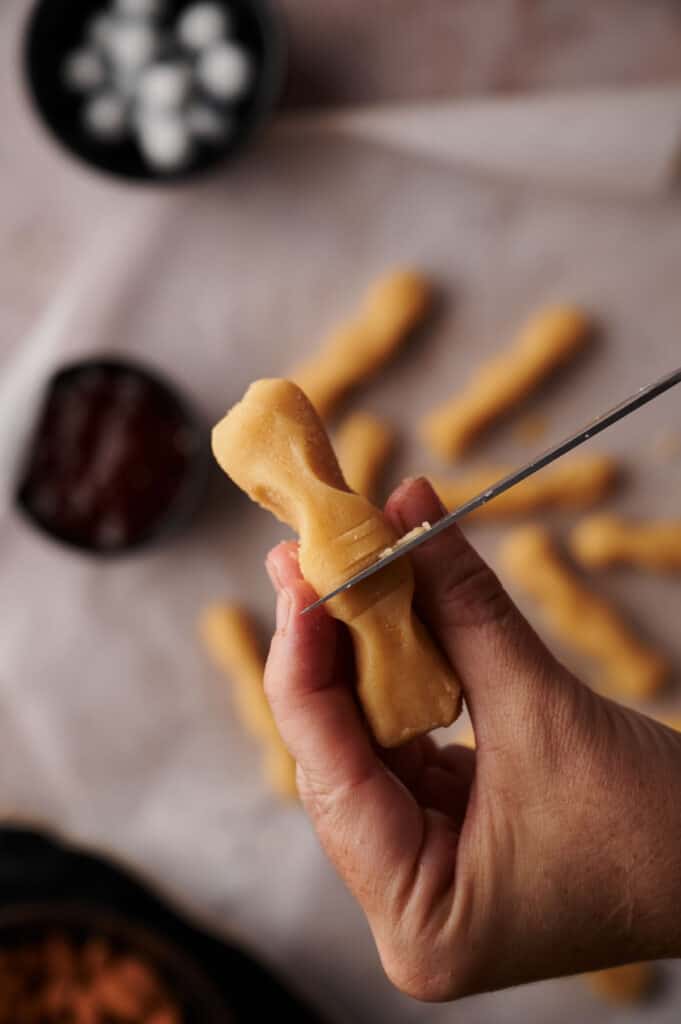
Now, shape them into fingers by pressing and rolling them. For added realism, use a sharp knife to create skin folds in the witch finger cookies.
Each finger can be unique, adding to the overall eerie effect.
Adding the Finishing Touches
To make the witch finger shape, place a small amount (about ½ tsp.) of raspberry jam on the tip of each finger.
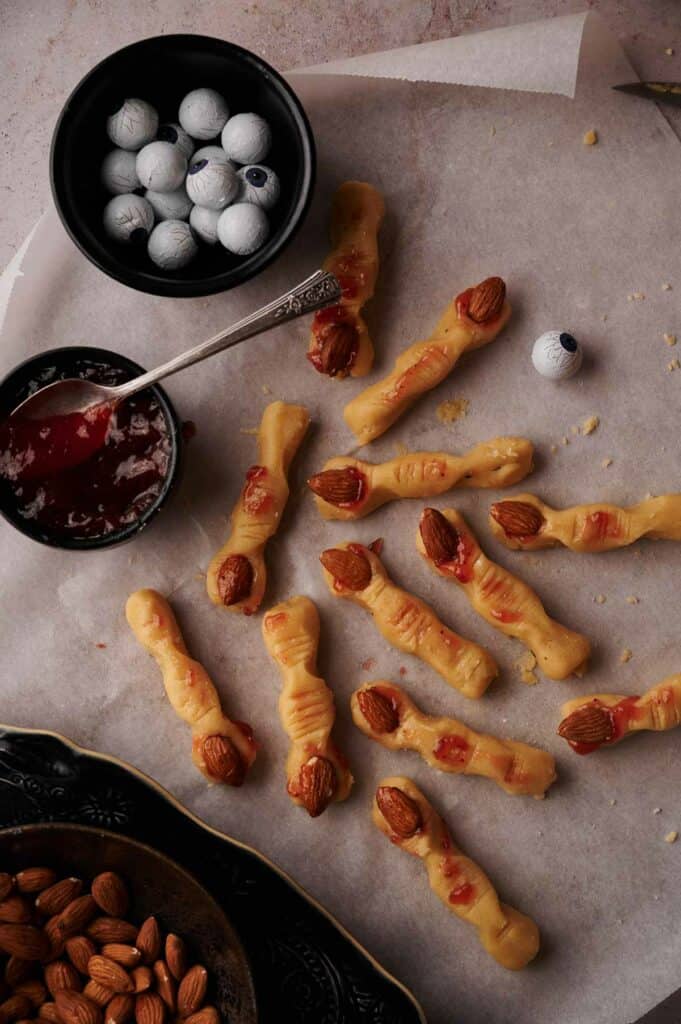
This will act as the “blood” in the nail bed and also help secure the almond “fingernail.” If you want to up the creepiness factor, add a bit more jelly around the knuckles.
Top each nail bed with an almond. Sliced almond works well, too!
Baking to Perfection
With your witch finger cookies shaped and ready, it’s time to bake. Arrange them on a prepared baking sheet lined with parchment paper.
This ensures they won’t stick and makes cleanup a breeze. Bake the cookies in your preheated oven for around 15 minutes. You’ll know they’re done when they turn a pale golden hue.
Once baked, you can brush them with a bit more jelly for added gloss and flavor.
Enjoying Your Creations
After you let the cookies cool on the cookie sheet, it’s time to serve them up! Whether you’re hosting a Halloween party or just enjoying a fun baking day, these cookies are sure to be a hit.
Their unique appearance, paired with their delightful taste, makes them a memorable treat for all.

Equipment
Ingredients
- 1 cup butter softened
- 1 cup confectioner’s sugar
- ¾ cup sugar
- 1 egg
- 1 teaspoon vanilla extract
- 2 ¾ cup all-purpose flour
- ½ teaspoon salt
- ½ cup raspberry jelly
- 20 almonds
Instructions
- With an electric mixer, mix the butter and both sugars until creamy. Add the egg and vanilla extract and continue mixing. Then, add the flour and salt and mix with a spoon – incorporate the dough with your fingers; it will be dry in general but should hold the shape.1 cup butter, 1 cup confectioner’s sugar, ¾ cup sugar, 1 egg, 1 teaspoon vanilla extract, 2 ¾ cup all-purpose flour, ½ teaspoon salt
- Cover with plastic wrap and refrigerate for 1 hour.
- Roll the dough until ½ inch thick and cut in rectangles, roughly the length and thickness of a finger (2 inches x ½ inch). Shape them as fingers pressing and rolling them, you can also use a knife to make the skin folds and make it as realistic as possible.
- Place ½ tsp. of jelly on the point of each finger and top with the almond. Add a bit more jelly to the knuckles and arrange them on a paper covered baking sheet. Preheat the oven to 180ºC.½ cup raspberry jelly, 20 almonds
- Bake for 15 minutes or until they are slightly golden. Brush with a bit more jam, serve, and enjoy!
Notes
- Butter: While the recipe calls for softened butter, it’s essential to note the difference between salted and unsalted butter. Using unsalted butter gives you more control over the salt content in your cookies. However, if you only have salted butter on hand, you can use it but consider reducing the added salt in the recipe slightly.
- Other Nuts To Try: For the almond nail in these witch fingers cookies, you can also try using sliced almonds, blanched almonds, or pistachios chopped in half. There are plenty of options to suit different tastes and what you happen to have in your pantry!
- Alternative Nails for Nut Allergies: If someone in your family or among your guests has a nut allergy, you can substitute the almonds with pumpkin seeds. They still give that creepy fingernail appearance without the risk of an allergic reaction.
- Different types of jam: While raspberry jam offers a great “bloody” appearance, you can also use strawberry jam or even cherry jam for a similar effect. You can also try red decorating gel for that gory touch if you’d prefer.
- How to add food coloring: When it comes to adding green food coloring to your dough, a few drops go a long way, particularly if it’s gel food coloring. Start with a small amount and mix it in thoroughly. You can always add more if you want a deeper shade, but remember, the color will intensify slightly as the cookies bake.
- Adding other flavors: While the vanilla extract gives these cookies a delightful aroma and taste, you can also experiment by adding a hint of almond extract. It pairs wonderfully with the almond fingernails and offers a slightly different flavor twist.
- Texture: For those who love a crispier cookie, you can extend the baking time by a few minutes. Just keep a close eye on them to ensure they don’t over-brown. On the other hand, if you prefer a softer texture, bake them for a minute or two less than the recommended time.
- Can I make the dough in advance and bake the cookies later? Yes, you can prepare the dough up to two days in advance. Just wrap it tightly in plastic wrap and store it in the refrigerator. When you’re ready to bake, let the dough come to room temperature for easier handling.
- Storage: Store leftover cookies in an airtight container. This will help maintain their moisture and prevent them from becoming stale. If you’ve layered them with raspberry jam, placing a sheet of parchment paper between layers can prevent them from sticking together.
- Freeze: These cookies can be frozen for up to a month. Before freezing, make sure the witches fingers cookies are completely cooled. Then, place them in a single layer on a baking sheet and freeze until solid. Once frozen, transfer them to a zip-top bag or an airtight container, separating layers with parchment paper. When you’re ready to enjoy them, simply thaw at room temperature.
- Reviving stale cookies: Preheat your oven to a low setting, around 150ºC (or about 300ºF), and bake the cookies for 5-7 minutes. This will help them regain their original texture and warmth. Add a little extra jam, and they’re good to go!
Nutrition
SERIOUSLY GOOD
DESSERTS!
Dessert First is a collection of 61 RECIPES to show you that you can make beautiful, impressive desserts right in your own kitchen, no matter your skill level.
Immediate eBook download. No physical book available.
Includes ad-free recipes like:
∙ Lemon Pound Cake
∙ Key Lime Bars
∙ Boston Cream Pie
∙ No-Bake Chocolate Lasagna
∙ Raspberry Cheesecake
...and much more!
Recipe Notes and Expert Tips
- Butter: While the recipe calls for softened butter, it’s essential to note the difference between salted and unsalted butter. Using unsalted butter gives you more control over the salt content in your cookies. However, if you only have salted butter on hand, you can use it, but consider reducing the added salt in the recipe slightly.
- Other Nuts To Try: For the almond nail in these witch fingers cookies, you can also try using sliced almonds, blanched almonds, or pistachios chopped in half. There are plenty of options to suit different tastes and what you happen to have in your pantry!
- Alternative Nails for Nut Allergies: If someone in your family or among your guests has a nut allergy, you can substitute the almonds with pumpkin seeds. They still give that creepy fingernail appearance without the risk of an allergic reaction.
- Different types of jam: While raspberry jam offers a great “bloody” appearance, you can also use strawberry jam or even cherry jam for a similar effect. You can also try red decorating gel for that gory touch if you’d prefer.
- How to add food coloring: When it comes to adding green food coloring to your dough, a few drops go a long way, particularly if it’s gel food coloring. Start with a small amount and mix it in thoroughly. You can always add more if you want a deeper shade, but remember, the color will intensify slightly as the cookies bake.
- Adding other flavors: While the vanilla extract gives these cookies a delightful aroma and taste, you can also experiment by adding a hint of almond extract. It pairs wonderfully with the almond fingernails and offers a slightly different flavor twist.
- Texture: For those who love a crispier cookie, you can extend the baking time by a few minutes. Just keep a close eye on them to ensure they don’t over-brown. On the other hand, if you prefer a softer texture, bake them for a minute or two less than the recommended time.
- Can I make the dough in advance and bake the cookies later? Yes, you can prepare the dough up to two days in advance. Just wrap it tightly in plastic wrap and store it in the refrigerator. When you’re ready to bake, let the dough come to room temperature for easier handling.
How to Store Leftover Witch Finger Cookies
It’s easy to make these creepy finger cookies ahead, and there are different ways to store them.
Keeping Them Fresh
To ensure they remain as fresh as the day you baked them, store them in an airtight container. This will help maintain their moisture and prevent them from becoming stale.
If you’ve layered them with raspberry jam, placing a sheet of parchment paper between layers can prevent them from sticking together.
Long-Term Storage
If you’re planning ahead or simply baked more than you can eat right away, these cookies can be frozen for up to a month.
Before freezing, make sure the witches’ fingers cookies are completely cooled. Then, place them in a single layer on a baking sheet and freeze until solid.
Once frozen, transfer them to a zip-top bag or an airtight container, separating layers with parchment paper. When you’re ready to enjoy them, simply thaw at room temperature.
Reviving the Crunch
If you find that your cookies have lost a bit of their crunch after storing them, you can quickly revive them.
Preheat your oven to a low setting, around 150ºC (or about 300ºF), and bake the cookies for 5-7 minutes.
This will help them regain their original texture and warmth. Add a little extra jam, and they’re good to go!
What to Serve with Creepy Witch Finger Cookies
Creepy enough to serve on their own, but tasty enough to pair with other dishes.
Complementary Desserts
While these cookies are a standout on their own, they can be part of a larger Halloween dessert spread.
Serve them alongside Spooky Halloween Cookies, a pumpkin cheesecake, pumpkin bars, or chocolate cookies with added green food coloring for that witchy touch.
Savory Bites
If you’re hosting a Halloween party, balance out the sweetness of this amazing recipe with some savory treats.
Miniature vegan “mummy” hot dogs wrapped in pastry, deviled “spider” eggs with olive slices, or even a “monster” avocado sauce with blue corn chips can be fantastic additions.
These savory bites not only complement the sweet cookies but also add variety to your Halloween spread.
More Cookie Recipes For You To Try
- Peanut Butter Chocolate Chip Cookies
- The BEST Chocolate Chip Cookies
- Air Fryer Chocolate Crinkle Cookies with powdered sugar
- Easy Oatmeal Chocolate Chip Cookies
- Air Fryer White Chocolate Macadamia Nut Cookies
Did you make this recipe?
We love hearing how you went with ours recipes! Tag us on Instagram at @splash_of_taste_uk
You may also like…
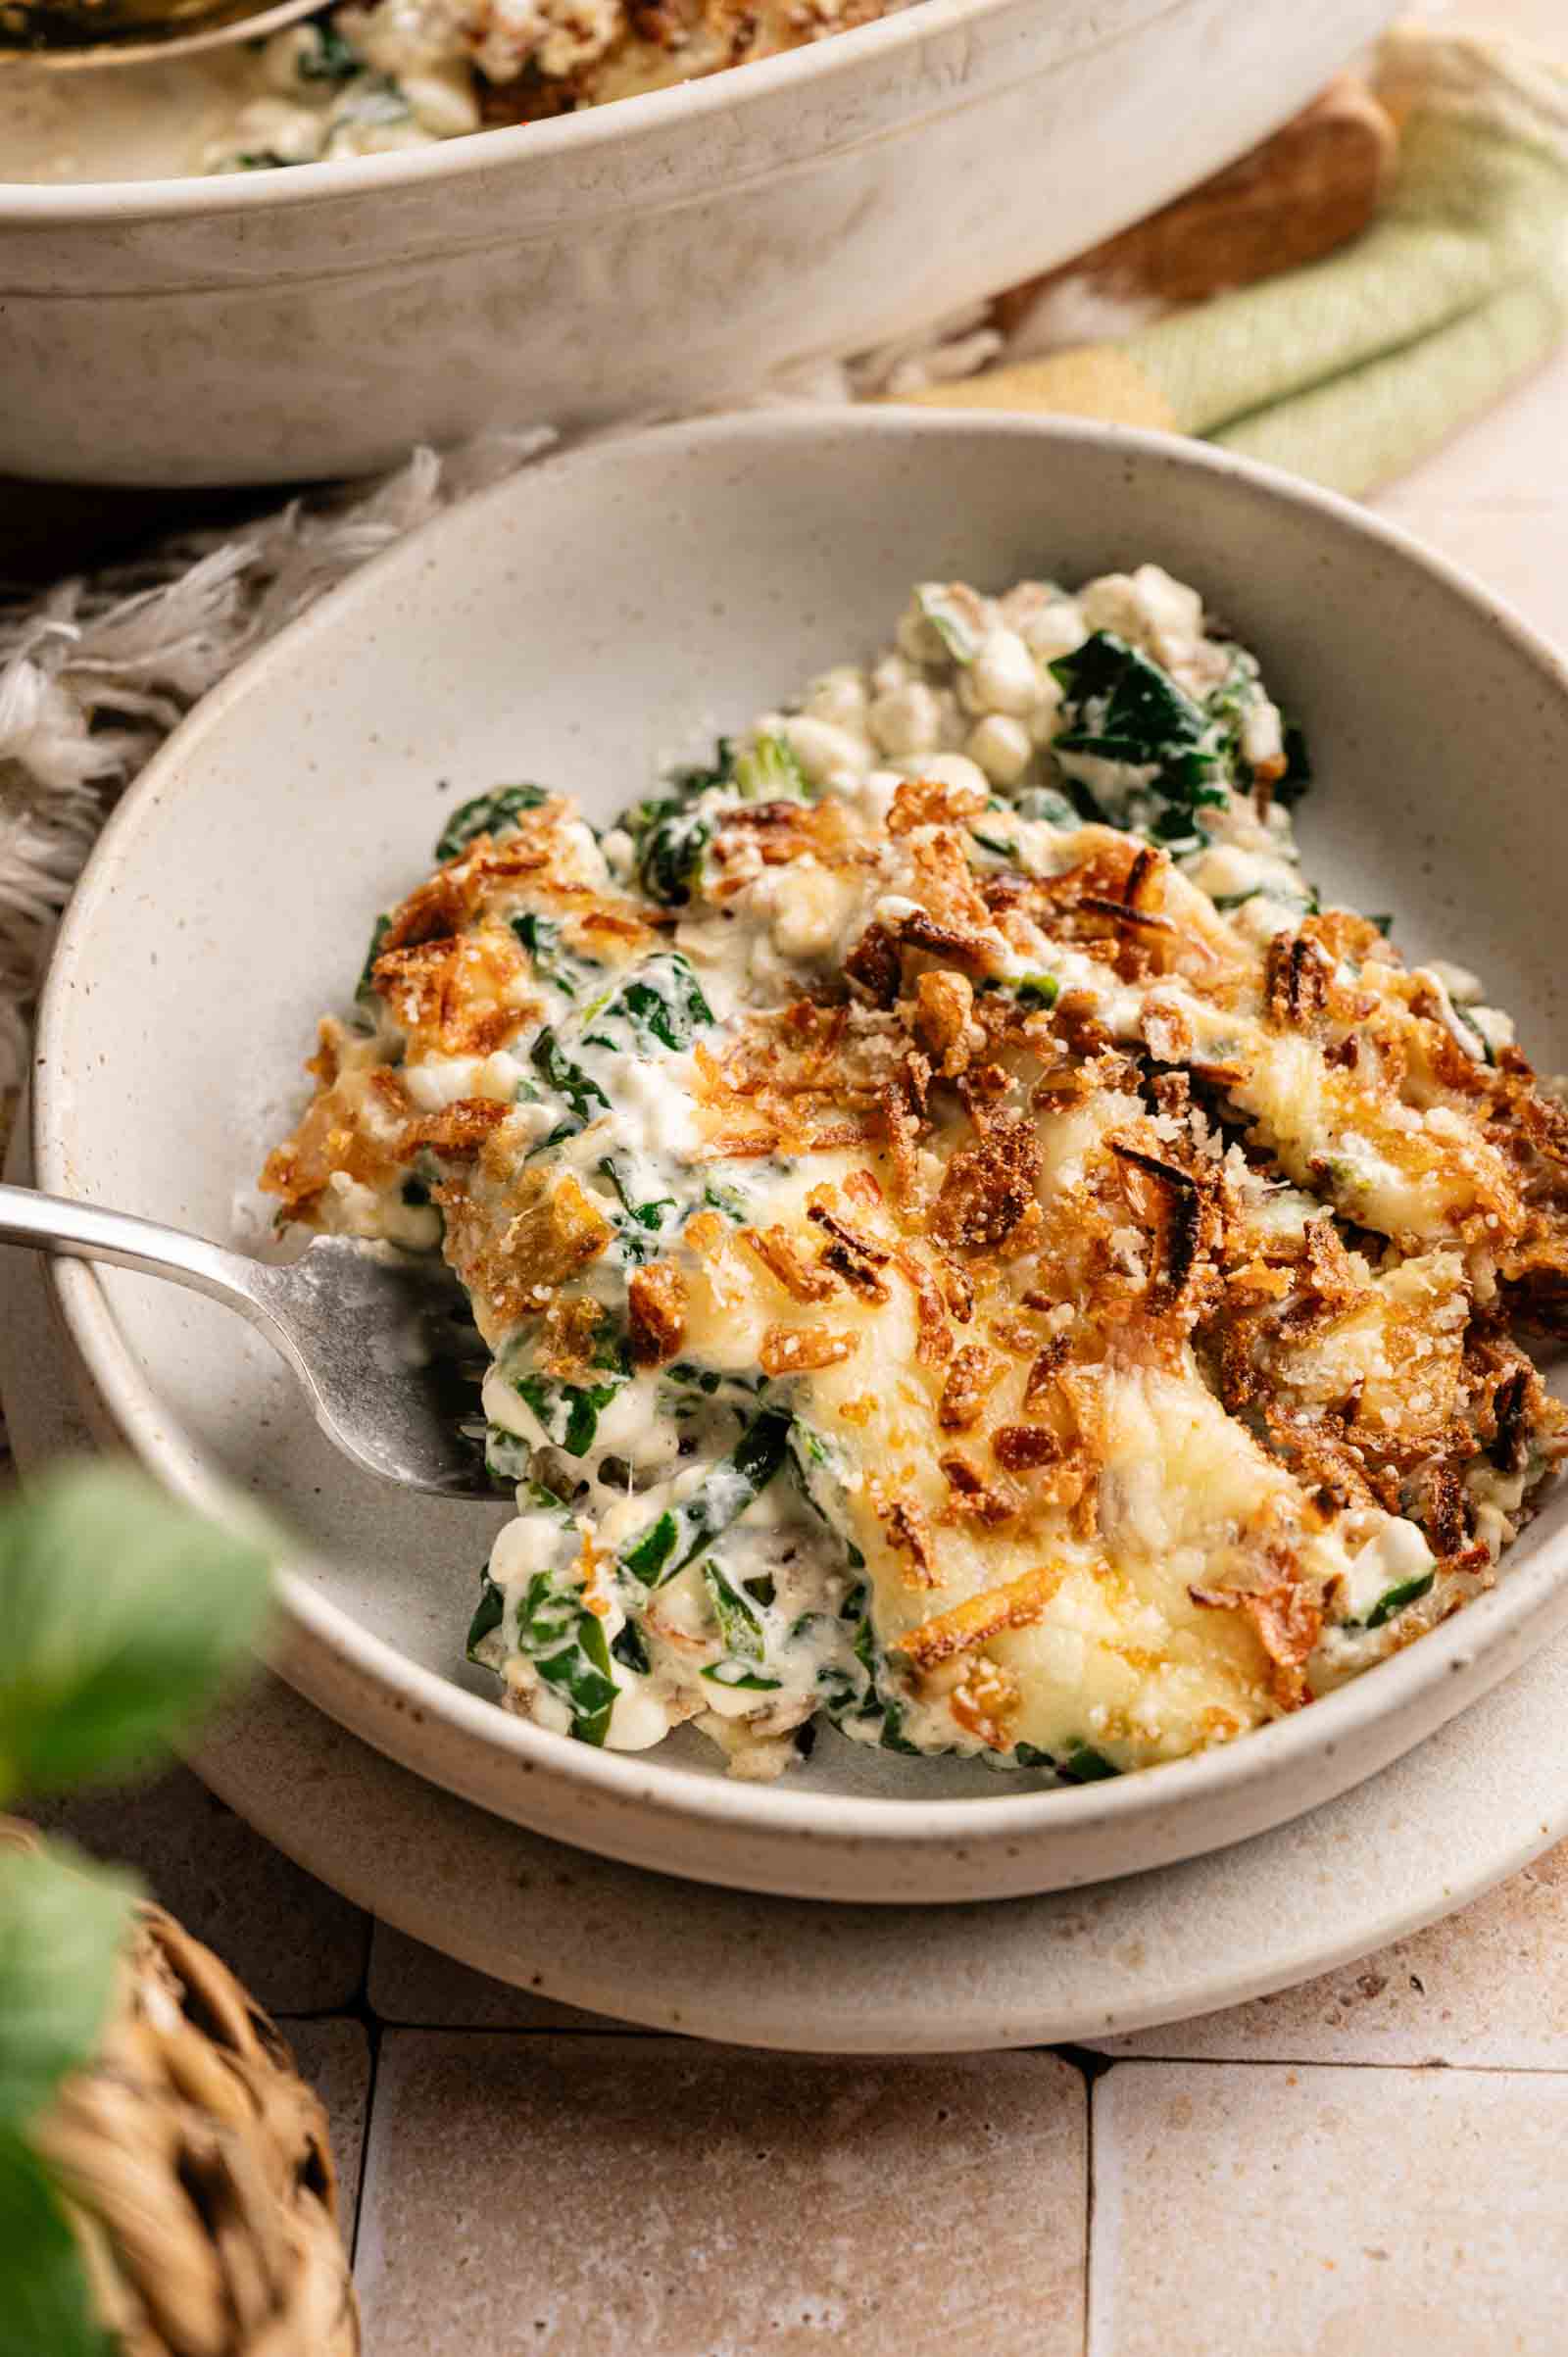
Spinach Casserole
When you pull a spoonful of Spinach Casserole out of the dish, the mozzarella stretches, the filling is warm and creamy, and that golden Parmesan and crunchy onion top is perfectly bubbly.
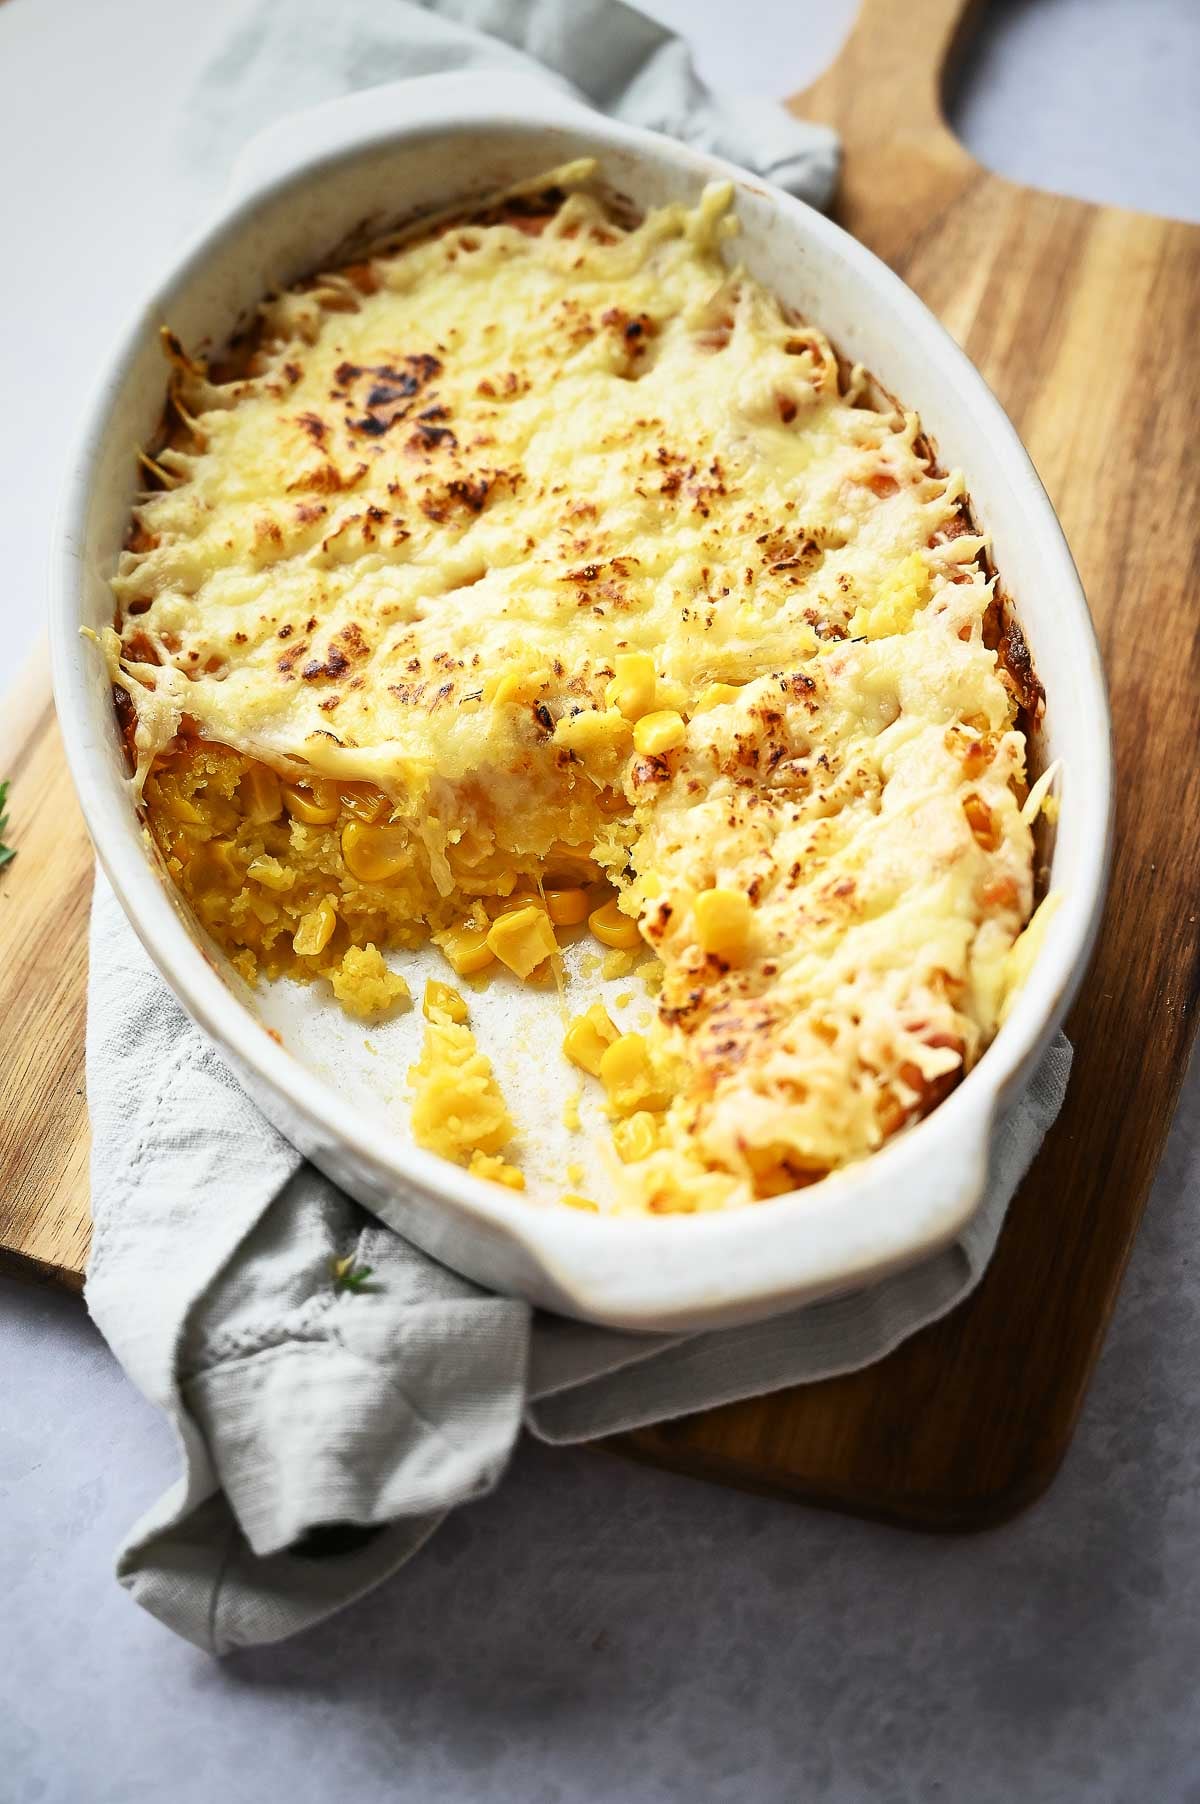
Corn Casserole
When you scoop into this Corn Casserole, you’ll hit that soft, buttery center under bubbling melted Cheddar. It’s warm, creamy, and so satisfying you’ll want to bring it to every gathering.

I wanted to make a teat batch of these before Halloween to teat my artistic skills and they turned out so good! Yummy too. My kids were totally freaked out, lol.