Crispy Chickpea Nuggets Recipe

A healthy, protein-packed alternative to traditional chicken nuggets, Chickpea Nuggets are a dream come true! Whether you’re vegetarian, looking for gluten-free options, or simply want to incorporate less meat into your diet, these chickpea nuggets will become your new favorite. They’re crispy on the outside, tender on the inside, and full of flavor, making them perfect for parties, family dinners, finger foods, or a nutritious snack.

This post contains affiliate links. As an Amazon Affiliate, if you purchase through those links, I earn a small commission. Thank you!
With years of culinary exploration and a passion for wholesome, accessible cooking, I’ve crafted this chickpea nugget recipe to bring joy and nourishment to your table. My journey into vegetarian cooking has taught me the importance of simple, nutritious ingredients, and this recipe is a reflection of that. It’s designed for ease, taste, and health, making it perfect for anyone seeking to enjoy delicious, vegetarian meals. My blog is a treasure trove of recipes that cater to a wide range of dietary preferences, and I’m thrilled to share this particular favorite with you.
Why You Will Love Making Chickpea Nuggets
These chickpea nuggets are perfect for anyone looking for a tasty, nutritious, and satisfying meal or snack. Here’s why you’ll find yourself making them again and again:
- Packed with Protein: Ideal for vegetarians and anyone looking to boost their protein intake with plant-based sources.
- Kid-Friendly: Their familiar shape and delicious taste are sure to win over the younger crowd.
- Versatile: Serve them as a snack, a main dish, or a side. They’re perfect for dipping into your favorite sauces.
- Allergy-Friendly: This recipe is easily adaptable for gluten-free diets, making it accessible to everyone.
- Simple Ingredients: Made with pantry staples, these nuggets are both affordable and easy to prepare.
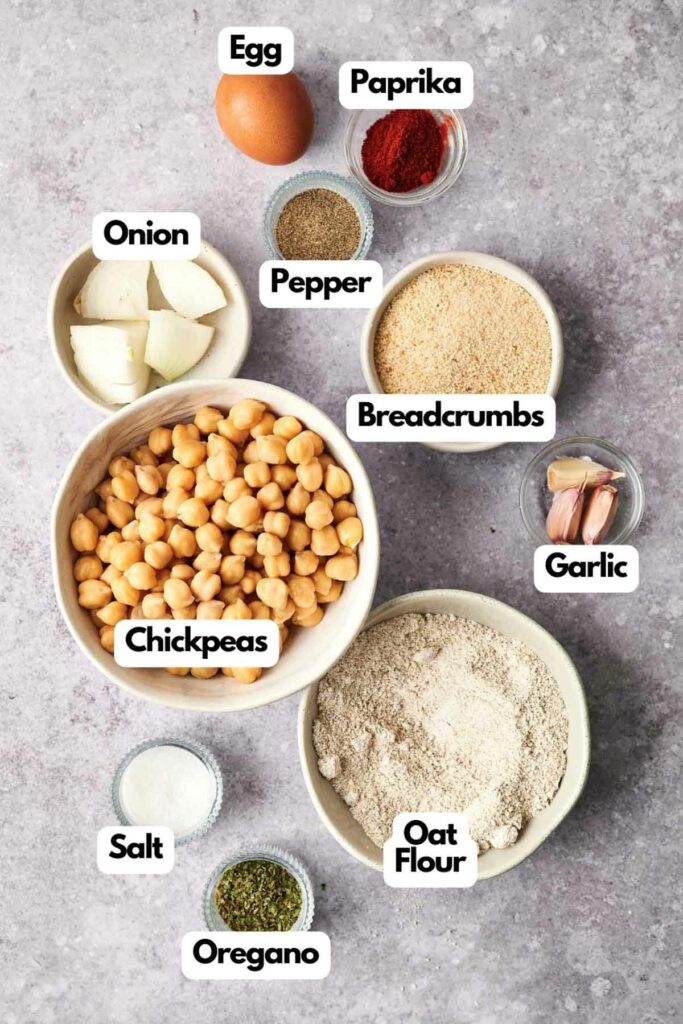
Ingredients You’ll Need
You’ll need all the ingredients in the photograph below.
How to Make Chickpea Nuggets with Step-By-Step Instructions
A complete printable recipe and the measurements in both US customary and metric are available in the recipe card below.
Making chickpea nuggets at home is simple and rewarding. Pair them with your favorite sides or even dishes like slow cooker honey soy chicken for a balanced and flavorful meal. Here’s how to get these golden bites of deliciousness ready for the oven in no time:
Ingredients Prep
Start by preheating your oven to 355°F (180ºC). Then, drain your canned chickpea liquid (aquafaba) and gather your spices, oat flour, and breadcrumbs. Panko breadcrumbs are my go-to!
Creating the Mixture
Take your food processor and combine the chickpeas, diced onion, oregano, smoked paprika, garlic, an egg, and a pinch of salt and black pepper. Pulse until you achieve a creamy, cohesive mixture. If it’s too wet, add some breadcrumbs to get the right consistency.
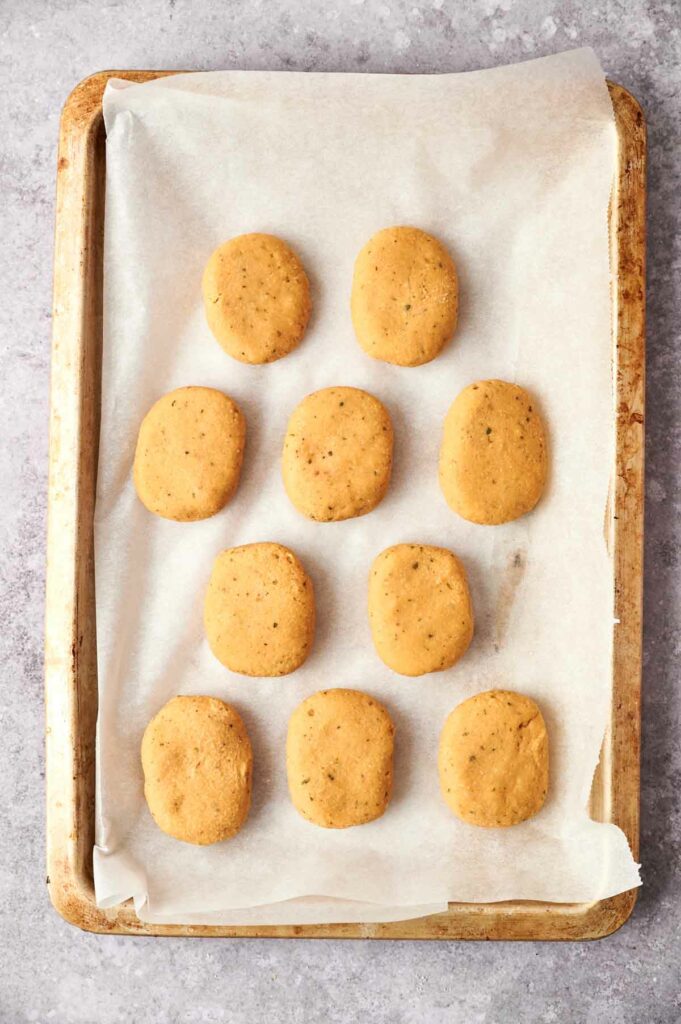
Shaping the Nuggets
Scoop out the mixture and form it into 2-inch ovals. This size is perfect for both cooking evenly and creating that classic nugget shape we all love.
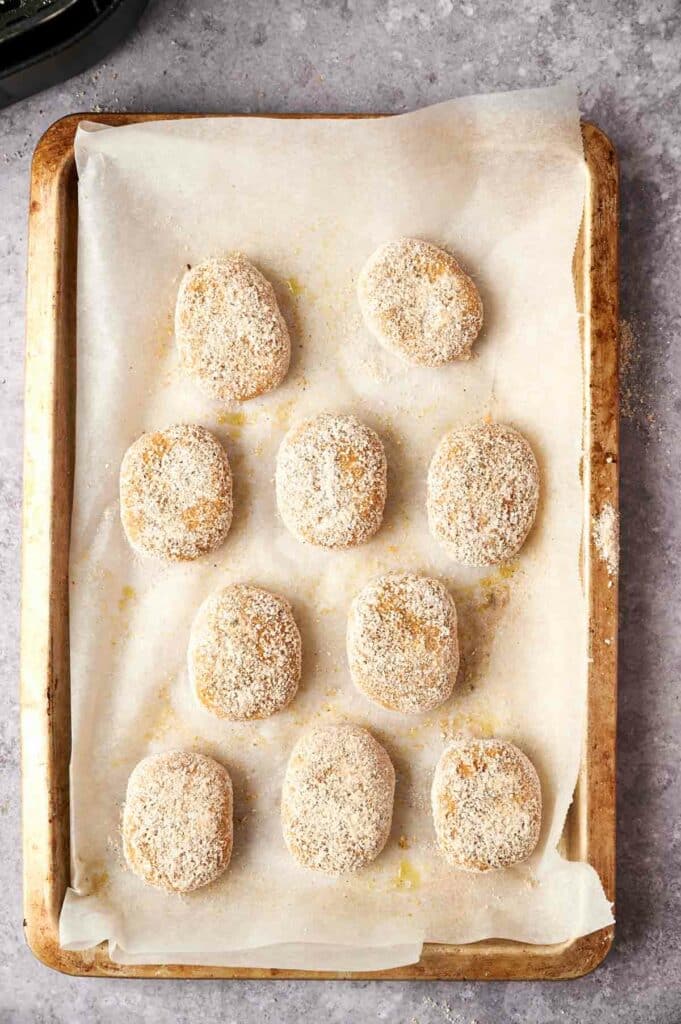
Coating
Mix your oat flour, breadcrumbs, garlic powder, and a little more salt and pepper in a separate bowl. Coat each nugget in this dry mix evenly. This step adds that irresistible crunch once baked.
Baking
Arrange your coated nuggets on a baking tray lined with parchment paper for easy cleanup. Give them a light spray of oil to help them crisp up, then pop them in the oven. Bake for about 15 minutes or until they’re golden brown and crispy.
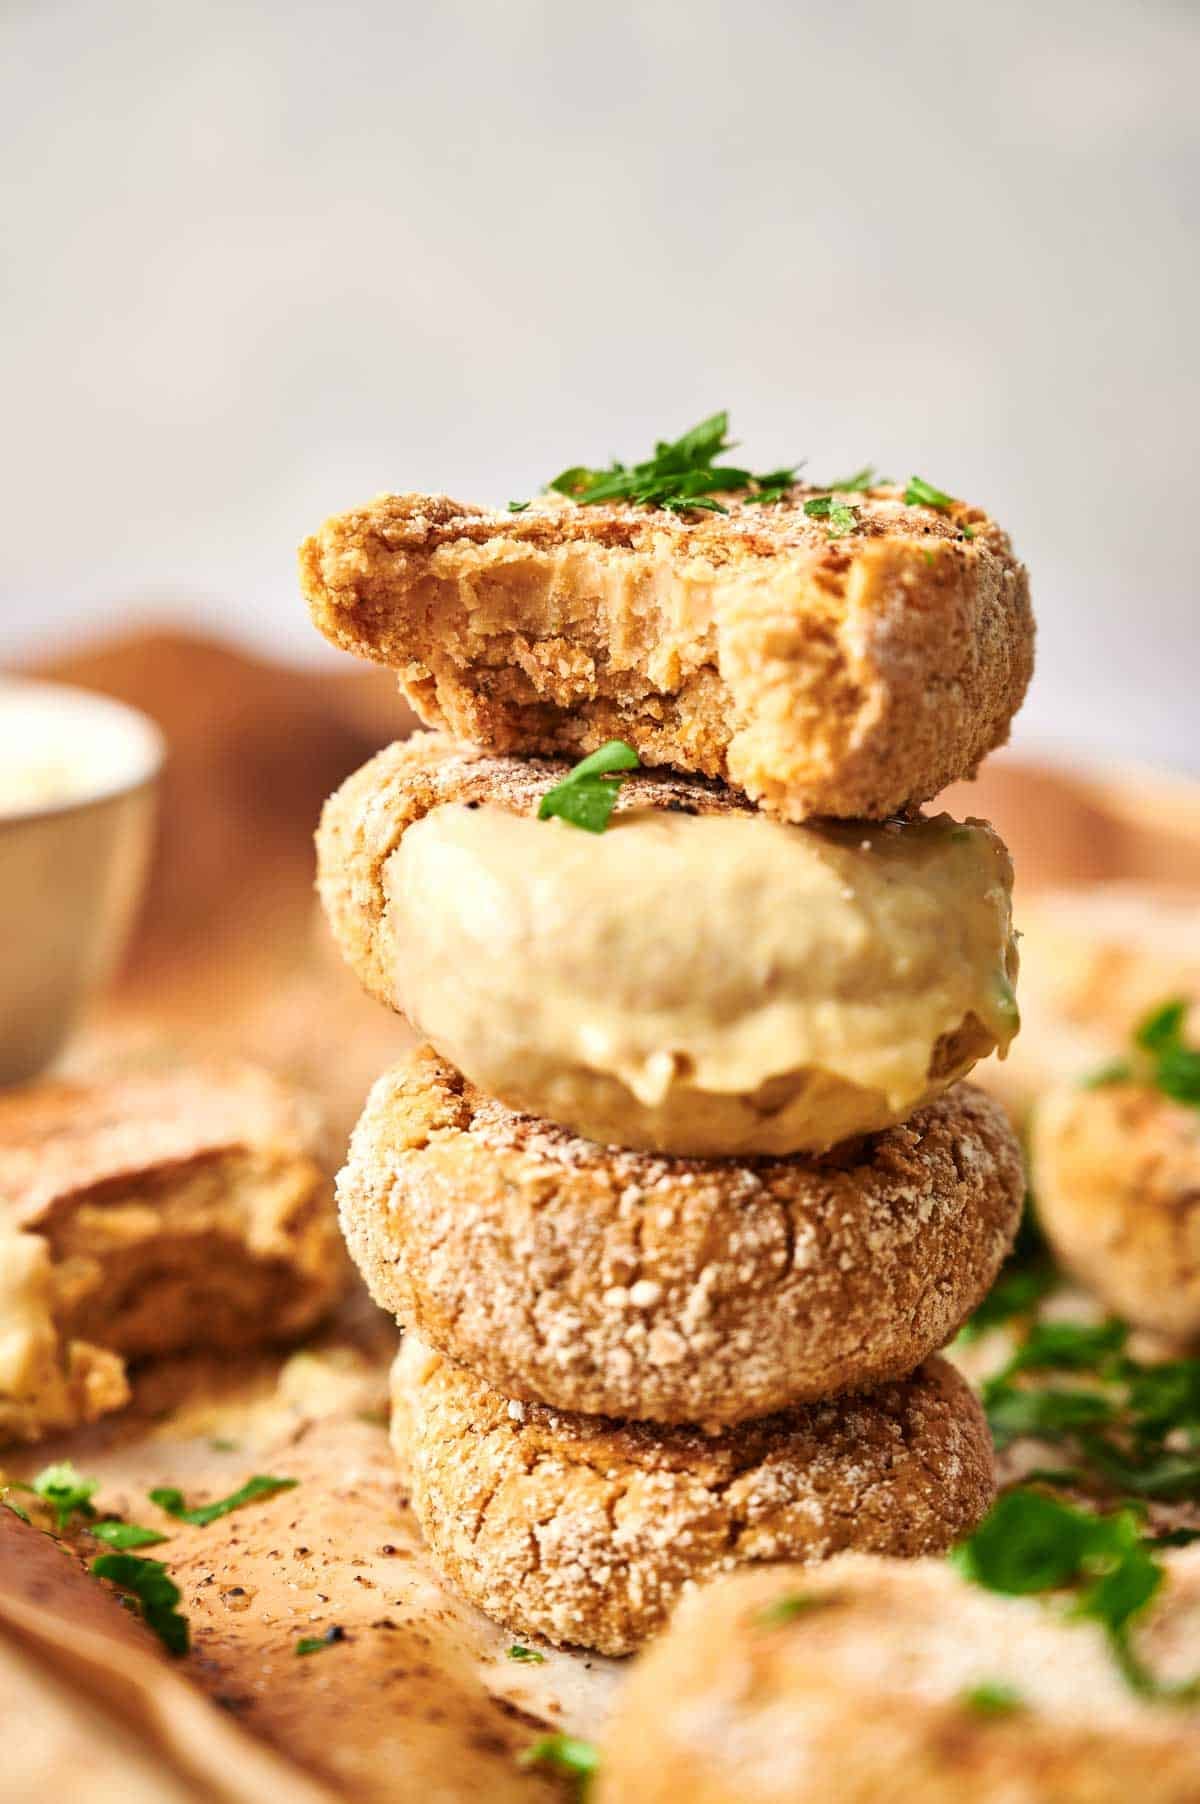
Garnishing and Serving
Once baked to perfection, sprinkle some fresh chopped parsley over your nuggets for a pop of color and freshness. Serve with Chick-fil-A sauce, ketchup, or your dip of choice for the ultimate bite.
Ingredients
- 3 cups chickpeas canned, drained
- ½ onion diced
- 1 teaspoon oregano
- 1 teaspoon smoked paprika
- 1 garlic clove
- 1 egg
- Salt and pepper
- ½ cup oat flour
- ½ cup breadcrumbs
- ½ teaspoon garlic powder
- Fresh chopped parsley for garnishing

Video
Instructions
- Preheat the oven to 355°F (180ºC). Place chickpeas, onion, oregano, smoked paprika, garlic, egg, salt, and pepper in a food processor and pulse until creamy. The mixture should be dry enough to allow you to scoop it in 2-inch shapes, if not, add a bit of breadcrumbs.3 cups chickpeas, ½ onion, 1 teaspoon oregano, 1 teaspoon smoked paprika, 1 garlic clove, 1 egg, Salt and pepper
- Scoop the mixture in 2-inch ovals.
- Mix flour, breadcrumbs, garlic powder, salt and pepper.½ cup oat flour, ½ cup breadcrumbs, ½ teaspoon garlic powder
- Cover the chickpea nuggets with the oat flour mixture and arrange in a baking tray. Spray a bit of oil.
- Bake for 15 minutes, or until golden brown.
- Sprinkle fresh chopped parsley on top and serve it with Chick-fil-A sauce.Fresh chopped parsley
Notes
- Texture is Key: The consistency of your chickpea mixture should be similar to a thick paste. If it’s too wet, the nuggets won’t hold their shape well. Add breadcrumbs sparingly until you achieve the right texture.
- No Food Processor: While a food processor makes the job quicker, you can also mash the chickpeas with a fork or potato masher. The texture might be slightly chunkier, but the nuggets will still be delicious.
- Customize Your Flavors: Feel free to experiment with different herbs and spices according to your taste preferences. This recipe is incredibly versatile!
- Add Heat: To add some heat to your chickpea nuggets, add spices like cayenne pepper, chili powder, or diced jalapeños into the mixture. Start with a small amount and adjust according to your preference for spice.
- Gluten-Free: To ensure these nuggets are gluten-free, use certified gluten-free oat flour and also use gluten-free bread crumbs.
- Oil-free: For an oil-free version, skip the spray of oil before baking. You might not get as crispy a finish on the outer crumb, but they’ll still be tasty. Also, ensure your baking sheet is non-stick or lined with parchment paper to prevent sticking.
- Serving Size: This recipe can easily be doubled or halved to accommodate the number of guests or for meal prep.
- Can I use fresh chickpeas instead of canned? Yes, you can use fresh chickpeas. Just remember to soak them overnight and cook them until tender before using them in this recipe. Keep in mind that canned chickpeas are a time-saver and offer a very similar result.
Storage & Reheating
- Cool Down: Allow the nuggets to cool to room temperature before storing to prevent moisture build-up.
- Refrigerate: Keep the leftovers in an airtight container in the refrigerator. They’ll stay fresh for up to 5 days.
- Freezing: For longer storage, freeze the nuggets on a baking sheet before transferring them to a freezer-safe bag. This way, they won’t stick together and you can enjoy them for up to 3 months.
- Reheating: To bring back that just-baked taste and texture, reheat the nuggets in the oven or air fry them in the air fryer. Microwave reheating is quick but may soften the crust. If they’re frozen, there’s no need to thaw; just adjust cooking time accordingly.
Nutrition
Recipe Notes and Expert Tips
To make sure your chickpea nuggets turn out perfectly every time, here are a few tips and tricks to keep in mind:
- Texture is Key: The consistency of your chickpea mixture should be similar to a thick paste. If it’s too wet, the nuggets won’t hold their shape well. Add breadcrumbs sparingly until you achieve the right texture.
- No Food Processor: While a food processor makes the job quicker, you can also mash the chickpeas with a fork or potato masher. The texture might be slightly chunkier, but the nuggets will still be delicious.
- Customize Your Flavors: Feel free to experiment with different herbs and spices according to your taste preferences. This recipe is incredibly versatile!
- Add Heat: To add some heat to your chickpea nuggets, add spices like cayenne pepper, chili powder, or diced jalapeños into the mixture. Start with a small amount and adjust according to your preference for spice.
- Gluten-Free: To ensure these nuggets are gluten-free, use certified gluten-free oat flour and also use gluten-free bread crumbs.
- Oil-free: For an oil-free version, skip the spray of oil before baking. You might not get as crispy a finish on the outer crumb, but they’ll still be tasty. Also, ensure your baking sheet is non-stick or lined with parchment paper to prevent sticking.
- Serving Size: This recipe can easily be doubled or halved to accommodate the number of guests or for meal prep.
- Can I use fresh chickpeas instead of canned? Yes, you can use fresh chickpeas. Just remember to soak them overnight and cook them until tender before using them in this recipe. Keep in mind that canned chickpeas are a time-saver and offer a very similar result.
How to Store Leftover Chickpea Nuggets
Enjoying your chickpea nuggets at their best means storing them properly. Here’s how to keep them delicious for days:
- Cool Down: Allow the nuggets to cool to room temperature before storing to prevent moisture build-up.
- Refrigerate: Keep the leftovers in an airtight container in the refrigerator. They’ll stay fresh for up to 5 days.
- Freezing: For longer storage, freeze the nuggets on a baking sheet before transferring them to a freezer-safe bag. This way, they won’t stick together and you can enjoy them for up to 3 months.
- Reheating: To bring back that just-baked taste and texture, reheat the nuggets in the oven or air fry them in the air fryer. Microwave reheating is quick but may soften the crust. If they’re frozen, there’s no need to thaw; just adjust cooking time accordingly.
What to Serve with Chickpea Nuggets
Pairing chickpea veggie nuggets with the right sides and sauces can turn them from a simple snack into a satisfying meal. Here are some easy ideas to try:
Dipping Sauces
Dipping sauces go hand-in-hand with chickpea nuggets. Classic ketchup, ranch, honey mustard, and mayo are always hits, but why not try something new? A tangy barbecue sauce, creamy garlic aioli, or a spicy Sriracha mayo can add an exciting twist. For a healthier option, a yogurt-based dip with herbs could be a refreshing accompaniment.
Side Dishes
Chickpea nuggets go well with a range of side dishes. For a light and healthy option, consider an avocado salad or a serving of steamed vegetables. If you’re leaning towards comfort food, sweet potato fries or a small serving of mac and cheese are perfect. To keep things simple, a portion of roasted vegetables (like carrots, sweet potatoes, and zucchini) seasoned with herbs and spices can complement the nuggets’ flavor perfectly.