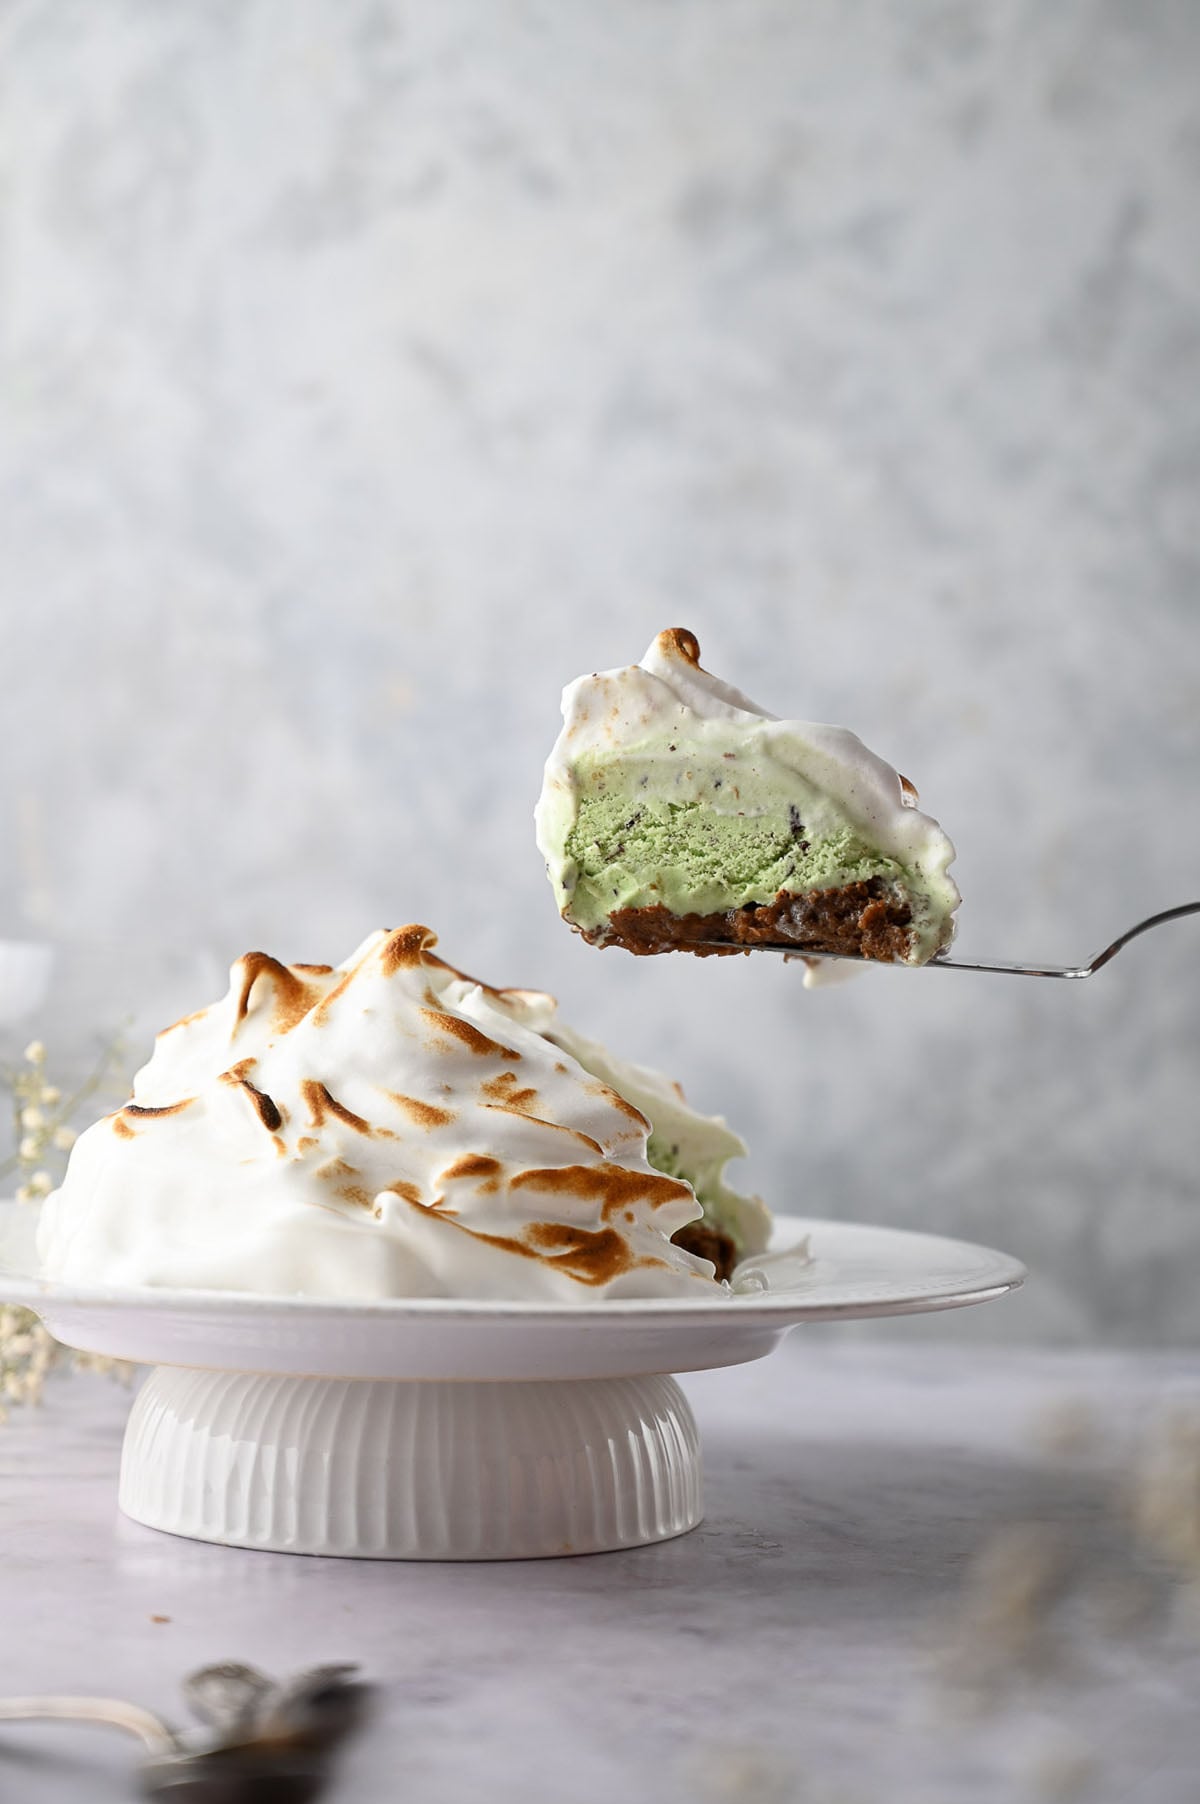
Baked Alaska
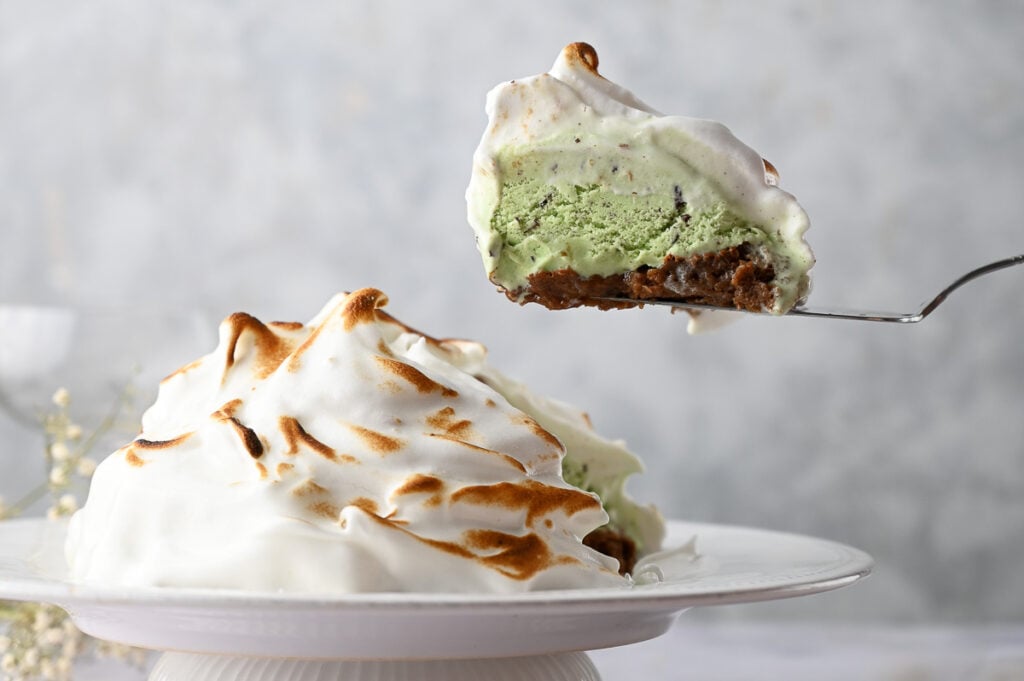
Baked Alaska is the kind of dessert I pull out when I really want to make an impression. The outside is a cloud of golden, toasted meringue, and when you slice through it, cold, creamy ice cream over a rich chocolate brownie base waits inside. It’s dramatic, beautiful, and honestly one of the most fun desserts you can bring to the table.
This post contains affiliate links. As an Amazon Affiliate, if you purchase through those links, I earn a commission. Thank you!
I love making this for special occasions like birthdays, anniversaries, and holiday dinner parties when I want a dessert that feels truly unforgettable. It’s the kind of dish that makes people genuinely gasp when you set it on the table, and the best part is you can assemble it ahead and keep it frozen until you’re ready to toast and serve. Store any leftovers wrapped tightly in the freezer for up to 2 months, though the meringue is always best right after it’s toasted.
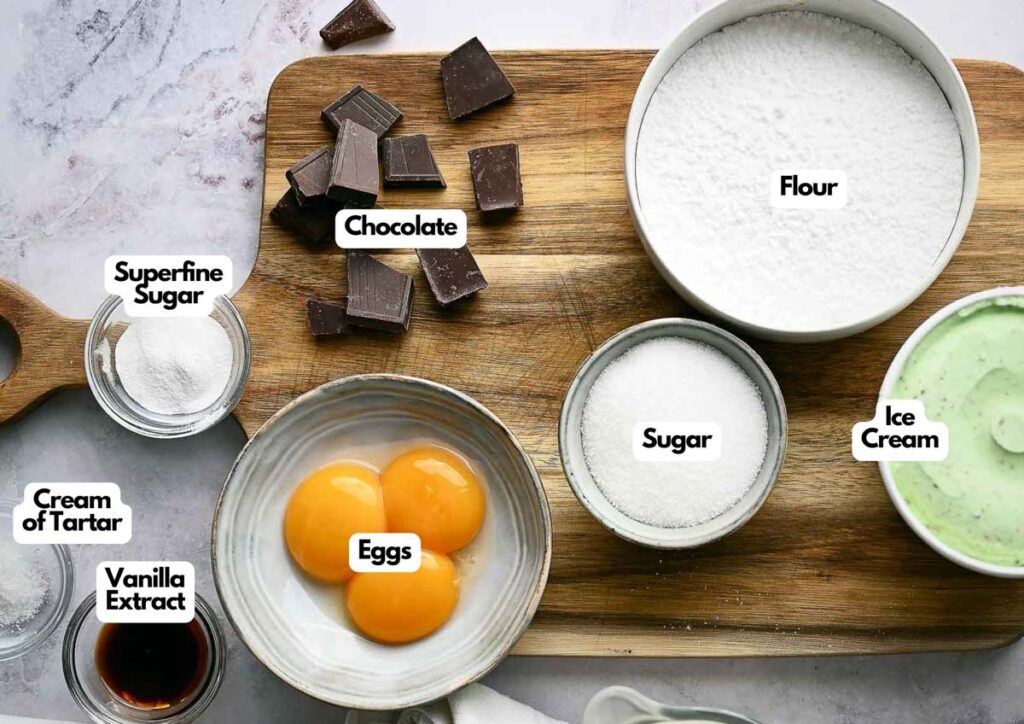
Ingredients You’ll Need
You’ll need all the ingredients shown in the photograph below.
How to Make Baked Alaska with Step-By-Step Instructions
Scroll down for the full recipe card containing a full printable recipe and measurements in both US customary and metric units.
This Baked Alaska recipe is genuinely one of the most fun kitchen projects, and I’ll walk you through each stage so yours comes out perfectly.
Preheat and Line the Pan
Preheat your oven to 350°F (180°C). Line your cake pan with parchment paper and lightly grease it with cooking spray. This helps make sure nothing sticks.
I use a nonstick springform pan so I can easily release the cake without the edges sticking to the sides.
Mix the Sponge Cake Base
In a batter bowl, beat the egg yolks with half of the sugar using a handheld mixer or a stand mixer fitted with a whisk attachment, until the mixture turns thick and pale. Stir in the vanilla extract, then gently fold in the melted and cooled bittersweet chocolate.
In a separate mixing bowl, beat the egg whites with a pinch of salt until foamy, then add the remaining sugar and keep beating until you get stiff peaks. Fold the whipped whites into the chocolate mixture carefully to keep as much air in there as possible.
Pour the batter into the prepared pan and bake for about 20 minutes, until set. Let it cool completely on a wire rack before moving on.

Prepare the Ice Cream Layer
Line a metal bowl with plastic wrap and give it a light coat of cooking spray. Pack the ice cream firmly into the bowl, pressing it in so there are no gaps or air pockets. Cover it and slide it into the freezer for at least 2 hours, until it’s very firm.
Once the cake has fully cooled, remove the top layer of plastic wrap from the ice cream and place the cake on top. Press gently so it seals well, then cover the whole thing and freeze again until rock-solid.
SERIOUSLY GOOD
DESSERTS!

Dessert First is a collection of 61 RECIPES to show you that you can make beautiful, impressive desserts right in your own kitchen, no matter your skill level.
Immediate eBook download. No physical book available.
Includes ad-free recipes like:
∙ Lemon Pound Cake
∙ Key Lime Bars
∙ Boston Cream Pie
∙ No-Bake Chocolate Lasagna
∙ Raspberry Cheesecake
...and much more!
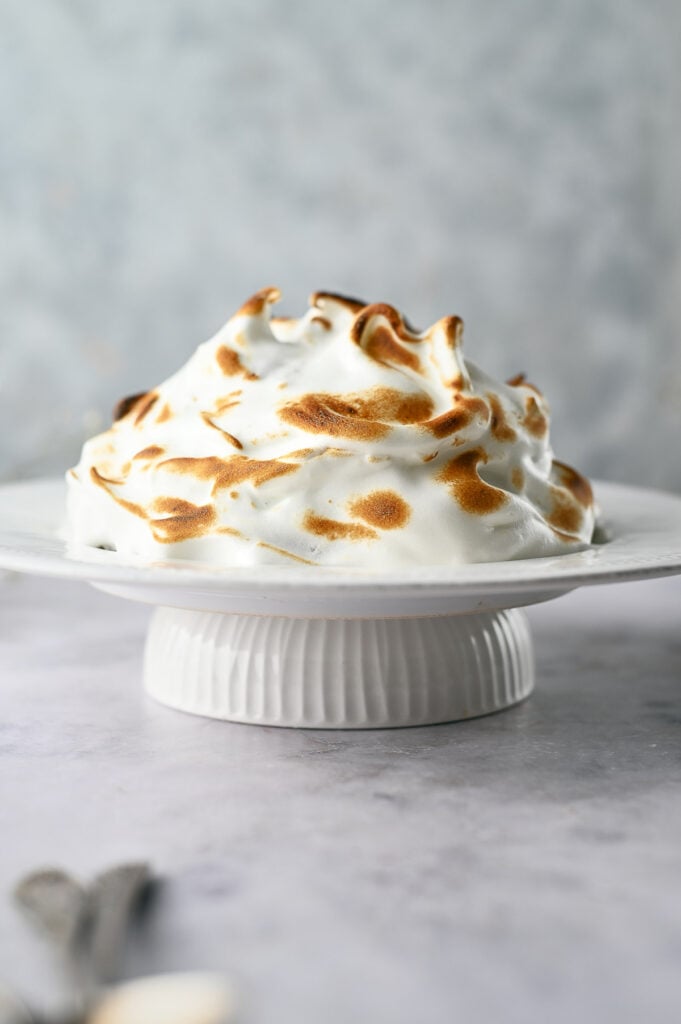
Make the Meringue
Beat the egg whites and cream of tartar together with your electric mixer until frothy. Slowly stream in the superfine sugar while continuing to whip, and keep going for about 6 minutes until the meringue is glossy and holds stiff peaks.
You want it thick enough to hold its shape when you spread or pipe it. A powerful hand mixer gets the job done without much effort.
Assemble and Bake
Remove ice cream and cake dome from the freezer, and unmold onto a parchment-lined baking sheet. The parchment keeps the dome base from sticking.
Pipe the meringue with a piping bag, or spread it with a spoon over the entire surface, making sure it touches the parchment all the way around to completely seal in the ice cream. Bake in a hot oven for 1 to 2 minutes, just until the meringue turns golden brown.
Finish and Serve
Carefully transfer or slice the Baked Alaska to a large round serving plate. For a more elegant finish, I like to torch the creases with a kitchen torch.
Slice using a sharp knife, and serve immediately, and enjoy!
Baked Alaska is best served the moment it comes out of the oven, but if you need to bring it to a party or gathering, assemble and freeze the ice cream and cake base completely solid before you leave.
Keep the meringue ready to spread or pipe on-site, and use a cooler to transport the frozen dome. Bake or torch the meringue at your destination for the best presentation and to keep the ice cream from melting during travel.
Equipment
Ingredients
For the Filling:
- Cooking spray
- 6 tablespoons sugar
- 3 large eggs separated
- 1 teaspoon vanilla extract
- 3 ounces bittersweet chocolate melted and cooled
- 1 pinch salt
- 3 pints ice cream any flavor
For the Meringue:
- 4 egg whites
- ¼ teaspoon cream of tartar
- 1 cup superfine sugar
Instructions
Prepare the Cake Base:
- Preheat the oven to 350°F (180°C). Line a cake pan with parchment paper and lightly coat with cooking spray.
- In a mixing bowl, beat the egg yolks with half of the sugar until thick and pale. Stir in the vanilla, then fold in the melted chocolate.6 tablespoons sugar, 3 large eggs, 1 teaspoon vanilla extract, 3 ounces bittersweet chocolate
- In another bowl, beat the egg whites and salt until foamy. Add the remaining sugar and continue beating until stiff peaks form.1 pinch salt
- Gently fold the whipped egg whites into the chocolate mixture.
- Pour the batter into the prepared pan and bake for about 20 minutes, until set. Cool completely on a wire rack.
Prepare the Ice Cream Layer:
- Line a metal bowl with plastic wrap and coat lightly with cooking spray.Cooking spray
- Pack the ice cream firmly into the bowl. Cover and freeze for at least 2 hours, until very firm.3 pints ice cream
- Remove the top plastic wrap and place the cooled cake on top of the ice cream. Press gently to seal. Cover again and freeze until solid.
Make the Meringue:
- Beat the egg whites and cream of tartar until frothy.¼ teaspoon cream of tartar, 4 egg whites
- Slowly add the sugar and continue whipping until glossy and stiff, about 6 minutes.1 cup superfine sugar
Assemble and Finish:
- Unmold the ice cream and cake onto a parchment-lined baking sheet.
- Spread or pipe the meringue over the entire surface, making sure it touches the parchment to seal.
- Bake in a hot oven for 1 to 2 minutes, just until golden brown. Serve immediately.
Notes
Nutrition
SERIOUSLY GOOD
DESSERTS!
Dessert First is a collection of 61 RECIPES to show you that you can make beautiful, impressive desserts right in your own kitchen, no matter your skill level.
Immediate eBook download. No physical book available.
Includes ad-free recipes like:
∙ Lemon Pound Cake
∙ Key Lime Bars
∙ Boston Cream Pie
∙ No-Bake Chocolate Lasagna
∙ Raspberry Cheesecake
...and much more!
How to Store Leftovers
If you have leftovers, wrap the remaining Baked Alaska tightly in plastic wrap and keep it in the freezer for up to 2 months. The meringue will lose some of its freshly toasted texture once frozen, but it’ll still taste great.
When you’re ready to serve, briefly use a kitchen torch to re-toast the meringue and bring back that golden color.
What to Serve With Baked Alaska
It’s awesome and rich on its own, but it’s also amazing with a few simple accompaniments that can round out the spread. Fresh strawberries or raspberries on the side keep things light and add a pop of color to the plate.
A drizzle of warm raspberry sauce or a simple berry compote alongside each slice plays beautifully against the bittersweet chocolate base and the cold ice cream. Try it with fudgy brownies for richness or butter cookies for crunch to complement the creamy soft meringue.
For drinks, a cup of strong espresso or even a sparkling lemonade pair nicely. The boldness of a good coffee cuts through the sweetness of the meringue perfectly, and it turns the whole dessert course into a real moment.
More Easy Recipes for You to Try at Home
I think you’ll also love these other impressive, delicious dessert recipes.
Never thought of making baked Alaska would be this easy. My boys love it and already they requested more with different ice cream. Their favourite ice cream. Because I made it with a store-brand vanilla ice cream as I wasn’t sure if I could nail this recipe and I didn’t want to waste on more expensive ice cream. Haha…I can make it now thanks to your recipe and tips.