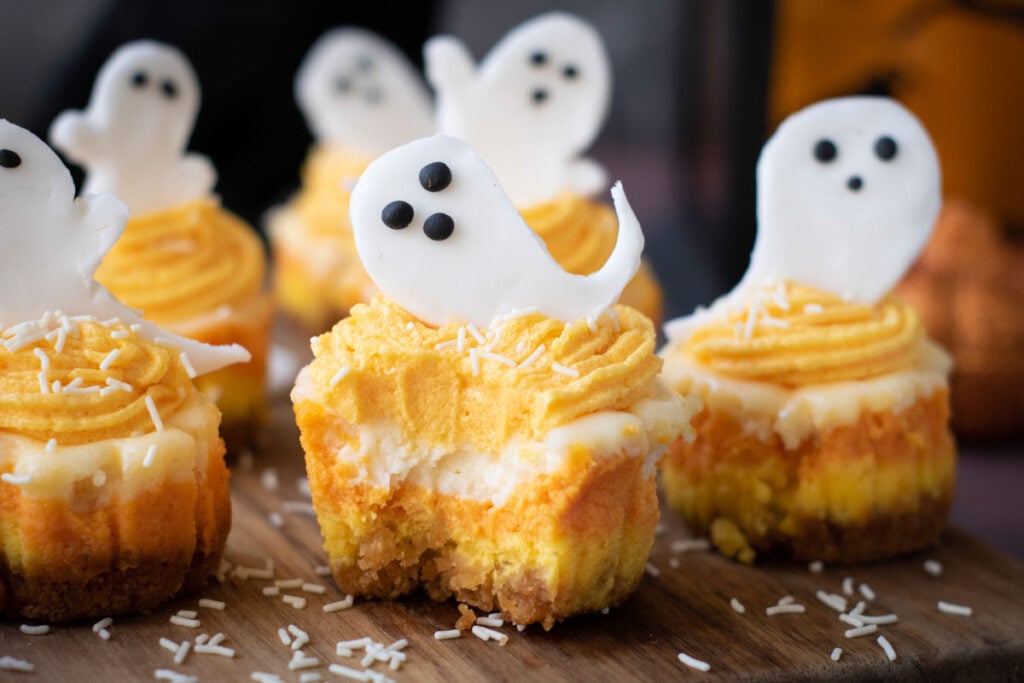
Halloween Candy Corn Mini Cheesecakes
When Halloween hits, I go straight for these Candy Corn Mini Cheesecakes, with buttery graham crust, silky layers of creamy cheesecake in bold candy corn colors, and a swirl of orange buttercream that melts right into every bite. There’s one easy step that makes those colors stay bright, and once you try it, you’ll be hooked all spooky season.
This post contains affiliate links. As an Amazon Affiliate, if you purchase through those links, I earn a commission. Thank you!
I make these Halloween Candy Corn Mini Cheesecakes for spooky parties, costume nights, or any festive get-together. They’re easy to prep ahead, and chilling them overnight makes party day feel more relaxed. I freeze the unfrosted version and add the topping after thawing. They pack neatly, serve easily, and always look right on a Halloween dessert table.
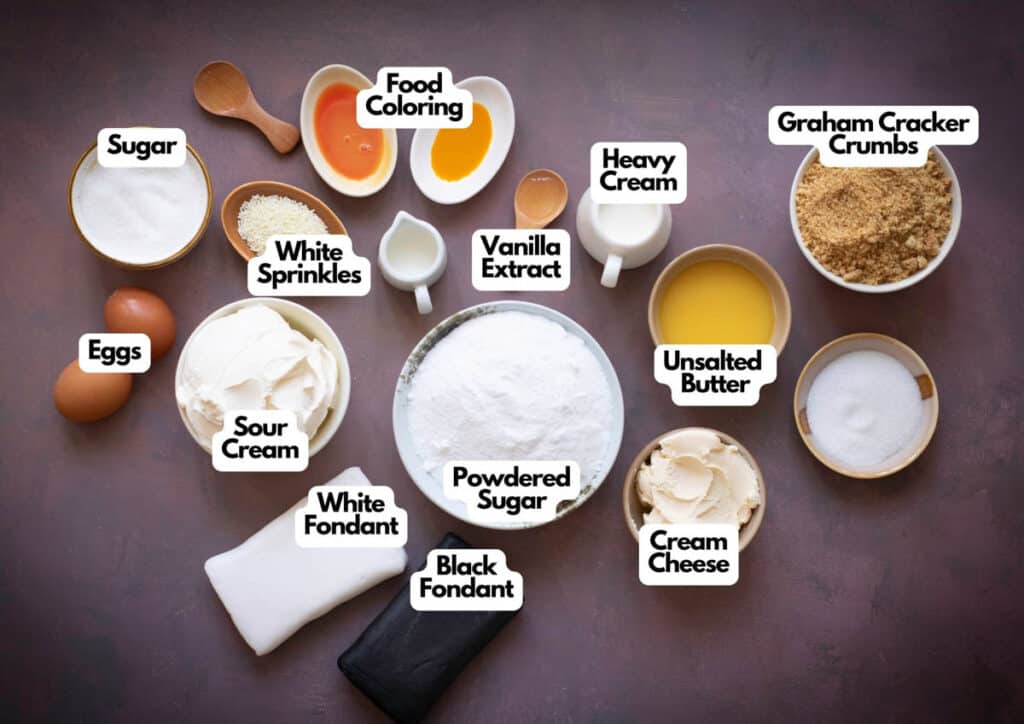
Ingredients You’ll Need
You’ll need all the ingredients shown in the photograph below.
How to Make Halloween Candy Corn Mini Cheesecakes with Step-By-Step Instructions
Scroll down for the full recipe card containing a full printable recipe and measurements in both US customary and metric units.
Follow these simple instructions to create colorful layered cheesecakes.
Prepare the Crust
Preheat your oven to 325°F and line a 12-cup muffin tin with cupcake liners. I like using a nonstick muffin pan so the liners sit flat and don’t shift around while baking. Then I top it with these reusable silicone baking cups that peel away easily and keep their shape without sticking.
Combine graham cracker crumbs, granulated sugar, and melted butter in a mixing bowl until the mixture feels like wet sand to help it hold together when baked. A glass mixing bowl makes it easy to stir in melted butter with no spilling over the sides.
Spoon it into the liners and press it down firmly to form a crust. I usually reach for this mini tart tamper because it simplifies pressing the crust evenly and avoids sticking to your fingers. Bake for 5 minutes, then set aside to cool.
Make the Cheesecake Batter
In a large mixing bowl, whisk the softened cream cheese so it’s smooth and lump-free. I always grab my large stainless steel mixing bowl for this part, so I have enough room to work with no splashing. A 6-speed electric hand mixer makes this quicker without overworking your arm.
Add sugar and continue beating until the batter is light and fluffy, creating a classic cheesecake creamy texture. Mix in the eggs one at a time, then stir in vanilla extract and sour cream to combine.
Divide the cream cheese mixture evenly into three bowls. Having a few ceramic ramekins on hand keeps things cleaner and easier to portion out the colors.
Tint one bowl with yellow food coloring, one with orange, and leave one plain.
SERIOUSLY GOOD
DESSERTS!

Dessert First is a collection of 61 RECIPES to show you that you can make beautiful, impressive desserts right in your own kitchen, no matter your skill level.
Immediate eBook download. No physical book available.
Includes ad-free recipes like:
∙ Lemon Pound Cake
∙ Key Lime Bars
∙ Boston Cream Pie
∙ No-Bake Chocolate Lasagna
∙ Raspberry Cheesecake
...and much more!
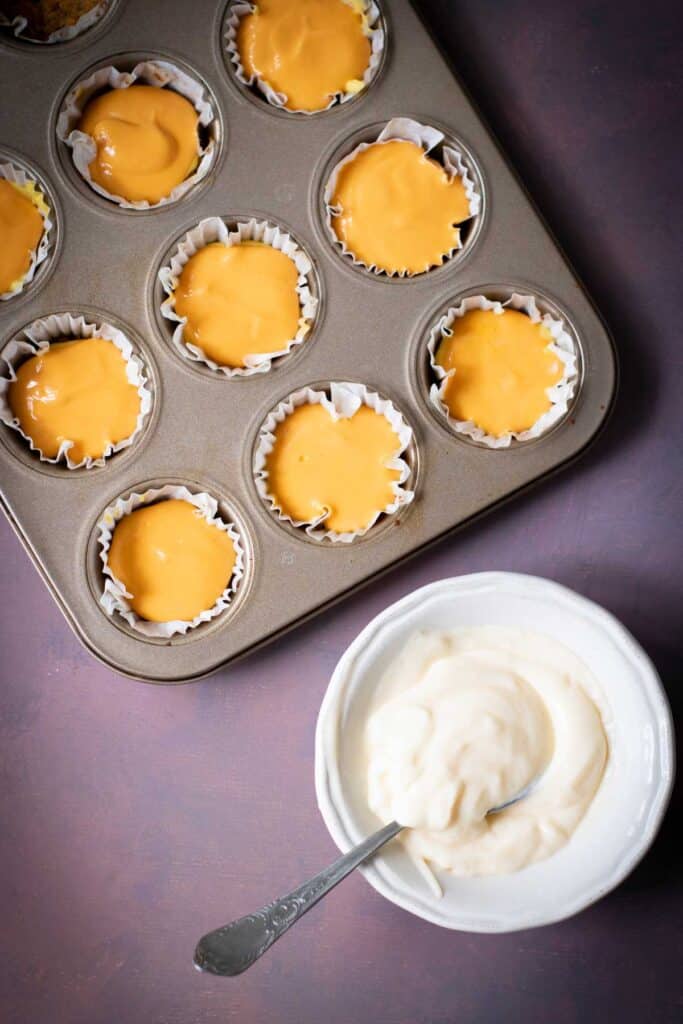
Layer and Bake
Spoon the yellow batter into each crust-lined cup first, smoothing it out gently. This small cookie scoop is super handy here, so you can get even layers without making a mess. Follow with the orange batter, then finish with the plain batter on top.
Bake for 18 to 20 minutes, or until the centers are set and no longer jiggly. Let them cool in the muffin tin for 30 minutes, then transfer to the fridge to chill for at least 4 hours or overnight.
Make the Orange Buttercream Frosting
In a clean bowl, whip the softened butter so it becomes fluffy. I like using my mixing bowl with a spout for frosting since it makes pouring and scooping easier.
Gradually add powdered sugar, mixing on low to prevent a mess. I often grab a silicone spatula because it helps scrape down the sides of the bowl so everything stays smooth and even.
Pour in heavy cream and vanilla, then beat on high until smooth and pipeable. Mix in orange food coloring to reach your desired shade.
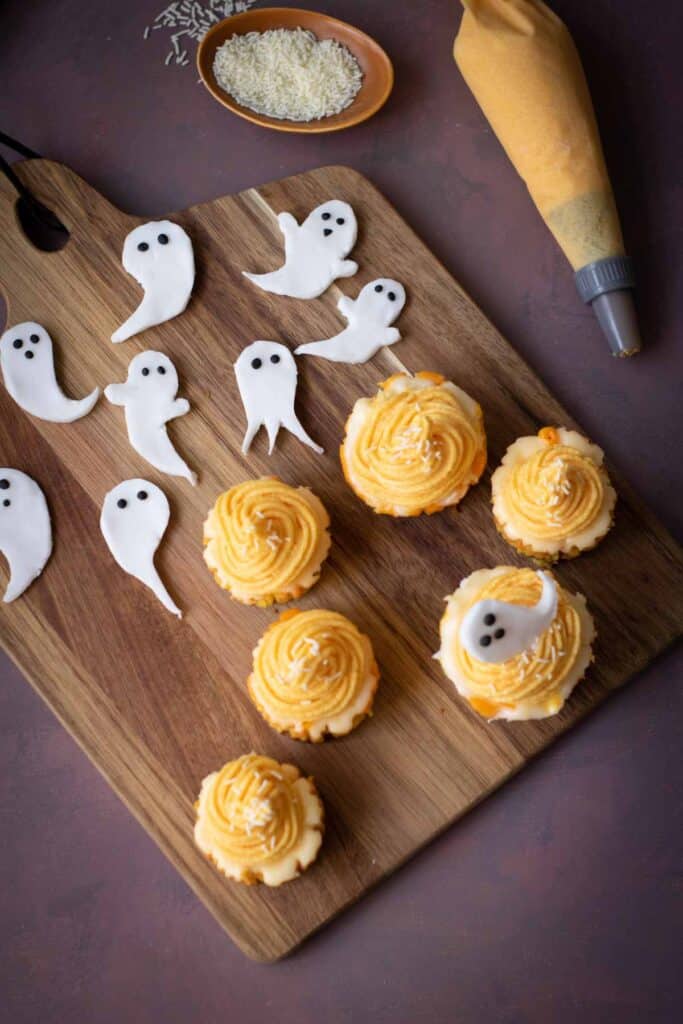
Decorate
Remove the chilled cheesecakes from the liners. Pipe a swirl of orange buttercream on top of each using a piping bag. I use this reusable piping bag set with metal tips to get cleaner, more defined swirls that hold their shape.
Top with white sprinkles for texture. Cut out small ghost shapes from white fondant and use an edible marker or black food coloring to draw on the faces.
Place one ghost on top of each cheesecake.
Serve
Once decorated, serve the mini cheesecakes chilled for the best texture and flavor. Enjoy!
If you’re bringing them to a Halloween party, I pack them in a hard-sided cupcake carrier to protect the decorations while traveling. To keep them cool on the way, I pop the container into my round insulated casserole carrier so the frosting doesn’t get too soft before serving.

Equipment
Ingredients
Crust Ingredients:
- 1 cup Graham Cracker crumbs
- 2 tablespoons granulated sugar
- ¼ cup unsalted butter melted
Cheesecake Filling:
- 16 ounces cream cheese softened
- ½ cup granulated sugar
- 2 medium eggs
- 1 teaspoon vanilla extract
- ½ cup sour cream
- Orange and yellow food coloring
Orange Buttercream Frosting:
- ½ cup unsalted butter softened
- 2 cups powdered sugar
- 2-3 tablespoons heavy cream
- 1 teaspoon vanilla extract
- Orange food coloring
Decorations:
- White sprinkles
- White fondant or sugar paste for ghost shapes
- Black edible marker or black food coloring
Instructions
Prepare the Crust:
- Preheat oven to 325°F (165°C). Line a 12-cup muffin tin with cupcake liners.
- In a bowl, mix graham cracker crumbs, sugar, and melted butter until fully combined.1 cup Graham Cracker crumbs, 2 tablespoons granulated sugar, ¼ cup unsalted butter
- Divide evenly between liners and press down to form a crust. Bake for 5 minutes, then let cool.
Make the Cheesecake Batter:
- In a large bowl, beat cream cheese until smooth. Add sugar and mix until fluffy. Beat in eggs one at a time, then add vanilla and sour cream.16 ounces cream cheese, ½ cup granulated sugar, 2 medium eggs, 1 teaspoon vanilla extract, ½ cup sour cream
- Divide batter into 3 bowls: Color one yellow, one orange, and leave one plain.Orange and yellow food coloring
Layer and Bake:
- Spoon a layer of yellow batter into each liner, followed by orange, and then plain on top.
- Bake for 18–20 minutes or until centers are set.
- Let cool in pan for 30 minutes, then refrigerate for at least 4 hours or overnight.
Make the Frosting:
- Beat butter until fluffy. Gradually mix in powdered sugar.½ cup unsalted butter, 2 cups powdered sugar
- Add heavy cream and vanilla; beat until smooth. Tint frosting with orange food coloring.2-3 tablespoons heavy cream, 1 teaspoon vanilla extract, Orange food coloring
Decorate:
- Remove chilled cheesecakes from liners. Frost with orange buttercream and add white sprinkles.White sprinkles, White fondant or sugar paste, Black edible marker or black food coloring
- For the ghosts, cut small shapes from white fondant and draw eyes and mouths with an edible marker. Place a ghost on top of each cheesecake.
Notes
- Room Temperature Cream Cheese: Let your cream cheese soften fully before mixing to avoid lumps in the batter.
- Don’t Overmix: Once you add the eggs, mix just until combined to avoid incorporating too much air.
- Even Layers: Use a small spoon or scoop to help control the layer amounts for each color.
- Color Order Matters: Start with yellow, then orange, then white to mimic the candy corn pattern clearly.
- Bake Until Just Set: The cheesecakes should have a slight jiggle in the center, don’t overbake or they’ll crack.
- Cool Gradually: Let them rest in the pan before refrigerating to prevent sudden temperature changes and sinking centers.
- Use a Piping Tip: A star or round piping tip helps you control the buttercream and get clean swirls.
- Decorate Just Before Serving: Add the fondant ghosts after chilling so they don’t melt or slide off.
Nutrition
SERIOUSLY GOOD
DESSERTS!
Dessert First is a collection of 61 RECIPES to show you that you can make beautiful, impressive desserts right in your own kitchen, no matter your skill level.
Immediate eBook download. No physical book available.
Includes ad-free recipes like:
∙ Lemon Pound Cake
∙ Key Lime Bars
∙ Boston Cream Pie
∙ No-Bake Chocolate Lasagna
∙ Raspberry Cheesecake
...and much more!
Recipe Notes and Expert Tips
I’ve tested this recipe a few times, and here’s what makes the process smoother and the final result even better:
- Room Temperature Cream Cheese: Let your cream cheese soften fully before mixing to avoid lumps in the batter.
- Don’t Overmix: Once you add the eggs, mix just until combined to avoid incorporating too much air.
- Even Layers: Use a small spoon or scoop to help control the layer amounts for each color.
- Color Order Matters: Start with yellow, then orange, then white to mimic the candy corn pattern clearly.
- Bake Until Just Set: The cheesecakes should have a slight jiggle in the center, don’t overbake or they’ll crack.
- Cool Gradually: Let them rest in the pan before refrigerating to prevent sudden temperature changes and sinking centers.
- Use a Piping Tip: A star or round piping tip helps you control the buttercream and get clean swirls.
- Decorate Just Before Serving: Add the fondant ghosts after chilling so they don’t melt or slide off.
How to Store Leftovers
Store leftover mini cheesecakes in an airtight container in the fridge for up to 4 days. Keep them in a single layer to avoid smudging the frosting. I transfer mine to a glass container with a locking lid so they don’t get crushed in the fridge.
They’re not ideal for freezing once frosted, but you can freeze the unfrosted cheesecakes tightly wrapped for up to 2 months. I like using BPA-free plastic wrap and heavy-duty aluminum foil so they’re well protected from freezer burn.
Thaw in the refrigerator overnight before decorating and serving.
More Easy Recipes for You to Try at Home
I’m always trying out simple and fun desserts that work for parties, holidays, and family treats, and these are just a few more ideas to add to your list.
