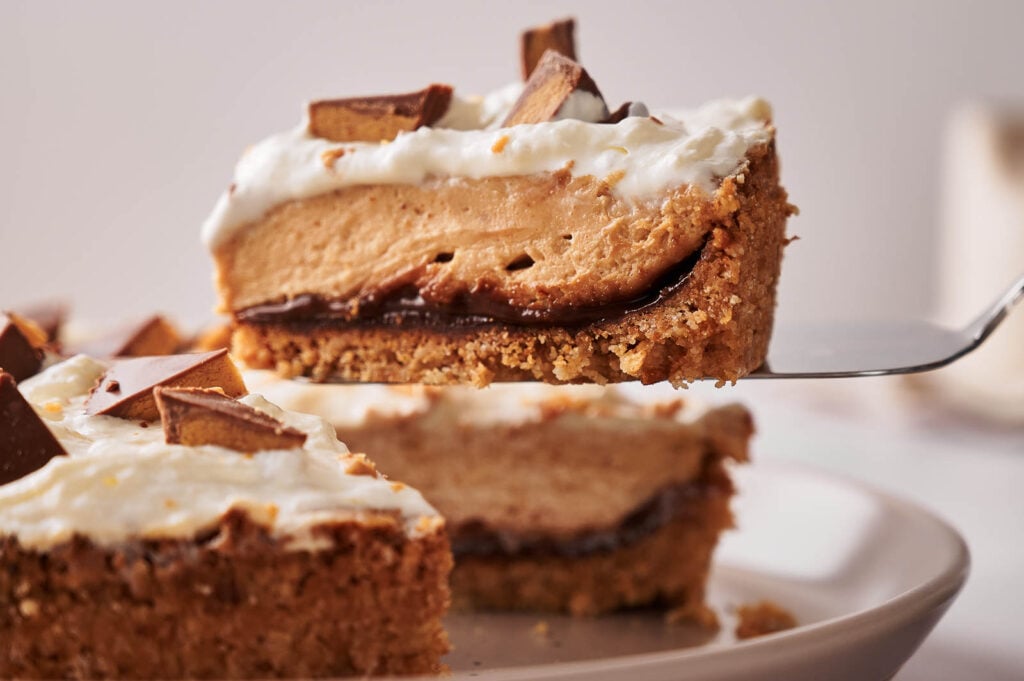
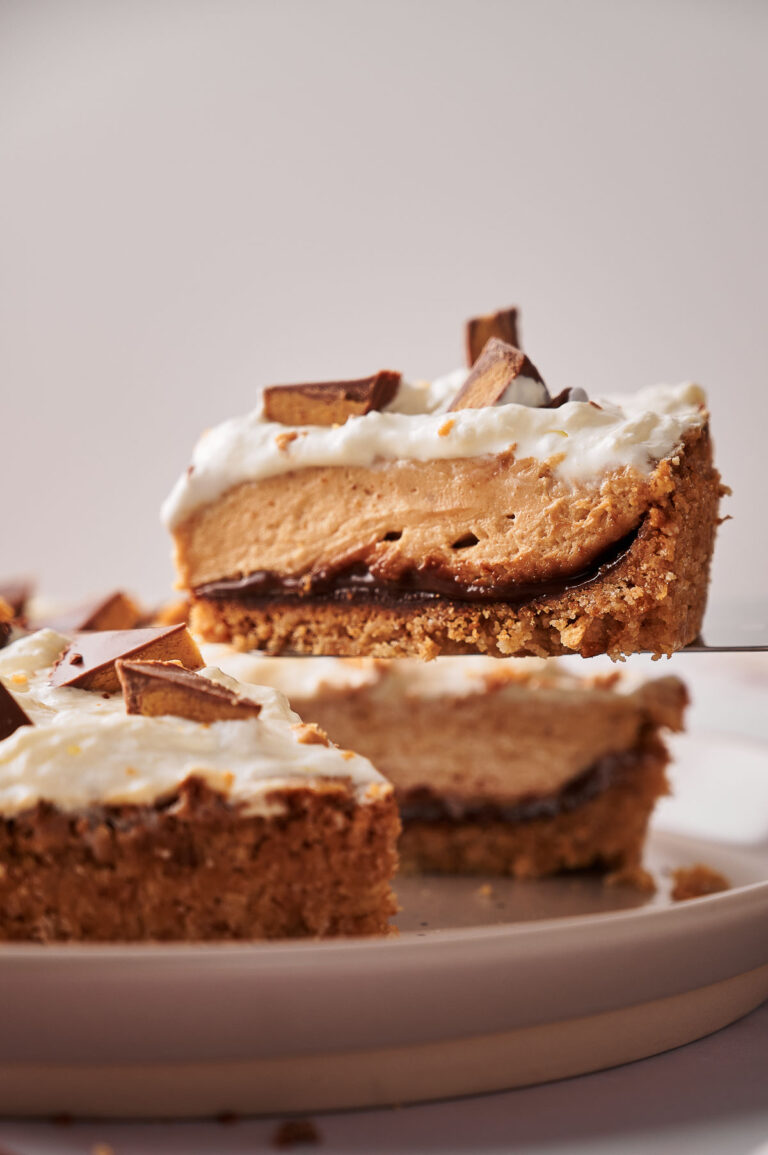
Reese’s Peanut Butter Pie

If you’re a peanut butter lover, this Reese’s Peanut Butter Pie is about to become your new obsession. The crust is buttery and sweet with a rich hot fudge layer, topped with smooth, creamy peanut butter filling that’s never too heavy. Reese’s cups on top add the perfect crunch, and you’ll catch yourself sneaking bites straight from the fridge.
This post contains affiliate links. As an Amazon Affiliate, if you purchase through those links, I earn a commission. Thank you!
I make this for family dinners, holiday gatherings, birthday parties, and summer potlucks when I need a dessert that really impresses. It feeds a crowd easily and slices beautifully for serving. You can make it a day ahead and it actually tastes better after sitting overnight. It stays fresh in the fridge for up to 4 days.
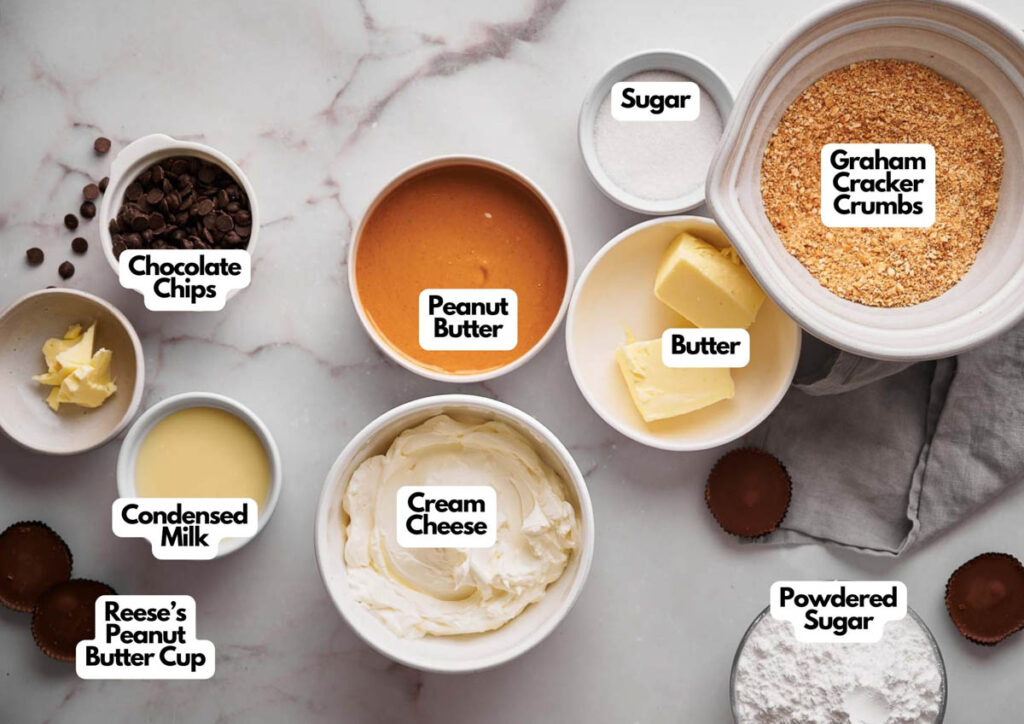
Ingredients You’ll Need
You’ll need all the ingredients shown in the photograph below.
How to Make Reese’s Peanut Butter Pie with Step-By-Step Instructions
Scroll down for the full recipe card containing a full printable recipe and measurements in both US customary and metric units.
You’ll start by making a buttery graham cracker crust, then layer on homemade hot fudge and creamy peanut butter filling before chilling everything until it’s perfectly set.
Crush the Graham Crackers
Preheat your oven to 350°F/175°C. Blitz the Graham crackers with a food processor or a blender until they’re fine crumbs. Or if you want to switch up the base, Oreos work fine, too. I’ve tried them before with my homemade Oreo pie crust, and it tastes just as delicious!
Place the Graham cracker crumbs (or Oreo crumbs) in a large mixing bowl and stir in the sugar, then the melted butter. I use unsalted butter so I have better control over the saltiness.
The crumb mixture should be grainy, and if there are any big chunks of cracker, break them up with your fingers.
Bake the Graham Cracker Crust
Pour the crumb mixture into a 9-inch nonstick springform cake pan or ceramic pie dish. Then, press down on the crumbs with your hands so that the base and the sides are covered.
You don’t want to press too hard, just enough so it’s no longer crumbly. Use the back of a spoon or a measuring cup to compact the edges of the base so they hold their shape.
Bake your crust for 10 minutes and then let it cool completely on a wire cooling rack before adding the fudge layer.
Prepare the Hot Fudge Sauce
In a heavy-bottomed saucepan over medium heat, add sweetened condensed milk and semi sweet chocolate chips. Stir constantly until the chocolate chips have melted and the mixture looks glossy. If you want the hot fudge sweeter, try milk chocolate chips instead.
Remove the pan from the heat, then add in the butter, stirring until it melts. Pour hot fudge sauce over the cooled crust, making sure to cover the entire surface but not too thickly. Set the remaining sauce aside for serving.
SERIOUSLY GOOD
DESSERTS!

Dessert First is a collection of 61 RECIPES to show you that you can make beautiful, impressive desserts right in your own kitchen, no matter your skill level.
Immediate eBook download. No physical book available.
Includes ad-free recipes like:
∙ Lemon Pound Cake
∙ Key Lime Bars
∙ Boston Cream Pie
∙ No-Bake Chocolate Lasagna
∙ Raspberry Cheesecake
...and much more!
Make the Peanut Butter Filling
In a large bowl, beat cream cheese, peanut butter, and powdered sugar together using a hand mixer or a stand mixer with a whisk attachment, until smooth and fluffy. You could also stir in a teaspoon of vanilla extract if you want to further deepen and enhance the peanut butter taste.
Using a rubber spatula, gently fold in half of the whipped topping until you don’t see any streaks. You can use Cool Whip or any brand of whipped topping you prefer. If Cool Whip’s unavailable, then 2 cups of heavy cream whipped until stiff peaks form works, too.
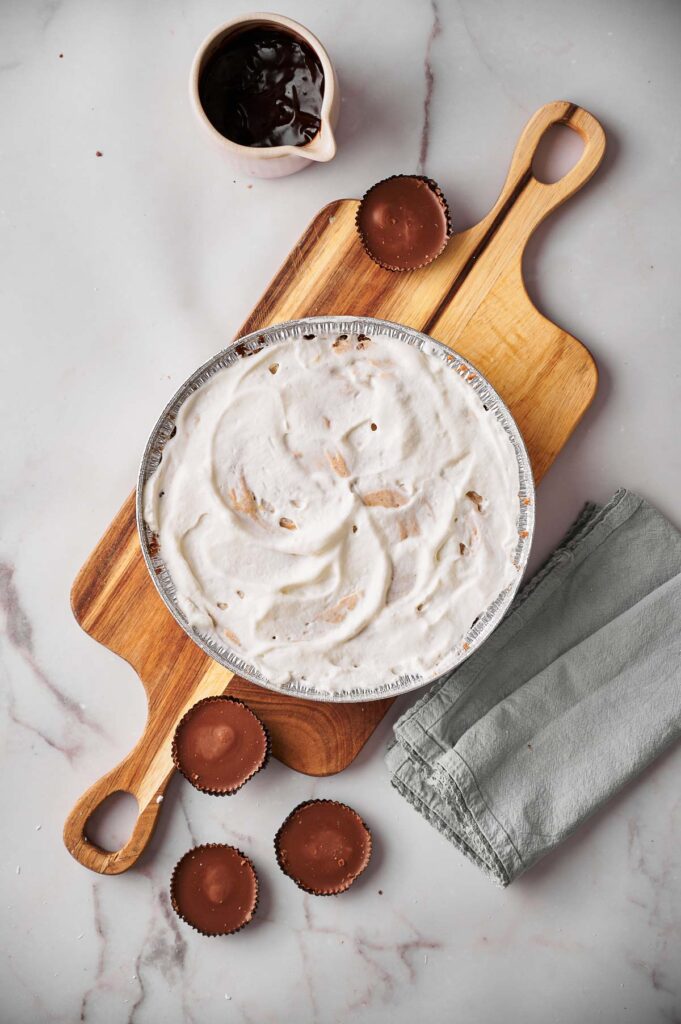
Spoon the smooth peanut butter mixture over the chocolate-coated crust and place the remaining whipped topping over it so that the filling is covered. Smooth the topping with the back of a spoon to create an even layer.
Refrigerate and Decorate
Chill for a minimum of 2 hours, or until the filling is firm enough to slice cleanly. When ready to serve, decorate with chopped, bite-sized Reese’s peanut butter cups. If you want, garnish with peanuts and the remaining hot fudge sauce after reheating it.
Slice, and enjoy your Reese’s Peanut Butter Pie!
Keep the pie chilled until right before you leave, then transport it in a hard-sided cake container with a secure lid to protect the whipped topping. Place the container on a flat surface in your car and avoid stacking anything on top.
If you’re driving for more than 30 minutes, pack the pie in a cooler with ice packs underneath the container to keep it cold. The pie travels best when it’s fully set after at least two hours of chilling, and you can add the mini Reese’s decoration just before serving.
Ingredients
For the Graham cracker crust
- 1½ cups Graham cracker crumbs
- ¼ cup granulated sugar
- 6 tablespoons unsalted butter
For the hot fudge sauce
- 3½ ounces sweetened condensed milk
- ¼ cup semi sweet chocolate chips
- ½ tablespoon unsalted butter
For the pie filling
- 16 ounces cream cheese softened
- 1 cup creamy peanut butter
- ¾ cup powdered sugar
- 16 ounces whipped topping thawed
- 1 cup mini Reese's peanut butter cups
Instructions
For the Graham cracker crust
- Preheat your oven to 350°F/180°C
- Using a food processor or blender, blitz the Graham crackers until they are fine crumbs. Then, place the crumbs in a mixing bowl and stir in the sugar, then the melted butter. The crumb mixture should be grainy, if there are any big chunks of cracker break them up1½ cups Graham cracker crumbs, ¼ cup granulated sugar, 6 tablespoons unsalted butter
- Pour the crumb mixture into a 9 inch cake pan and using your hands press down on the crumbs so that the base and the sides are covered, you don't want to press too hard, just ensure that it's no longer crumbly. Use the back of a spoon to compact the edges of the base
- Bake your crust for 10 minutes and then let it cool completely
For the hot fudge sauce
- In a saucepan over medium heat, add sweetened condensed milk and chocolate chips and stir constantly until the chocolate chips have melted3½ ounces sweetened condensed milk, ¼ cup semi sweet chocolate chips
- Remove the pan from the heat, add the butter and stir until the butter has melted. Pour hot fudge sauce over the cooled crust so that the crust is covered but not too thickly, set the remaining sauce aside½ tablespoon unsalted butter
For the filling
- Beat cream cheese, peanut butter, and powdered sugar together until smooth, then, using a rubber spatula, fold in half of the whipped topping16 ounces cream cheese, 1 cup creamy peanut butter, ¾ cup powdered sugar, 16 ounces whipped topping
- Spoon the peanut butter mixture over the crust and place the remaining whipped topping over it so that the filling is covered, smooth the topping with the back of a spoon. Chill for a minimum of 2 hours
- When ready to serve, decorate with mini peanut butter cups, and if preferred, garnish with peanuts and hot fudge sauce (reheated). Enjoy your Reese's peanut butter pie!1 cup mini Reese's peanut butter cups
Notes
Nutrition
SERIOUSLY GOOD
DESSERTS!
Dessert First is a collection of 61 RECIPES to show you that you can make beautiful, impressive desserts right in your own kitchen, no matter your skill level.
Immediate eBook download. No physical book available.
Includes ad-free recipes like:
∙ Lemon Pound Cake
∙ Key Lime Bars
∙ Boston Cream Pie
∙ No-Bake Chocolate Lasagna
∙ Raspberry Cheesecake
...and much more!
How to Store Leftovers
Cover the pie with plastic wrap or transfer slices to an airtight container and store in the refrigerator for up to 4 days. The whipped topping stays fluffy and the crust keeps its texture when stored properly.
For longer storage, wrap individual slices tightly in plastic wrap, then place them in a freezer-safe container for up to 3 months. Thaw frozen slices in the fridge overnight before serving, and the filling will soften back to its creamy texture without getting watery.
What to Serve With Reese’s Peanut Butter Pie
I love pairing slices with strong coffee or cold milk to balance the peanut butter and chocolate. You could also serve it alongside fresh berries like strawberries or raspberries for a tart contrast.
If you’re putting together a dessert spread, this sits beautifully next to rich treats like brownies, sugar cookies, or fruit tarts because the creamy, chilled texture contrasts nicely with other desserts.
You could also serve small slices with whipped cream or a drizzle of melted chocolate for an extra treat.
More Easy Recipes for You to Try at Home
I think you’ll enjoy these other easy pies I make all the time for gatherings and celebrations.
