Oreo Balls

The best part about Oreo Balls is that they’re completely no-bake but taste amazing. Crushed Oreos mix with cream cheese into smooth, fudgy filling, then white chocolate hardens into a shell around each one. Every bite has that perfect crack with rich sweetness inside. One batch is never enough.

This post contains affiliate links. As an Amazon Affiliate, if you purchase through those links, I earn a commission. Thank you!
I make these for Christmas cookie trays, Valentine’s Day treats, Easter baskets, birthday parties, and potlucks because they’re a crowd-favorite dessert. Kids and adults both love them. They’re perfect for making ahead since they stay fresh in the fridge for about a week or freeze for up to 2 months.
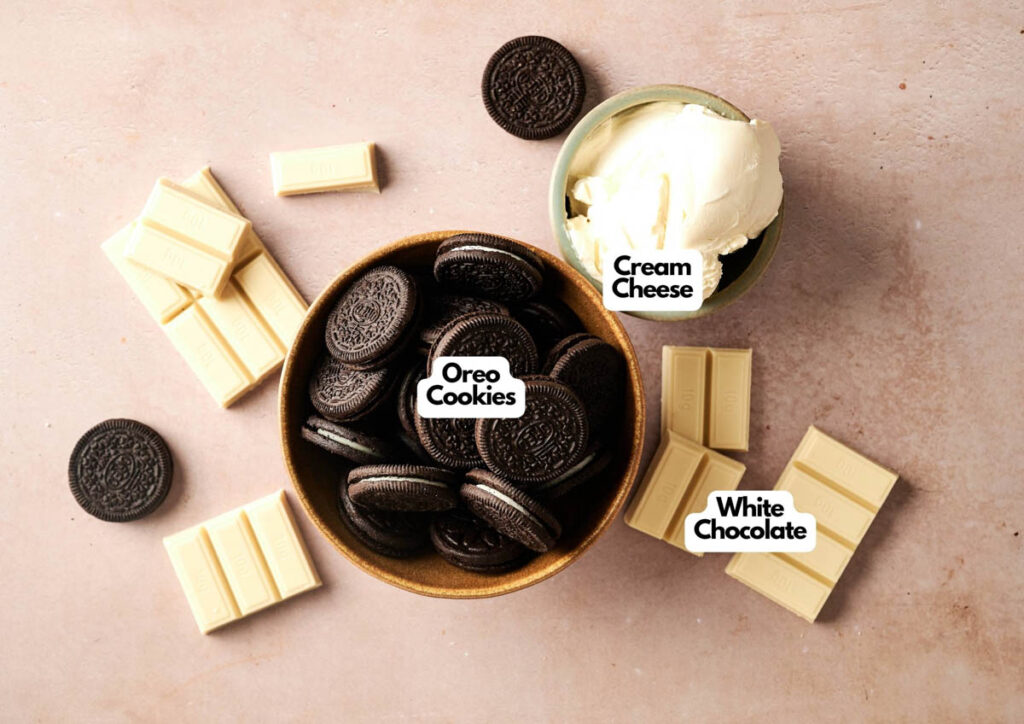
Ingredients You’ll Need
You’ll need all the ingredients shown in the photograph below.
How to Make Oreo Balls with Step-By-Step Instructions
Scroll down for the full recipe card containing a full printable recipe and measurements in both US customary and metric units.
I’ll walk you through the process of making these easy no-bake Oreo Balls from start to finish.
Crush the Oreos Into Fine Crumbs
Place the Oreo cookies in a food processor and pulse until you’ve got fine, even crumbs. You want them broken down completely so the texture stays smooth when mixed with cream cheese.
If you don’t have a food processor, use a blender or place the cookies in a ziplock bag and crush them with a rolling pin, but the food processor makes this step incredibly fast. I always use my food processor for this as it’s easy to use.
Mix in the Cream Cheese
Add the softened cream cheese directly into the food processor with the Oreo crumbs. Mix on medium-low speed or pulse until all ingredients are fully combined.
Scrape down the sides to ensure an even mixture without any dry spots. The mixture should look like thick cookie dough.
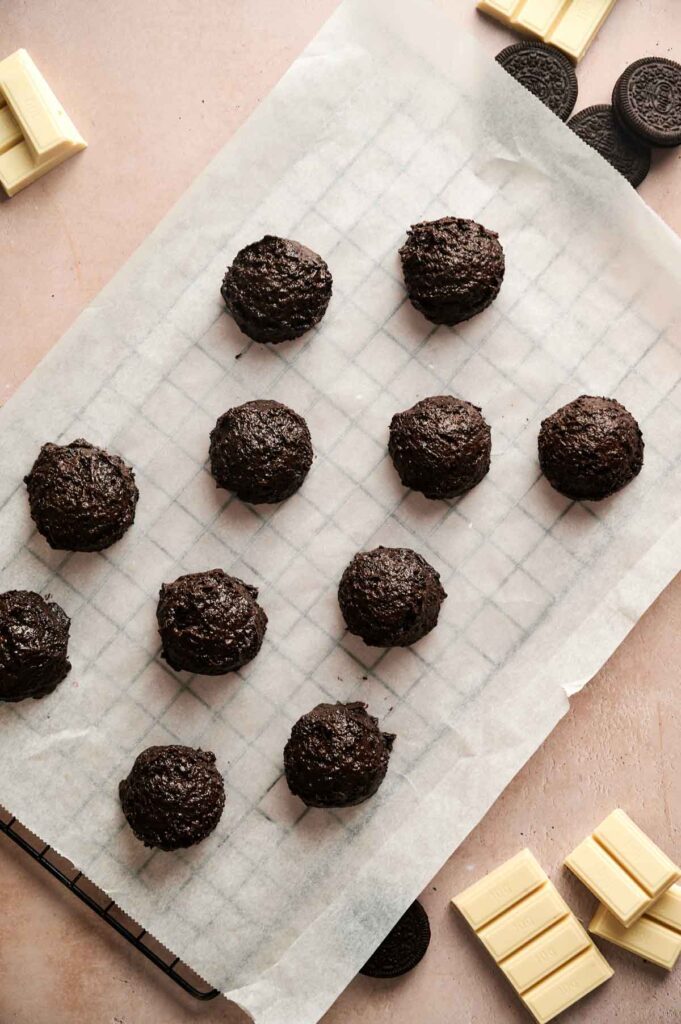
Roll Into Balls and Chill
Scoop about 1 tablespoon of the mixture, around 20 grams each, and roll it between your palms into 1-inch balls. If you want them all the same size, a kitchen scale helps with consistency.
Place them in a single layer on a baking tray lined with parchment paper or wax paper as you go. Once you’ve rolled all the balls, cover the baking sheet and refrigerate for at least 1 hour, or up to 2 days.
They need to be firm before dipping or the chocolate won’t stick properly.
Melt the White Chocolate
In a microwave-safe bowl, melt the white chocolate according to the package instructions. I usually do 30-second intervals, stirring between each one, so it’s completely smooth.
If the chocolate seems too thick for dipping, stir in a small amount of vegetable oil until it reaches a thinner, more coatable consistency.
SERIOUSLY GOOD
DESSERTS!

Dessert First is a collection of 61 RECIPES to show you that you can make beautiful, impressive desserts right in your own kitchen, no matter your skill level.
Immediate eBook download. No physical book available.
Includes ad-free recipes like:
∙ Lemon Pound Cake
∙ Key Lime Bars
∙ Boston Cream Pie
∙ No-Bake Chocolate Lasagna
∙ Raspberry Cheesecake
...and much more!
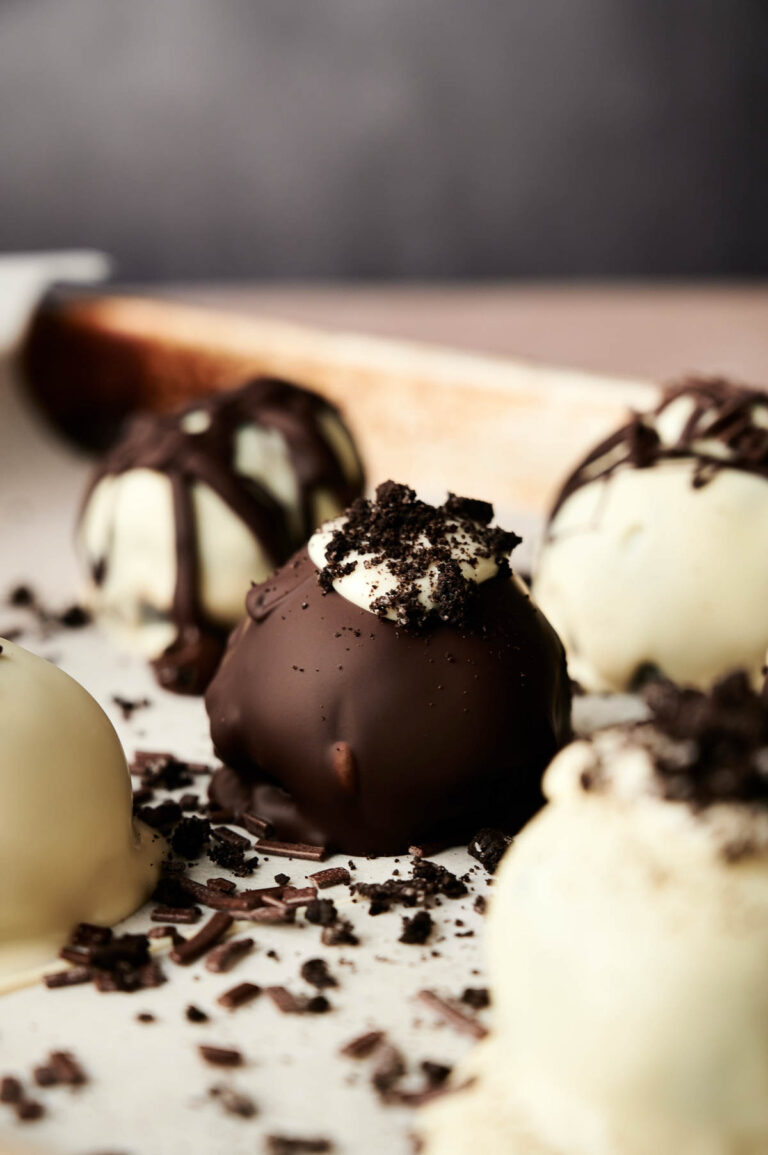
Dip Each Ball in Chocolate
Using a fork, dip cookie balls into the melted white chocolate, ensuring they’re fully coated. Gently tap the fork on the side of the bowl to let the excess chocolate drip off, then place the ball back onto the parchment paper.
Work quickly so the chocolate doesn’t harden in the bowl. This dipping tool set makes this even easier if you make these often.

Add Toppings and Let Set
While the coating is still wet, sprinkle the tops with crushed Oreos, colorful sprinkles, or drizzle with melted chocolate for decoration. Let them sit at room temperature until the chocolate hardens completely, which usually takes about 15 to 20 minutes.
If you’re in a hurry, pop them in the fridge to speed up the process.
Serve and Enjoy
Let the coated Oreo balls sit until the chocolate has hardened, then serve or store them in the refrigerator until ready to enjoy. They taste best when they’re cold and the texture is firm. Enjoy!
These transport really well for potlucks, cookie exchanges, or bringing to parties since the chocolate coating keeps them neat and mess-free. An insulated casserole carrier keeps them cold during transport, especially if you’re traveling for more than a few minutes.
If you’re gifting them, this sturdy gift box with a window lets people see the beautiful treats inside while keeping them protected during transport. Enjoy!
Ingredients
- 38 Oreo cookies
- 8 ounces cream cheese at room temperature
- 1 cup white chocolate melted
Video
Instructions
- Place the Oreo cookies in a food processor and pulse until fine crumbs form.38 Oreo cookies
- Add the softened cream cheese and mix on medium-low speed (or pulse in the processor) until smooth and fully combined. Scrape down the sides to ensure an even mixture.8 ounces cream cheese
- Scoop about 1 tablespoon of the mixture (around 20 grams each) and roll into 1-inch balls. Place them on a parchment-lined baking sheet. Cover and refrigerate for at least 1 hour, or up to 2 days, until firm.
- In a microwave-safe bowl, melt the white chocolate according to the package instructions. If it’s too thick, stir in a small amount of vegetable oil until smooth.1 cup white chocolate
- Dip each chilled ball into the melted chocolate using a fork or skewer, allowing the excess to drip off. Place back onto parchment paper.
- While the coating is still wet, top with crushed Oreos, sprinkles, or drizzle with melted chocolate.
- Let the coated Oreo balls sit until the chocolate hardens, then serve or store in the refrigerator until ready to enjoy.
Notes
- Use room-temperature cream cheese: Let it sit on the counter for about 30 minutes before mixing, so it blends smoothly with the Oreo crumbs without leaving lumps.
- Chill the balls for at least 1 hour: Refrigerate them in the fridge to ensure they’re firm enough to dip without falling apart or sliding off the fork.
- Use almond bark for easier melting: Almond bark melts smoothly than chocolate chips and sets up harder, making it perfect for coating these Oreo truffles without adding vegetable oil.
- Work in small batches when dipping: Keep the undipped balls in the fridge while you coat a few at a time so they stay cold and the chocolate sets quickly.
- Customize the toppings: Try crushed candy canes for holidays, mini chocolate chips, or colored sprinkles to match your party theme.
- Flash-freeze for easy stacking: Freeze the coated Oreo Balls on a baking sheet for 30 minutes before transferring them to a storage container to prevent them from sticking together.
Nutrition
SERIOUSLY GOOD
DESSERTS!
Dessert First is a collection of 61 RECIPES to show you that you can make beautiful, impressive desserts right in your own kitchen, no matter your skill level.
Immediate eBook download. No physical book available.
Includes ad-free recipes like:
∙ Lemon Pound Cake
∙ Key Lime Bars
∙ Boston Cream Pie
∙ No-Bake Chocolate Lasagna
∙ Raspberry Cheesecake
...and much more!
How to Store Leftovers
Store Oreo Balls in an airtight container in the refrigerator for up to 1 week. I like to layer them between sheets of parchment paper so they don’t stick together.
For longer storage, freeze them for up to 2 months. I use freezer-safe containers that seal tightly to prevent freezer burn.
When you’re ready to eat them, let them thaw in the fridge for a few hours or at room temperature for about 30 minutes. They taste amazing cold straight from the fridge, almost like little frozen truffles.
What to Serve With Oreo Balls
Oreo Balls are rich and sweet, so I like serving them alongside fresh fruit like strawberries or raspberries to cut through the chocolate. They’re great on a dessert platter with brownies, cookies, or other bite-sized treats for parties.
They pair beautifully with hot chocolate for a cozy winter treat, or serve them with vanilla ice cream for an extra indulgent dessert. If you’re hosting, arrange them on a platter with other holiday sweets for a festive display.
More Easy Dessert Recipes for You to Try at Home
You might also love these other crowd-pleasing, no-bake desserts that are perfect for parties and gatherings.
