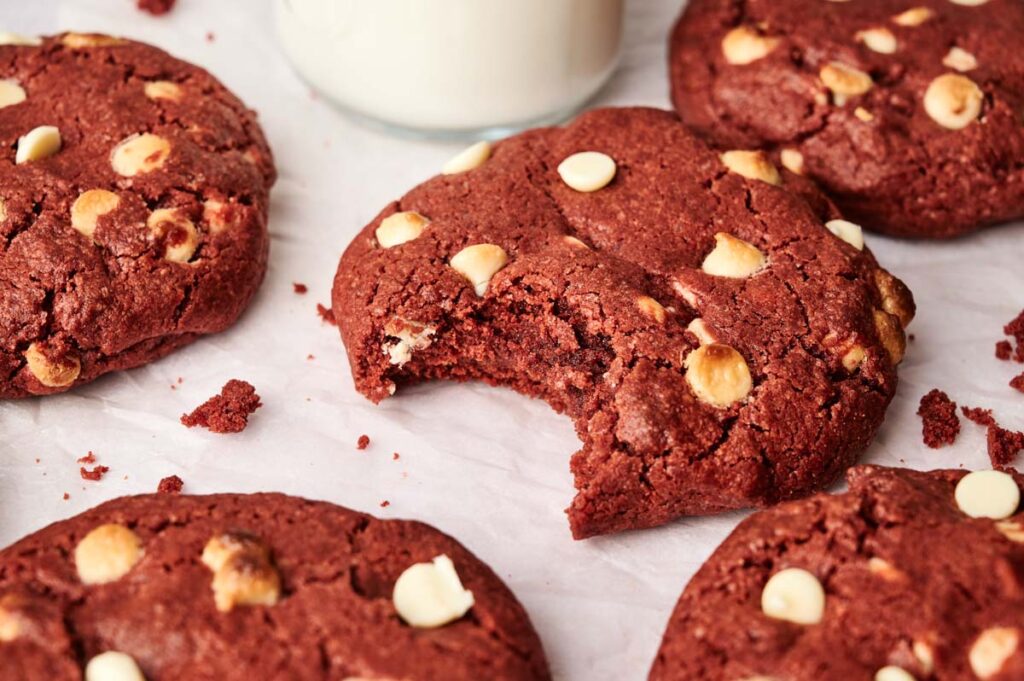
Copycat Crumbl Red Velvet White Chocolate Chip Cookies Recipe

Why spend a fortune at the bakery when you can make your own amazing red velvet cookies right at home? These Copycat Crumbl Red Velvet White Chip Cookies let you get that soft, chewy, bakery-style cookie for a fraction of the cost. Packed with rich cocoa flavor and loaded with creamy white chocolate chips, these cookies are just as delicious (if not better) than the ones you’d buy—plus, you get the fun of making them yourself
This post contains affiliate links. As an Amazon Affiliate, if you purchase through those links, I earn a small commission. Thank you!
I love seeing my family’s eyes pop at the sight of these huge cookies, and when they realize I’ve made them, it’s magical. This is a great way of saving money while still enjoying the taste of bakery cookies. Easy to make and perfect for Christmas, Valentine’s Day, potlucks, or bake sales, these crowd-pleasing cookies will soon become favorites.
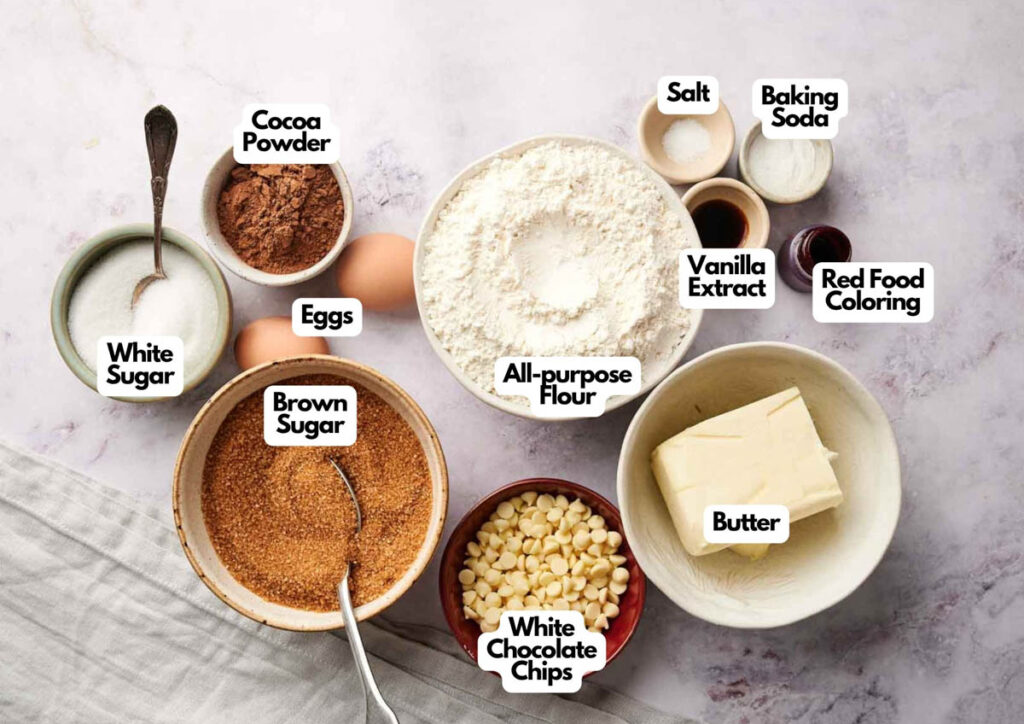
Ingredients You’ll Need
You’ll need all the ingredients shown in the photograph below.
How to Make Copycat Crumbl Red Velvet White Chocolate Chip Cookies with Step-By-Step Instructions
Scroll down for the full recipe card containing a full printable recipe and measurements in both US customary and metric units.
Making these cookies is so easy—just follow my step-by-step guide, and you’ll have bakery-quality cookies in no time!
Preheat the oven
Preheat your oven to 180°C (350°F). Getting the oven to the right temperature early ensures your cookies bake perfectly.
Cream the butter and sugars
Start by beating together softened butter, white sugar, and brown sugar until it’s light and fluffy. This creamy base is what gives the cookies their rich, buttery texture.
Add eggs and vanilla
Mix in the eggs one at a time, making sure each is fully incorporated. Then, pour in that splash of vanilla extract—this brings a warm, sweet depth to the cookies.
SERIOUSLY GOOD
DESSERTS!

Dessert First is a collection of 61 RECIPES to show you that you can make beautiful, impressive desserts right in your own kitchen, no matter your skill level.
Immediate eBook download. No physical book available.
Includes ad-free recipes like:
∙ Lemon Pound Cake
∙ Key Lime Bars
∙ Boston Cream Pie
∙ No-Bake Chocolate Lasagna
∙ Raspberry Cheesecake
...and much more!
Combine dry ingredients
In a separate bowl, sift together flour, cocoa powder, baking soda, and salt. Gradually add this to your butter mixture, and stir until it all comes together into a soft, chocolatey dough.
Add red color and white chocolate chips
Mix in the red food coloring until your dough turns that signature red velvet shade.
Gently fold in the white chocolate chips, saving a few for topping the cookies later. This gives the cookies those melty, gooey pockets of white chocolate with every bite.
Shape and bake
Divide the dough into 12 large portions—these cookies are meant to be big! Flatten them slightly on a lined baking sheet.
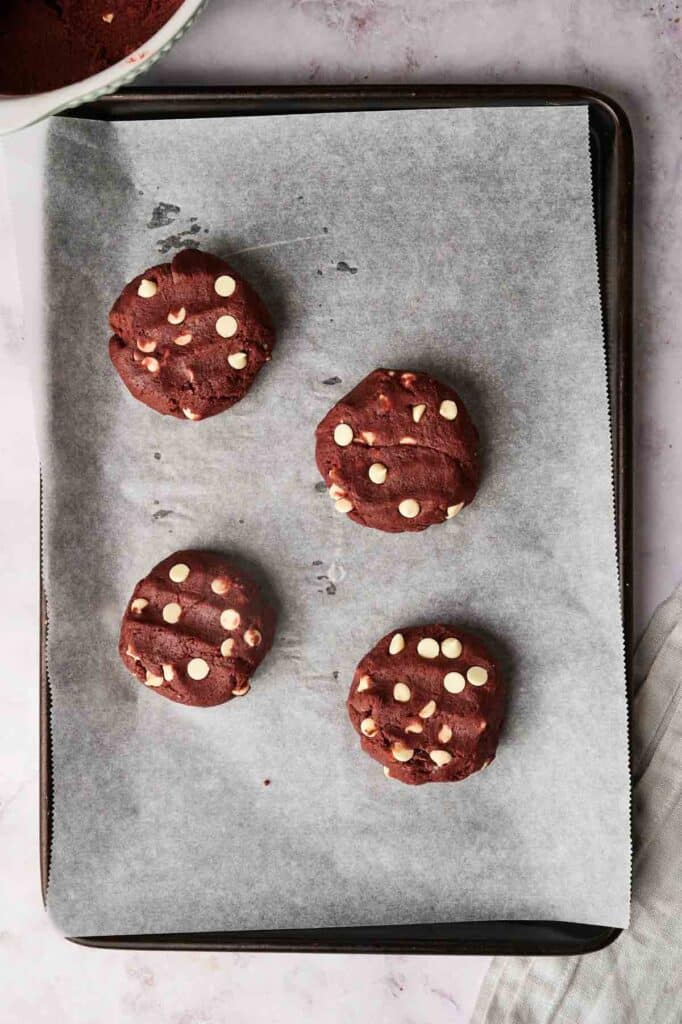
Bake at 180°C (350°F) for 12-15 minutes, just until the edges are set but the centers are still soft. That’s the sweet spot!
Cool and add extra chips
Let the cookies cool on a wire rack for approximately 10 minutes.
While they’re still warm, top them with the extra white chocolate chips for an irresistible bakery-style look and extra gooeyness.
Enjoy your cookies!

Equipment
Ingredients
- 1 ½ cups butter softened
- ½ cup sugar
- 1 ½ cups brown sugar
- 2 eggs
- 1 tablespoon vanilla extract
- 4 cups all-purpose flour
- ½ cup cocoa powder
- 2 teaspoons baking soda
- 1 teaspoon salt
- 1 tablespoon red food coloring
- 2 cups white chocolate chips
Instructions
- Preheat your oven to 180ºC (350°F) and line two baking sheets with parchment paper.
- In a large bowl, cream together the softened butter, granulated sugar, and brown sugar until the mixture is light and fluffy. This should take about 2-3 minutes with an electric mixer.1 ½ cups butter, ½ cup sugar, 1 ½ cups brown sugar
- Add the eggs one at a time, beating well after each addition. Stir in the vanilla extract until fully blended and smooth.2 eggs, 1 tablespoon vanilla extract
- In a separate bowl, sift together the flour, cocoa powder, baking soda, and salt. Gradually add the dry ingredients to the wet mixture, mixing on low speed until the dough comes together. The dough will be soft and slightly sticky.4 cups all-purpose flour, ½ cup cocoa powder, 2 teaspoons baking soda, 1 teaspoon salt
- Mix in the red food coloring until the dough has an even, bright red color. Gently fold in the white chocolate chips, saving a handful for topping the cookies later.1 tablespoon red food coloring, 2 cups white chocolate chips
- Portion out the dough into 12 large balls (each about ½ cup of dough) and place 6 balls on each prepared baking sheet. Make sure to leave enough space between each cookie as they will spread. Flatten each cookie slightly with your hand.
- Bake in the preheated oven for 12-15 minutes, until the edges are set but the centers remain soft. Let the cookies cool on the baking sheet for at least 10 minutes before transferring them to a wire rack to cool completely.
- For an extra touch, press a few more white chocolate chips onto the tops of the warm cookies before they finish cooling. Serve once cooled or store in an airtight container for up to 5 days.
Notes
- Softened butter matters: Your butter should be soft but not melted. This helps create that perfect soft and chewy texture.
- Measure flour carefully: Use the spoon-and-level method to avoid packing in too much flour, which could make your cookies dense instead of tender.
- Food coloring tip: Gel-based food coloring works best for that bold red velvet look without thinning the dough.
- Chill for thicker cookies: If you like thicker cookies, refrigerate the dough for about 30 minutes before baking.
- Watch your spacing: These cookies are big and will spread, so leave plenty of space between them on the baking sheet.
- Underbake slightly for soft centers: Take the cookies out when they’re just set at the edges. They’ll continue to cook as they cool, giving you that perfectly soft center.
- Extra chips for looks: Press extra white chocolate chips into the cookies while they’re still warm for that bakery-perfect finish.
Nutrition
SERIOUSLY GOOD
DESSERTS!
Dessert First is a collection of 61 RECIPES to show you that you can make beautiful, impressive desserts right in your own kitchen, no matter your skill level.
Immediate eBook download. No physical book available.
Includes ad-free recipes like:
∙ Lemon Pound Cake
∙ Key Lime Bars
∙ Boston Cream Pie
∙ No-Bake Chocolate Lasagna
∙ Raspberry Cheesecake
...and much more!
Recipe Notes and Expert Tips
Here are a few of my tips to make sure your cookies turn out amazing every time:
- Softened butter matters: Your butter should be soft but not melted. This helps create that perfect soft and chewy texture.
- Measure flour carefully: Use the spoon-and-level method to avoid packing in too much flour, which could make your cookies dense instead of tender.
- Food coloring tip: Gel-based food coloring works best for that bold red velvet look without thinning the dough.
- Chill for thicker cookies: If you like thicker cookies, refrigerate the dough for about 30 minutes before baking.
- Watch your spacing: These cookies are big and will spread, so leave plenty of space between them on the baking sheet.
- Underbake slightly for soft centers: Take the cookies out when they’re just set at the edges. They’ll continue to cook as they cool, giving you that perfectly soft center.
- Extra chips for looks: Press extra white chocolate chips into the cookies while they’re still warm for that bakery-perfect finish.
How to Store Leftover Red Velvet White Chocolate Chip Cookies
Store any leftover cookies in an airtight These cookies stay soft and fresh when stored properly. Keep any leftovers in an airtight container at room temperature for up to 5 days.
To maintain that fresh-baked texture, place a slice of bread in the container with the cookies. The moisture from the bread will help keep them soft.
If you want to keep them for longer, you can freeze them. Once the cookies have completely cooled, place them in a single layer on a baking sheet and freeze for about an hour.
After they’re frozen, transfer them to a freezer-safe container or bag. They’ll keep well for up to 2 months.
More Easy Cookie Recipes for You to Try at Home
If you love cookies as much as I do, then you should check out these delicious recipes.
