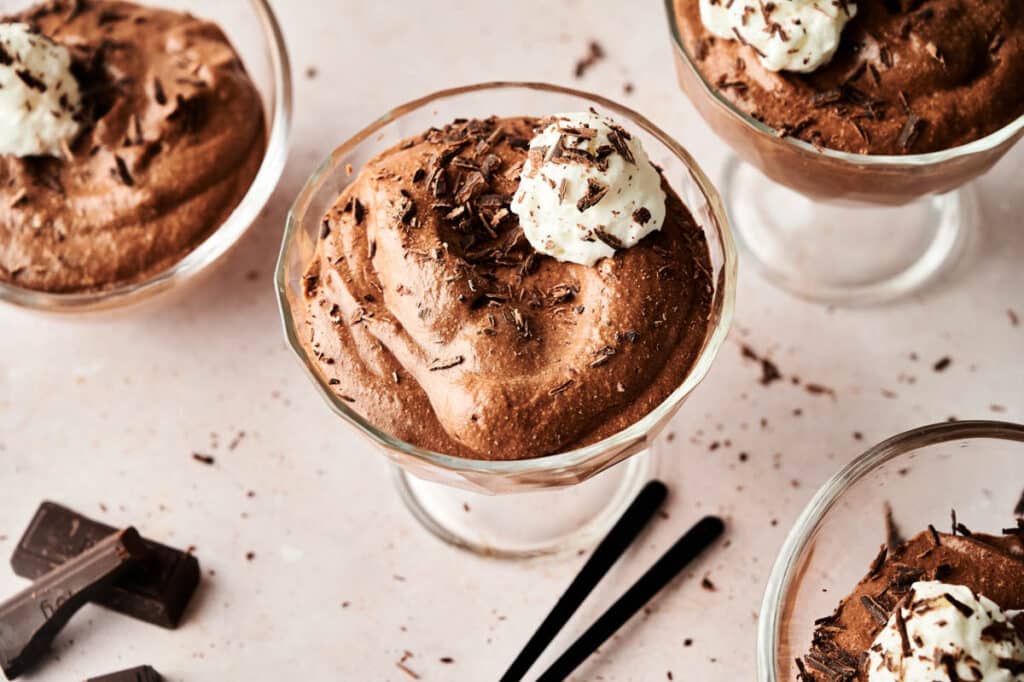
Chocolate Mousse

Chocolate Mousse makes me feel like I’m treating myself to something truly special. The texture is impossibly light and airy, while the chocolate flavor stays rich and deep. Every spoonful melts on your tongue in a way that feels indulgent without being heavy. It’s elegant enough for a dinner party but comforting enough to enjoy curled up at home.
This post contains affiliate links. As an Amazon Affiliate, if you purchase through those links, I earn a commission. Thank you!
Whether it’s Valentine’s Day, Christmas Eve, or a cozy date night for chocolate lovers, this dessert always feels right. I love that it’s simple to prep, stores well, and tastes even better once it’s chilled. It’s one of those easy chocolate mousse recipes you can make ahead without any stress, giving you more time to just enjoy the moment.
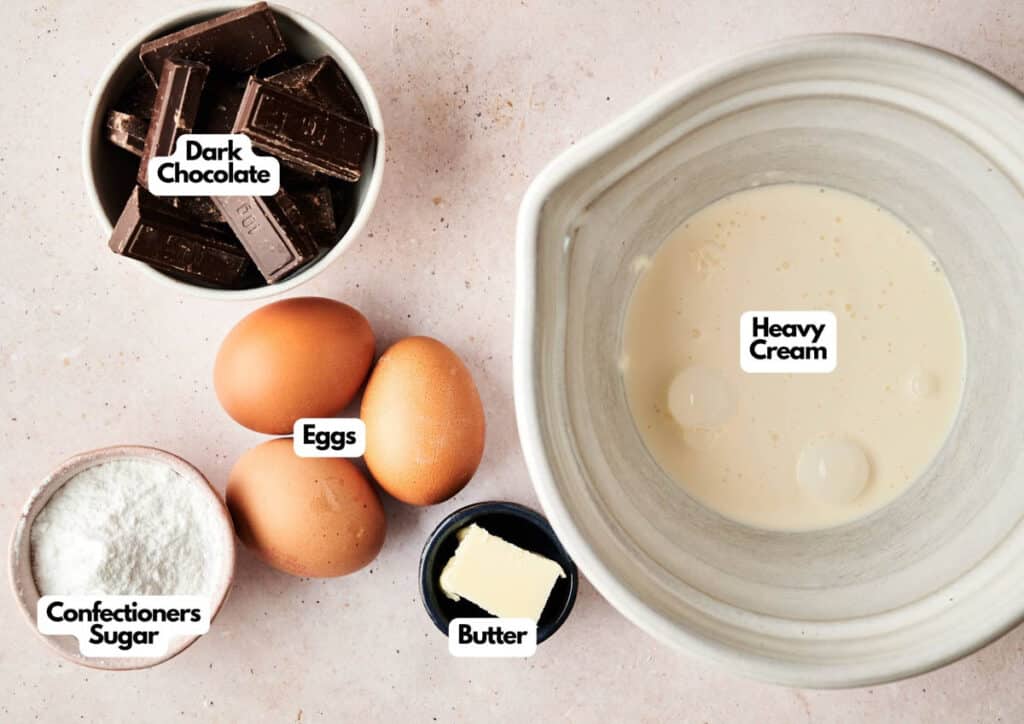
Ingredients You’ll Need
You’ll need all the ingredients shown in the photograph below.
How to Make Chocolate Mousse with Step-By-Step Instructions
Scroll down for the full recipe card containing a full printable recipe and measurements in both US customary and metric units.
If you follow my simple instructions, you’ll see how easy and satisfying it is to make this classic dessert at home.
Separate and Prep the Eggs
Start by separating the yolks from the whites while the raw eggs are still cold; it’s much easier this way. To make the job cleaner and avoid broken yolks, I use an egg separator that rests neatly on top of a bowl.
Place the yolks in a small bowl and the whites in a large or medium bowl, so you’d have enough room to beat. Having a glass mixing bowl set with a lid is a game-changer for preps like this. Set them aside to come to room temperature, which helps them whip up beautifully later on.
Whip and Chill Heavy Cream
In a chilled mixing bowl, whip the heavy cream until soft peaks form. The cream should hold its shape but still look smooth and silky. Keep it in the refrigerator so it stays firm and deepens in flavor while you work on the next steps.
It’s best to cover the bowl loosely with plastic wrap if you’re not using one with a lid, to prevent the cream from absorbing any fridge odors or drying out. I keep a roll of BPA-free plastic wrap handy for when I need to keep my food sealed and fresh.
Melt the Chocolate and Butter
Cut the dark chocolate into small pieces and add them to a microwave-safe bowl, along with the butter. Heat in short 1-minute bursts, stirring after each interval until smooth and glossy without any lumps.
You can also melt them gently on the stovetop using a nonstick saucepan with pour spout that makes it easy to control the heat and transfer smoothly.
Let it cool slightly for about a minute or two, so it won’t cause the eggs to curdle or scramble later, but also keep it just warm enough to stay liquid and easy to blend.
Beat Egg Whites and Add Sugar
Using a hand mixer or a stand mixer with a whisk attachment, beat the egg whites until they form stiff peaks. I like using this powerful hand mixer, which gives me full control every time.
For bigger batches or more hands-free mixing, I pull out my tilt-head stand mixer for whipping egg whites effortlessly. Gradually add the confectioner’s sugar and beat again just until the sugar dissolves and the whites turn glossy. This is what gives the mousse its signature lift.
SERIOUSLY GOOD
DESSERTS!

Dessert First is a collection of 61 RECIPES to show you that you can make beautiful, impressive desserts right in your own kitchen, no matter your skill level.
Immediate eBook download. No physical book available.
Includes ad-free recipes like:
∙ Lemon Pound Cake
∙ Key Lime Bars
∙ Boston Cream Pie
∙ No-Bake Chocolate Lasagna
∙ Raspberry Cheesecake
...and much more!
Add Yolks and Chocolate to the Cream
Take the whipped cream out of the fridge and gently whisk in the egg yolks, then slowly pour in the warm, but slightly cooled melted chocolate. Stir gently until just combined.
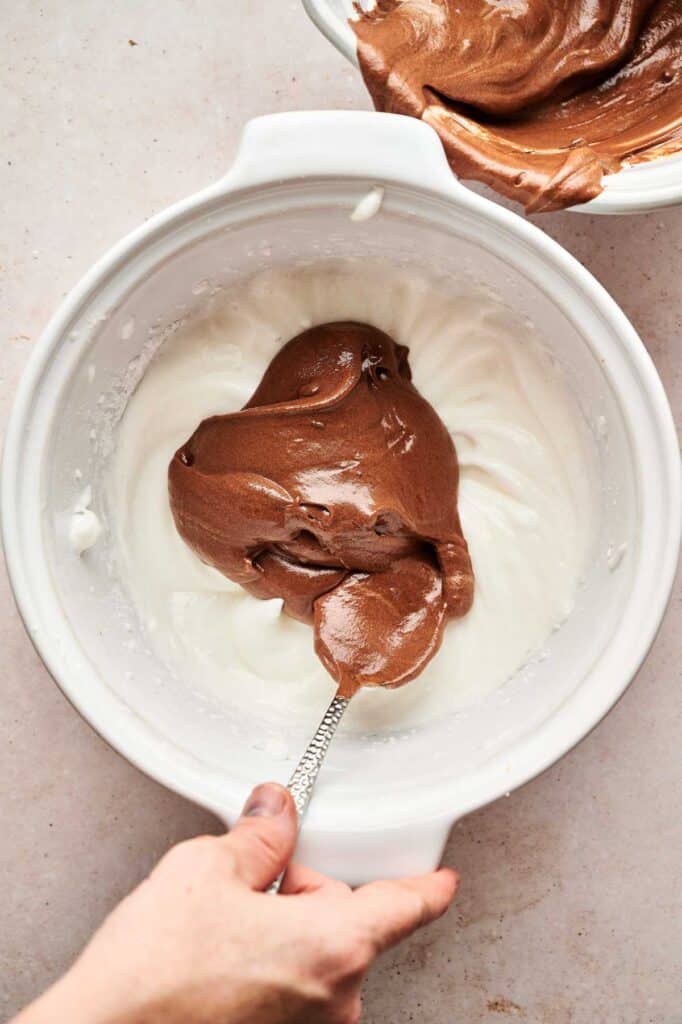
Combine Chocolate and Egg Whites
Now, carefully fold the chocolate mixture, a little at a time, into the whipped egg whites. When you add the chocolate cream gradually, you keep the textures balanced and the chilled whipped cream from deflating.
It’s best to use a folding motion here with a spatula, turning the bowl as you go, to keep as much air in the mixture as possible. A flexible silicone spatula like this one helps you fold gently without deflating the mixture and scrape down the sides cleanly.
Work slowly and stop as soon as everything looks uniform to keep it light and airy; overmixing will deflate the mousse and make it dense instead of fluffy.
Chill Before Serving and Enjoy
Spoon the mousse into small serving cups or ramekins, smoothing the tops or giving them a light swirl with the back of a spoon. I love using these ceramic ramekins that stack nicely as they chill.
You can also use these Italian dessert cups, trifle glasses, or ice cream bowls for a fancier feel. Refrigerate for at least 4 hours, or until firm and set.
When ready to serve, top each one with a dollop of whipped cream and a sprinkle of chocolate shavings for a little extra sweetness. Enjoy!

Equipment
Ingredients
- 3 pasteurized eggs cold
- 1 cup dark chocolate
- 1 tablespoon butter
- ½ cup heavy cream full fat
- ¼ cup confectioners’ sugar
For topping:
- Whipped cream
- Chocolate shavings
Video
Instructions
- Separate the yolks from the whites and set aside.3 pasteurized eggs
- In a bowl, whip the heavy cream until soft peaks form.½ cup heavy cream, Whipped cream
- In a microwave-safe bowl, heat the dark chocolate and butter in 1-minute intervals, stirring after each, until smooth. Let cool slightly.1 cup dark chocolate, 1 tablespoon butter
- Beat the egg whites until stiff peaks form. Add the confectioners’ sugar and beat just until incorporated. Gently mix in the egg yolks.¼ cup confectioners’ sugar
- Slowly pour the melted chocolate into the egg mixture, folding gently until just combined. Add the cream mixture, folding carefully to keep the mixture light and airy.
- Spoon the mousse into 4 small serving cups and refrigerate for at least 4 hours, or until set.
- Top with whipped cream and chocolate shavings before serving.Chocolate shavings
Notes
- Start with pasteurized eggs for safety: Pasteurized eggs ensure this no-bake dessert stays velvety and safe to enjoy while keeping the texture silky, velvety, and stable.
- Choose your chocolate: Use milk chocolate to make it sweeter or stir in a little cocoa to deepen the chocolate flavor and color. You can also experiment with different types of chocolate, like semisweet, bittersweet, or white, to create subtle variations in taste.
- Handle melting with care: If using the stovetop, always melt chocolate and butter gently over medium-low heat to avoid scorching. Keep stirring until it’s smooth and glossy; good quality chocolate chips melt just as beautifully and easily, if handled the same way.
- Use powdered sugar for smoother blending: Replace confectioner’s sugar with powdered sugar if you want a finer, silkier sweetness that dissolves effortlessly into the egg whites.
- Improve texture and stability: Chill the mixing bowl and beaters before whipping to give your whipped cream better stability. You could also beat the egg whites to medium peaks instead of stiff ones to create a lighter, fluffier mousse that still holds its airy structure.
- Add gelatin for extra structure: Dissolve a teaspoon of unflavored gelatin in warm water and fold it in once the chocolate and cream are combined for a mousse that holds its shape longer. This is especially great if you plan to pipe or layer it.
- Enhance balance with vanilla: A small splash of vanilla extract brings out the richness of the chocolate and adds a smooth, rounded note to the overall flavor.
- Fold, don’t stir: Use gentle motions when mixing to preserve all the airy volume that gives mousse its lightness.
Nutrition
SERIOUSLY GOOD
DESSERTS!
Dessert First is a collection of 61 RECIPES to show you that you can make beautiful, impressive desserts right in your own kitchen, no matter your skill level.
Immediate eBook download. No physical book available.
Includes ad-free recipes like:
∙ Lemon Pound Cake
∙ Key Lime Bars
∙ Boston Cream Pie
∙ No-Bake Chocolate Lasagna
∙ Raspberry Cheesecake
...and much more!
How to Store Leftovers
To store leftovers, cover each cup tightly with plastic wrap and refrigerate for up to 3 days. If you’re using ramekins, you can also fit them inside a stackable glass container to keep them intact and fresh without absorbing other fridge odors.
These clear square dessert containers are also great for easier storage and grab-and-go. For longer storage, freeze the mousse for up to 2 months. Just make sure it’s tightly sealed and covered to keep it safe and thaw it overnight in the refrigerator before serving.
You can place the mousse in a durable freezer container or an ice cream tub to avoid freezer burn or forming ice crystals. Or portion in into a freezer bag if you want to save freezer space. It will still taste delicious, though the texture may be slightly denser once frozen and thawed.
What to Serve With Chocolate Mousse
Chocolate Mousse pairs beautifully with something light and fresh, like a handful of raspberries or strawberries. Pair it with a slice of light vanilla sponge or chocolate cake for texture contrast.
You can also serve it alongside buttery shortbread cookies or a small glass of espresso to balance out the richness. It’s elegant enough for a dinner party but simple enough to enjoy on a cozy night in.
More Easy Recipes for You to Try at Home
I’ve got plenty more easy dessert recipes that hit that same balance of comfort and elegance, perfect for when you want to treat yourself without a lot of fuss.
