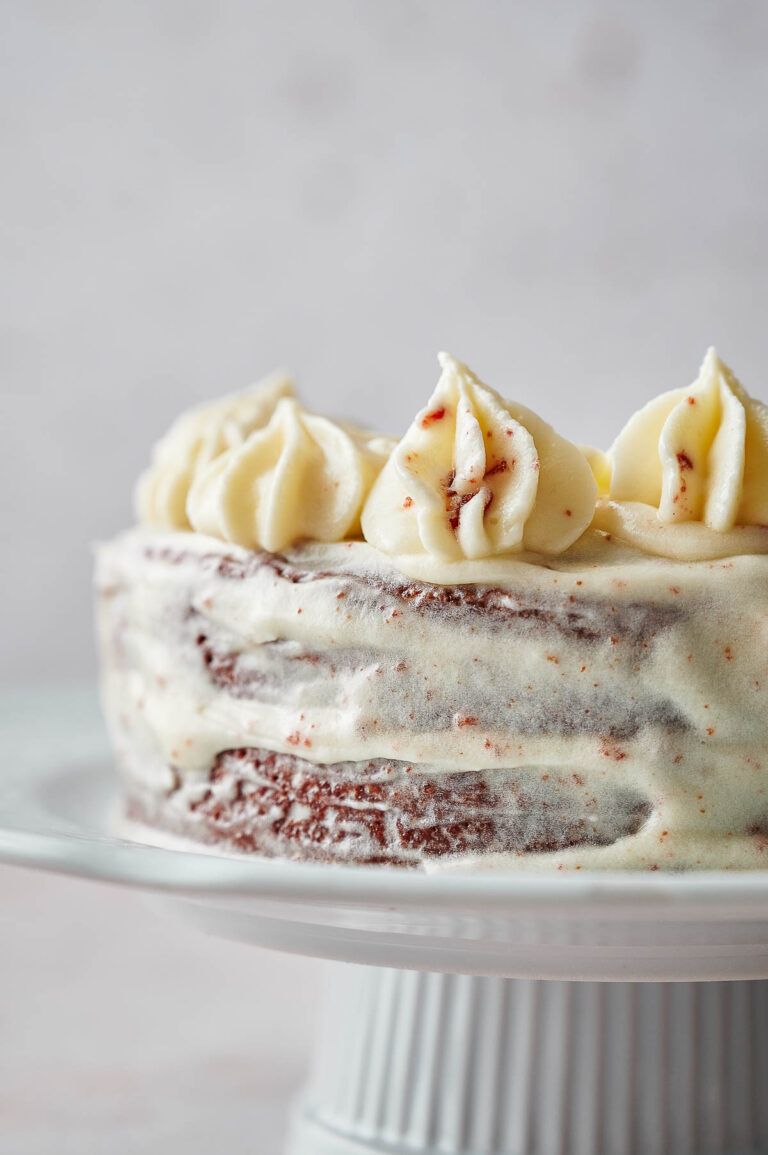
Red Velvet Cake
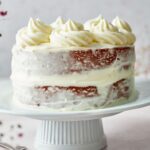
Red Velvet Cake has always been my favorite special-occasion dessert, and this recipe is a keeper. The layers bake up soft and tender with that signature hint of cocoa. Fluffy cream cheese frosting between each layer adds tangy sweetness that balances everything perfectly. You’ll have people asking for seconds before you finish slicing.
This post contains affiliate links. As an Amazon Affiliate, if you purchase through those links, I earn a commission. Thank you!
I make this for birthdays, Valentine’s Day, Christmas, and anniversary celebrations when I want a dessert that really wows. The layers can be baked a day ahead and frosted the morning of your event, making party prep easier. It looks stunning on a cake stand and feeds a crowd beautifully. It stays fresh in the fridge for up to 3 days or in the freezer for up to 3 months.
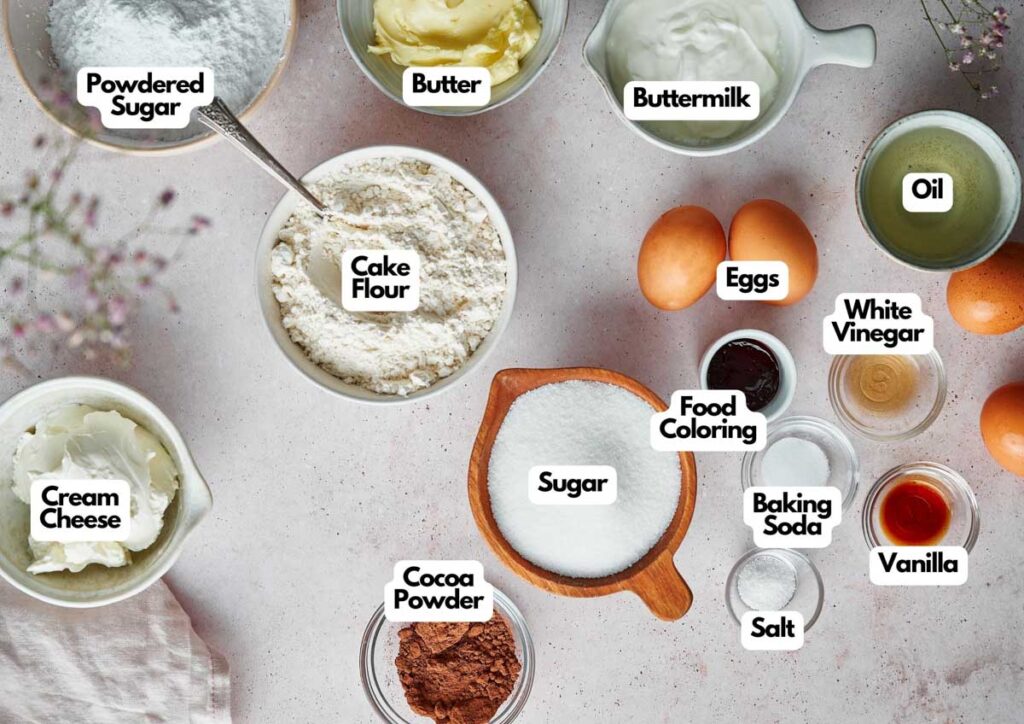
Ingredients You’ll Need
You’ll need all the ingredients shown in the photograph below.
How to Make Red Velvet Cake with Step-By-Step Instructions
Scroll down for the full recipe card containing a full printable recipe and measurements in both US customary and metric units.
Making red velvet cake from scratch is easier than you think, and the results are so much better than box mix.
Preheat and Prepare Your Pans
Preheat your oven to 350°F/177°C now for even baking, and grease your cake pans. I use nonstick springform pans so I can easily release the cakes.
Combine Dry Ingredients
In a large mixing bowl, whisk together the cake flour, cocoa powder, baking soda, and salt, then set it aside. I use unsweetened here but natural cocoa powder also works fine.
Mix the Wet Ingredients
Using a stand mixer fitted with a paddle attachment or a handheld electric mixer, beat your butter and sugar until fully combined, approximately 1 minute in a medium bowl. Using a stand mixer makes the mixing process effortless and creates perfectly smooth mixture every time.
Add the oil (you can use canola or vegetable oil), egg yolks, vinegar, and vanilla extract, scraping the sides as needed with a silicone rubber spatula to make sure everything gets incorporated evenly, and beat on high speed for 2 minutes.
Combine and Add Buttermilk
Reduce the mixer speed to low and gradually add in the flour mixture, a third at a time, alternating it with buttermilk.
If you don’t have buttermilk, mix 1 cup regular milk with 1 tablespoon white vinegar or lemon juice, let it sit for 5 minutes until it curdles, and use it as a direct substitute. Regular milk alone won’t work because you need the buttermilk’s acidity for the cake rise.
Another alternative is sour cream; it gives a tangier flavor, but using just sour cream might make the batter slightly thicker and the crumb denser. If you’ve really got no other option, you can thin it out with extra liquid, like milk.
SERIOUSLY GOOD
DESSERTS!

Dessert First is a collection of 61 RECIPES to show you that you can make beautiful, impressive desserts right in your own kitchen, no matter your skill level.
Immediate eBook download. No physical book available.
Includes ad-free recipes like:
∙ Lemon Pound Cake
∙ Key Lime Bars
∙ Boston Cream Pie
∙ No-Bake Chocolate Lasagna
∙ Raspberry Cheesecake
...and much more!
Add Color
Add your red food coloring and beat until combined. As much as possible, I use liquid food coloring because it distributes more evenly throughout the batter than gel versions.
Whip the Egg Whites
Switch to high speed, and then, in a separate bowl, beat the egg whites until you have fluffy peaks, approximately 3 minutes. Gently fold the mixture into the cake batter using a folding motion to keep the airiness intact.
Bake the Layers
Divide batter evenly between two prepared pans and bake until a cake tester or a toothpick inserted comes out clean and the tops spring back when gently touched, with a bake time of approximately 30 minutes.
Be careful not to overbake, as it can dry out the cake; you want it super moist with a velvety crumb. Leave to cool completely on a wire cooling rack before frosting.
Make the Cream Cheese Frosting
Using a stand mixer fitted with a whisk attachment or handheld electric mixer on medium speed, beat the butter and cream cheese together in a large bowl for 2 minutes.
Add the vanilla extract, confectioners sugar, and salt, set the speed to high, and beat until fully combined and creamy for about 3 minutes. Your cream cheese frosting will be soft but not runny. If it is, add a little more sifted powdered sugar.
Assemble the Cake
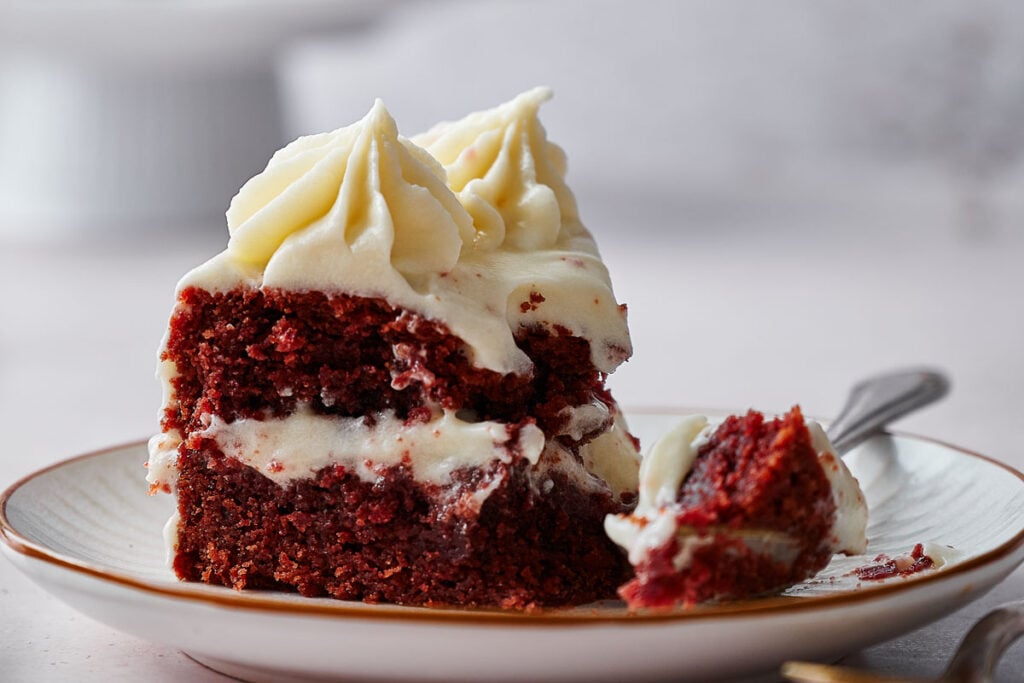
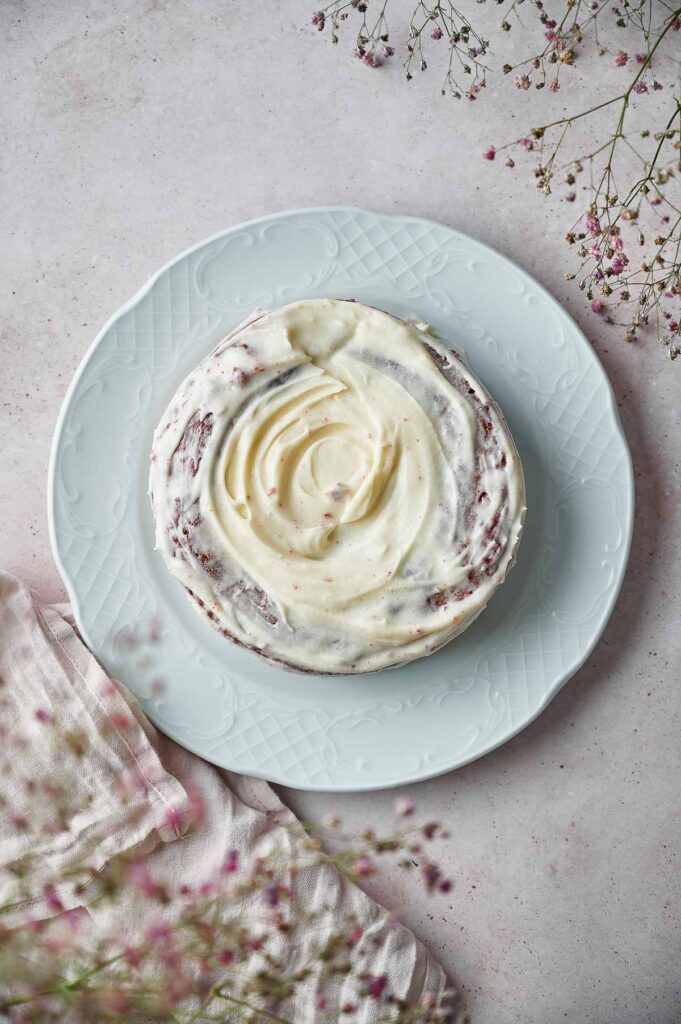
To create flat surfaces, use a serrated knife to slice off the tops of the cake layers. Place the first cake on your cake stand and cover evenly with your fluffy frosting. Add the second layer on top of the frosting, then frost the top and sides using an offset spatula or a bench scraper.
You can also use a reusable piping bag set with metal tips to pipe a decorative border, then add strawberries, raspberries, or mixed berries if desired. Sometimes, I serve it with my homemade strawberry topping, and it’s a win!
Slice and Serve
Get your knife and slice the cake, wiping the blade clean between each cut for neat edges. Serve on a serving plate and enjoy!
This moist red velvet cake travels surprisingly well to potlucks and gatherings. Just chill the frosted cake in the fridge for at least 1 hour before transporting so the cream cheese frosting sets firmly and won’t slide.
Use a hard-sided cake container with a secure lid to protect the layers during travel, and place it on a flat surface in your car where it won’t tip. If you’re traveling in warm weather, keep the cake cool with ice packs in a round insulated carrier placed around the carrier.
Equipment
Ingredients
- 3 cups cake flour
- 2 tablespoons unsweetened cocoa powder
- 1 teaspoon baking soda
- ½ teaspoon salt
- ½ cup unsalted butter softened to room temperature
- 2 cups granulated sugar
- 1 cup oil canola or vegetable oil
- 4 large eggs yolks and whites separated
- 1 teaspoon distilled white vinegar
- 1 tablespoons vanilla extract
- 1 cup buttermilk
- 2 tablespoons red food coloring
Making the frosting
- ¾ cup unsalted butter softened to room temperature
- 16 ounces cream cheese
- 2 teaspoons vanilla extract
- 5½ cups confectioner's sugar
- 1 pinch salt
Instructions
- Preheat your oven to 350°F/180°C and grease your cake pans
Making the cake
- In a large mixing bowl, whisk flour, cocoa powder, baking soda, and salt and set aside3 cups cake flour, 2 tablespoons unsweetened cocoa powder, 1 teaspoon baking soda, ½ teaspoon salt
- Next, use a stand mixer fitted with a paddle attachment or a handheld electric mixer, beat your butter and sugar until fully combined, approximately 1 minute. Now, add oil, egg yolks, vinegar, and vanilla extract, scraping the sides as needed with a rubber spatula, and beat on high speed for 2 minutes.½ cup unsalted butter, 2 cups granulated sugar, 1 cup oil, 4 large eggs, 1 teaspoon distilled white vinegar, 1 tablespoons vanilla extract
- Reduce the speed to low and add in your flour mixture, a third at a time, and alternate it with buttermilk. Add your food coloring and beat it until combined1 cup buttermilk, 2 tablespoons red food coloring
- Switch to high speed, and then, in a separate bowl, beat the egg whites until you have fluffy peaks, approximately 3 minutes4 large eggs
- Now gently fold the mixture into the cake batter. Divide your batter between two pans and bake until a toothpick comes out clean when inserted and the tops spring back when gently touched, approximately 30 minutes, be careful not to overbake. Leave to completely cool
Making the frosting
- Using a stand mixer fitted with a whisk or handheld electric mixer on medium speed beat butter and cream cheese together in a large bowl for 2 minutes. Then, add vanilla extract, confectioners sugar, and salt set the speed to high, and beat until fully combined and creamy, approximately 3 minutes. Your frosting will be soft but not runny, if it is, add a little more confectioners sugar¾ cup unsalted butter, 16 ounces cream cheese, 2 teaspoons vanilla extract, 5½ cups confectioner's sugar, 1 pinch salt
Assembly
- To create flat surfaces, use a serrated knife to slice off the tops of the cakes. Place the first cake on your cake stand and cover evenly with frosting, add the second layer on top of the frosting, and then cover the top and sides with frosting. Optional; use a piping bag to pipe a decorative border, and add strawberries, raspberries, or mixed berries. Serve and enjoy!
Notes
Nutrition
SERIOUSLY GOOD
DESSERTS!
Dessert First is a collection of 61 RECIPES to show you that you can make beautiful, impressive desserts right in your own kitchen, no matter your skill level.
Immediate eBook download. No physical book available.
Includes ad-free recipes like:
∙ Lemon Pound Cake
∙ Key Lime Bars
∙ Boston Cream Pie
∙ No-Bake Chocolate Lasagna
∙ Raspberry Cheesecake
...and much more!
How to Store Leftovers
Store leftover cake in an airtight container in the fridge for up to 3 days since the cream cheese frosting needs refrigeration. Let it sit at room temperature for about 20 minutes before serving so the cake softens and the flavors come through.
For longer storage, wrap each slice of red velvet cake tightly in plastic wrap, then place it in a freezer container or freezer bag, and freeze for up to 3 months. Thaw frozen slices in the fridge overnight, then bring to room temperature before eating for the best texture.
What to Serve With Red Velvet Cake
This cake pairs wonderfully with a scoop of vanilla ice cream or a dollop of whipped cream for extra richness. I also love serving it alongside fresh berries like strawberries or raspberries, which add a bright, tart contrast to the sweet cream cheese frosting.
For a complete dessert spread, you could enjoy it with a cup of coffee, hot chocolate, or cold milk. The mild cocoa flavor and creamy frosting make it versatile enough to complement just about any beverage or fruit you have on hand.
More Easy Recipes for You to Try at Home
Check out these other easy desserts that deliver that same wow factor.
