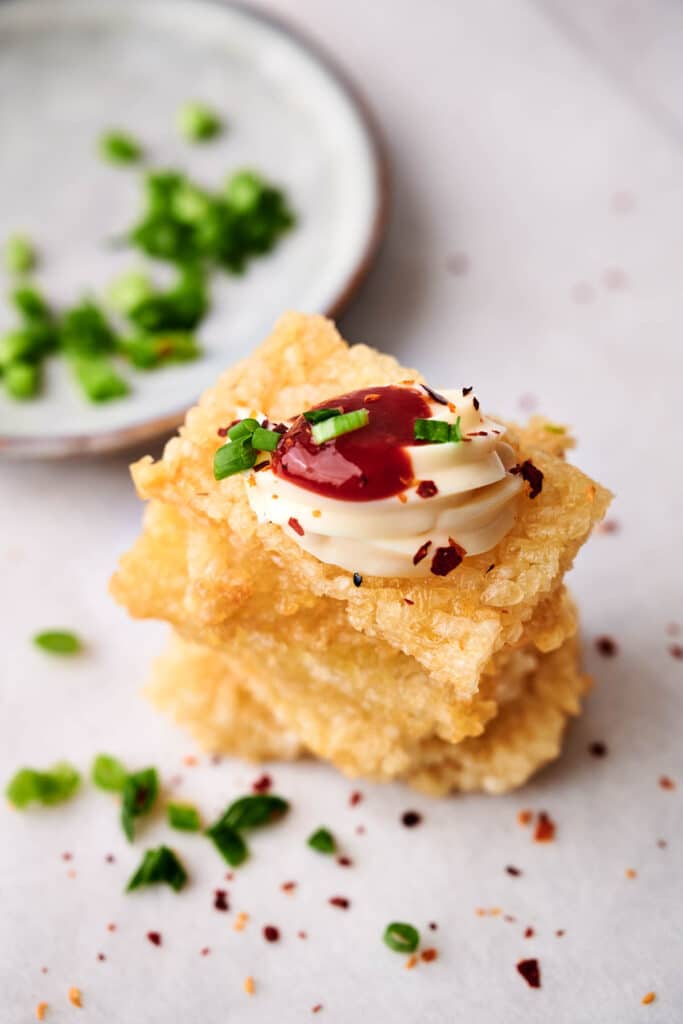
Easy Crispy Rice Recipe

Crispy rice is all about texture—light, crunchy on the outside, and soft on the inside. My simple recipe takes basic sushi rice and transforms it into golden, crispy rice cakes that pair well with a variety of toppings or dipping sauces. Whether you’re making them for a snack or an appetizer, these fried rice cakes deliver the perfect bite.
This post contains affiliate links. As an Amazon Affiliate, if you purchase through those links, I earn a commission. Thank you!
When I need a crowd-pleasing appetizer, crispy rice is always a win. Whether for a gathering or weekend spread, these golden, crunchy bites disappear fast. I can prep them ahead, chill the rice, and fry when ready—perfect for stress-free entertaining.
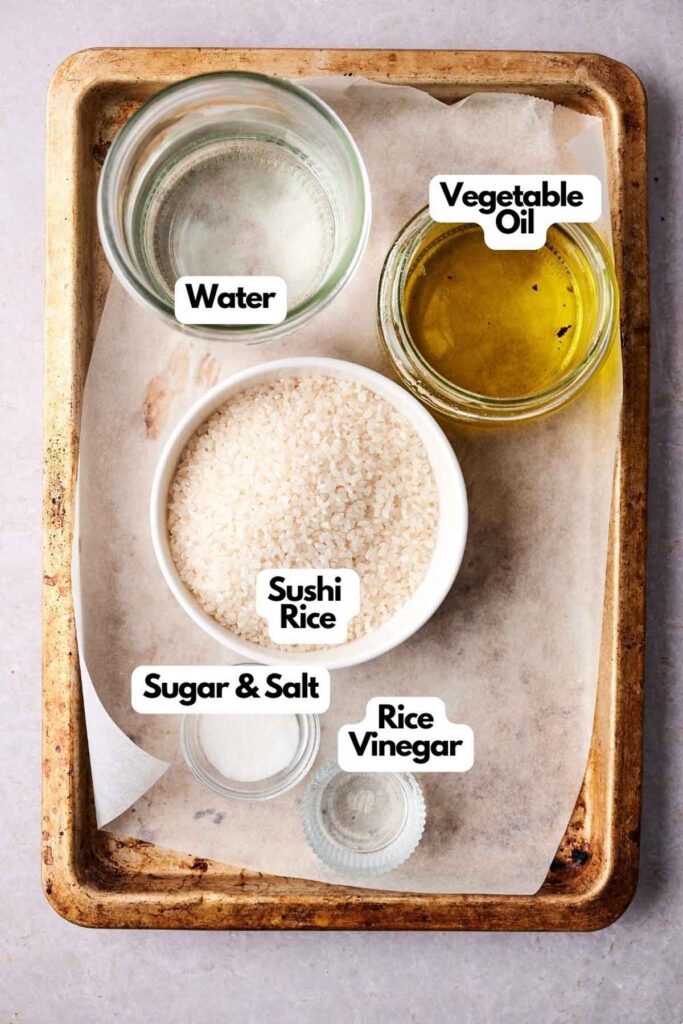
Ingredients You’ll Need
You’ll need all the ingredients shown in the photograph below.
How to Make Crispy Rice with Step-By-Step Instructions
Scroll down for the full recipe card containing a full printable recipe and measurements in both US customary and metric units.
Follow my simple instructions, and you’ll find making crispy rice is easier than you think.
Rinse and Soak the Rice
Place the sushi rice in a large bowl and cover it with water. Stir the rice in circular motions, then drain the water. Repeat this process at least four times until the water runs clear.
Removing excess starch is key to achieving the right texture. After draining, let the rice sit for 20 minutes to absorb any remaining moisture.
Cook the Rice
Transfer the rice to a pot and add fresh water. Bring it to a boil over medium-high heat, then reduce the heat to low, cover, and let it simmer for 12 minutes.
Keeping the lid on, turn off the heat and allow the rice to continue steaming for another 10 minutes. This resting period ensures even cooking and prevents mushy rice.
Season the Rice
In a small bowl, combine rice vinegar, sugar, and salt. Heat the mixture in the microwave for a few seconds, stirring until the sugar dissolves completely.
Transfer the cooked rice to a large tray, drizzle the seasoning over it, and mix well to ensure every grain is evenly coated.
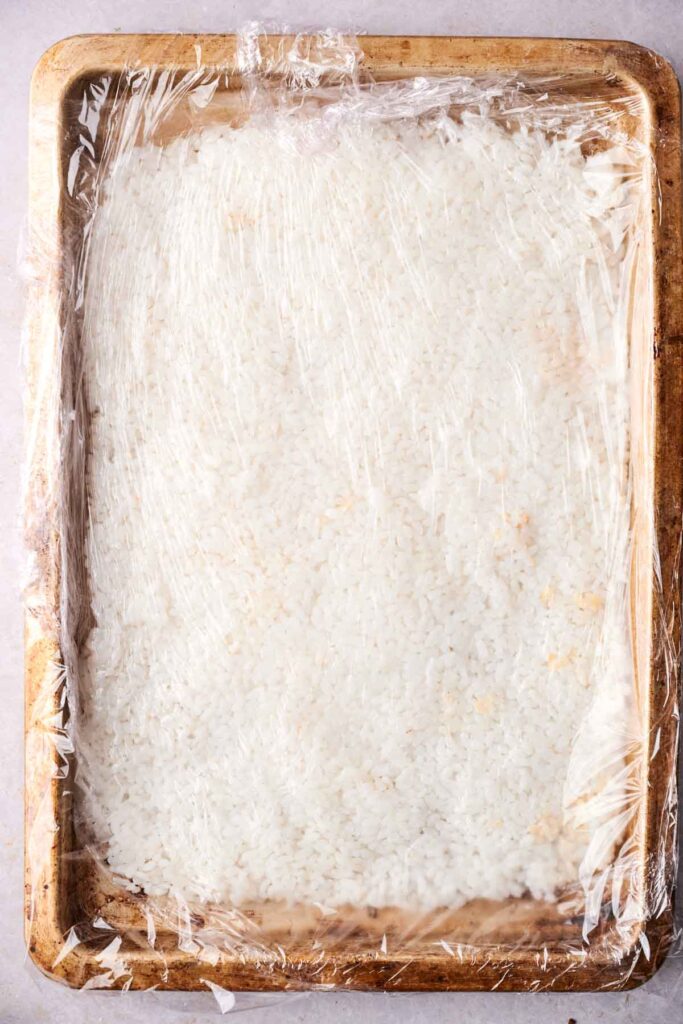
Shape and Chill the Rice
Line a baking tray with plastic wrap and spread the rice into a thin layer about ½ inch thick. Press it down gently but firmly to create a compact, uniform surface.
Cover with another layer of plastic wrap and refrigerate for at least two hours. Chilling the rice helps it firm up, making it easier to cut and handle when frying.
Cut the Rice into Squares
Once the rice is fully chilled, remove it from the refrigerator and cut it into 2×1-inch rectangles.
For easy frying, prepare small parchment squares and place each rice piece on top. The parchment paper helps prevent sticking when lowering the rice into the hot oil.
Fry Until Crispy
Heat vegetable oil in a deep pan or large skillet to 350°F (180°C). Working in batches, place a rice cake on top of a parchment square and carefully lower it into the oil.
Let it pan fry undisturbed for about 2–3 minutes, then remove the parchment and continue frying until golden brown on all sides. Transfer to a paper towel-lined plate to drain excess oil.
Serve and enjoy!

Ingredients
- 1 cup sushi rice
- 1 ½ cups water
- 1 tablespoon rice vinegar
- 1 teaspoon sugar
- ½ teaspoon salt
- Vegetable oil
Instructions
- Place the sushi rice in a large bowl and cover it with water. Stir in circular motions, then drain the water. Repeat this process at least four times until the water runs clear to remove excess starch. Once finished, drain thoroughly and let the rice sit for 20 minutes.1 cup sushi rice
- Transfer the drained rice to a pot and allow it to rest before cooking. Add 1 ½ cups of water, then bring it to a boil over medium-high heat. Once boiling, reduce the heat to low, cover, and let it simmer for 12 minutes. After the cooking time is up, turn off the heat and keep the lid on, allowing the rice to steam undisturbed.1 ½ cups water
- In a small cup, mix the rice vinegar, sugar, and salt. Heat in the microwave for a few seconds, stirring until the sugar dissolves completely. Transfer the cooked rice to a large tray, drizzle the seasoning mixture over it, and stir gently until well combined.1 tablespoon rice vinegar, 1 teaspoon sugar, ½ teaspoon salt
- Line a baking sheet with plastic wrap and evenly spread the seasoned rice into a layer about ½ inch thick. Cover the top with another sheet of plastic wrap and refrigerate for at least two hours to allow it to firm up.
- Once chilled, remove the rice from the refrigerator and cut it into 2×1-inch rectangles. Prepare small squares of parchment paper and place each rice piece on top. These will make handling the rice easier when frying.
- Heat vegetable oil to 350°F (180°C). Working in batches, place a rice cake onto the parchment paper and carefully lower it into the hot oil. Allow it to fry until golden brown, then remove and drain on paper towels to absorb excess oil.Vegetable oil
- Serve and enjoy!
Notes
- Rinse the rice thoroughly: Washing the rice multiple times removes excess starch and prevents it from becoming overly sticky. This step is essential for achieving crispy results.
- Let the rice rest before cooking: Allowing the rice to sit after rinsing helps it absorb moisture evenly, ensuring even cooking.
- Use the right seasoning balance: The vinegar, sugar, and salt mixture enhances flavor without overpowering the rice, making it the perfect base for toppings.
- Chill the rice properly: Refrigerating the rice before cutting it into squares helps it hold its shape and makes frying much easier.
- Use parchment paper for frying: Lowering the rice into the oil with parchment paper prevents sticking and makes handling easier.
- Monitor the oil temperature: Keep the oil at a steady 350°F (180°C) to achieve a crispy exterior without burning the rice.
- Drain well after frying: Let the fried rice cakes rest on a paper towel to remove excess oil and keep them from becoming greasy.
- Reheat for extra crispiness: If needed, reheat the crispy rice in an air fryer or oven to restore its crunch after storing.
Nutrition
Recipe Notes and Expert Tips
I have a few key tips to help you get perfectly crispy rice every time.
- Rinse the rice thoroughly: Washing the rice multiple times removes excess starch and prevents it from becoming overly sticky. This step is essential for achieving crispy results.
- Let the rice rest before cooking: Allowing the rice to sit after rinsing helps it absorb moisture evenly, ensuring even cooking.
- Use the right seasoning balance: The vinegar, sugar, and salt mixture enhances flavor without overpowering the rice, making it the perfect base for toppings.
- Chill the rice properly: Refrigerating the rice before cutting it into squares helps it hold its shape and makes frying much easier.
- Use parchment paper for frying: Lowering the rice into the oil with parchment paper prevents sticking and makes handling easier.
- Monitor the oil temperature: Keep the oil at a steady 350°F (180°C) to achieve a crispy exterior without burning the rice.
- Drain well after frying: Let the fried rice cakes rest on a paper towel to remove excess oil and keep them from becoming greasy.
- Reheat for extra crispiness: If needed, reheat the crispy rice in an air fryer or oven to restore its crunch after storing.
How to Store Leftover Crispy Rice
If you have leftovers, store them in an airtight container at room temperature for up to a day. For longer storage, refrigerate for up to three days.
When ready to eat, reheat in an oven or air fryer at 375°F (190°C) for a few minutes to restore the crispiness.
What to Serve With Crispy Rice
Crispy rice is incredibly versatile and pairs well with a variety of plant-based toppings. Try it with smashed avocado, spicy marinated tofu, veggie chicken, or a drizzle of soy sauce and sesame oil.
Serve alongside a fresh cucumber salad, roasted seaweed sheets, or pickled vegetables for a flavorful and balanced meal.
More Easy Recipes for You to Try at Home
I have plenty of other easy appetizer recipes that you’ll love making at home.
